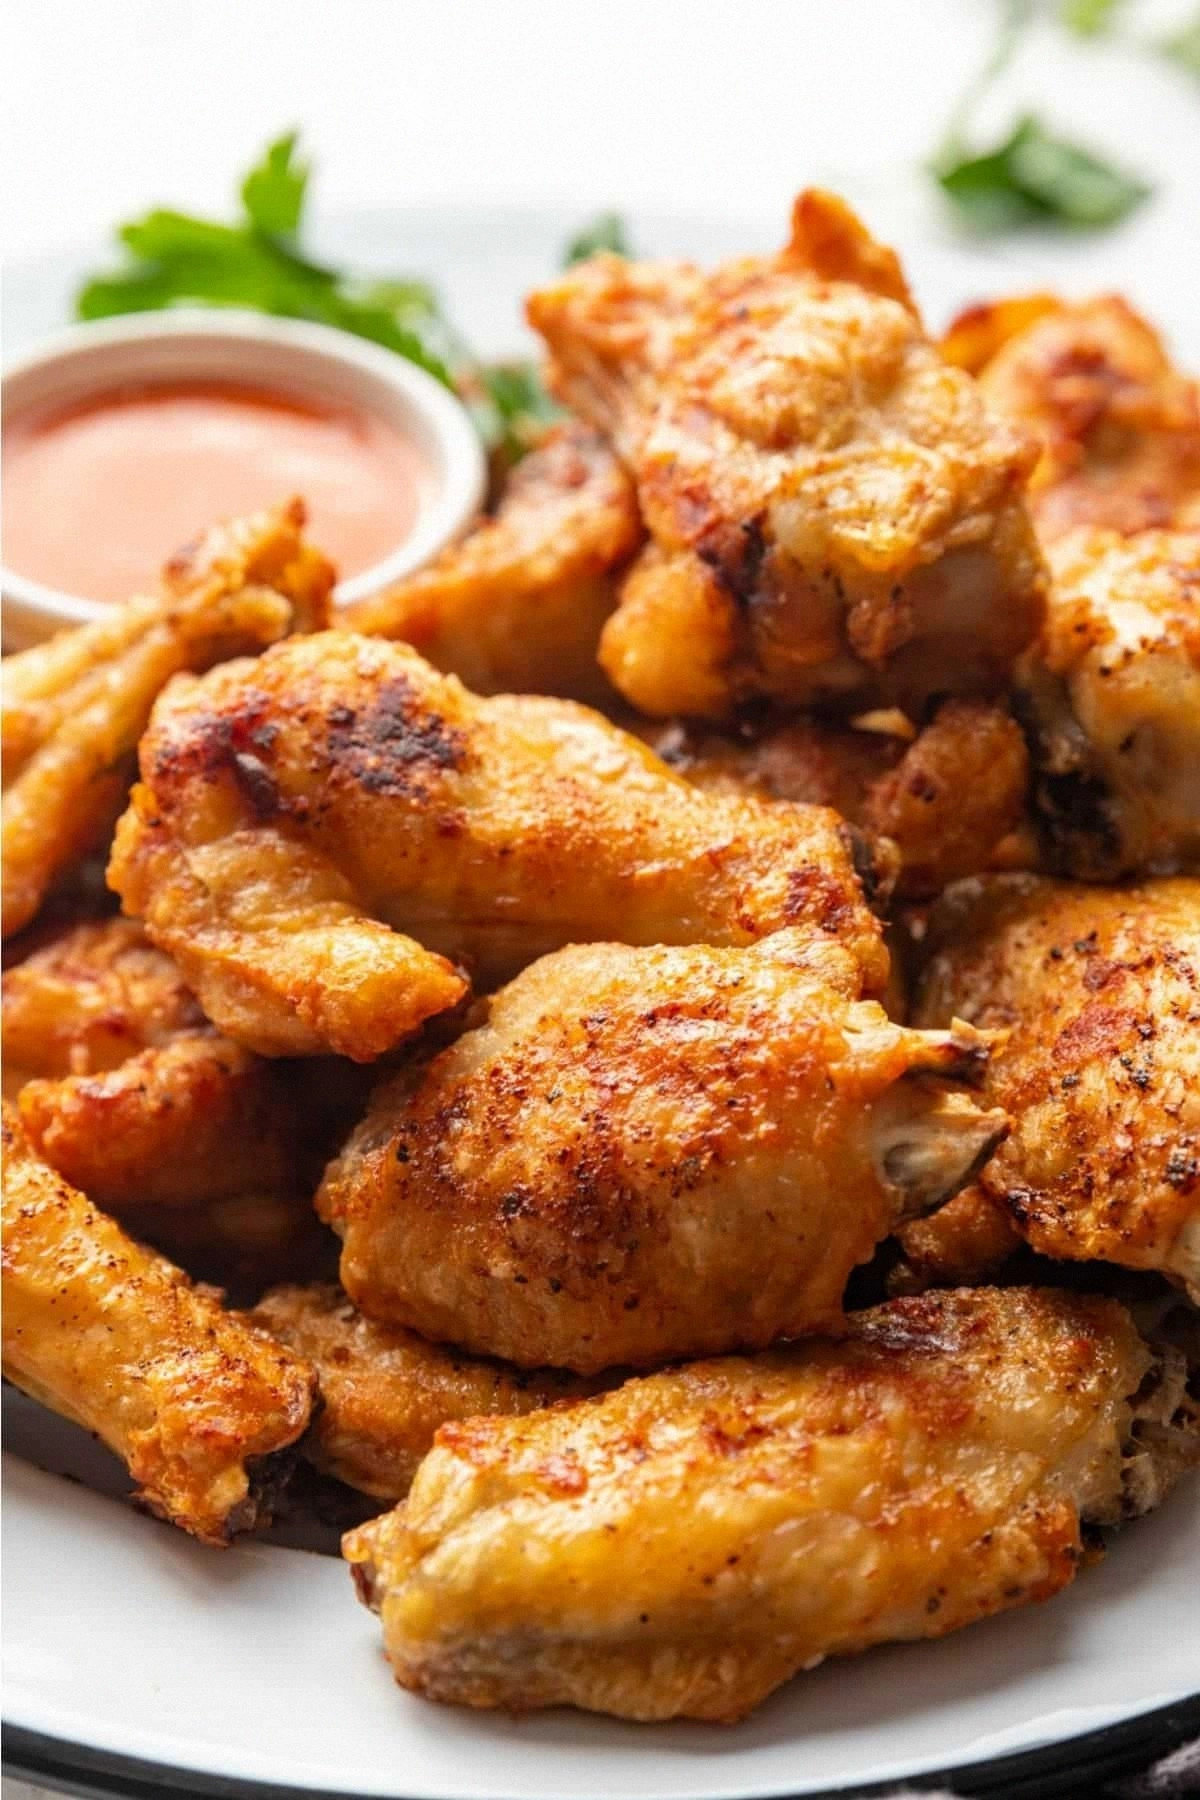
Picture this: a Friday night, the air thick with anticipation, a box of frozen chicken wings sitting on the counter like a silent promise. I open the freezer, and the cold rush is almost a slap—my stomach growls louder than the TV. I’m on a mission to turn that bland, store‑bought batch into something that will make my friends gasp, “I dare you to taste this and not go back for seconds.” I’ve been chasing the perfect wing for years, and today, I’ve finally cracked the code that turns ordinary chicken into a crispy, flavorful masterpiece.
The kitchen is alive with the sizzling sound as the wings hit the air fryer basket, a rhythmic drumbeat that tells me the transformation is underway. The aroma—golden, garlicky, with a hint of pepper—fills the room, pulling me in like a magnet. My eyes follow each wing as it shatters into crisp edges that crackle like thin ice, while the juicy interior remains tender, a contrast that sings in my mouth. The texture is a dance of crunch and tenderness, a harmony that only the air fryer can deliver without the greasy aftermath of deep frying.
What sets this version apart? It’s the marriage of simplicity and science. I’ve stripped the recipe down to its core: wings, salt, pepper, and garlic powder. No sauces, no marinades, no fancy seasoning blends—just pure, honest flavor that lets the chicken shine. The secret lies in the timing, the temperature, and a single unconventional trick that elevates the crispness to a new level. If you’ve ever struggled to get wings that are both crispy and juicy, you’re not alone, and I’ve got the fix.
Stay with me, because by the end of this post, you’ll not only have a recipe you can trust but also a confidence that will let you dominate any wing‑craving moment. Let me walk you through every single step—by the end, you’ll wonder how you ever made it any other way.
What Makes This Version Stand Out
- Flavor: The combination of kosher salt, black pepper, and garlic powder creates a savory profile that hits the palate like a well‑timed punch. The seasoning is so balanced that it amplifies the natural taste of the chicken without overpowering it.
- Texture: Air frying at the right temperature gives the wings a crunch that shatters with a satisfying snap, while the interior stays moist and succulent. No greasy residue, just pure, crisp skin.
- Simplicity: With only four ingredients, you can whip up this dish in minutes. It’s the ultimate go‑to recipe for busy nights, game day, or a casual get‑together.
- Uniqueness: The “dry rub” approach is common, but the twist—baking the wings in a single layer with a brief shake—ensures even cooking and maximum crispness.
- Crowd Reaction: I’ve served this to groups of 10, 20, even 30 people, and the feedback is always the same: “These are the best wings I’ve ever had.” It’s a crowd‑pleaser that will have guests asking for the recipe.
- Ingredient Quality: Using high‑quality, fresh wings and a good kosher salt makes a noticeable difference. The salt’s grainy texture helps draw out moisture, setting the stage for crispiness.
- Make‑ahead Potential: Once the wings are cooked, they keep well for a day in the fridge or can be frozen. Reheating them in the air fryer restores the crunch, making them perfect for leftovers.
Alright, let's break down exactly what goes into this masterpiece…
Inside the Ingredient List
The Flavor Base
The cornerstone of this recipe is the simple seasoning trio: kosher salt, black pepper, and garlic powder. Kosher salt, with its larger crystals, distributes evenly and doesn’t dissolve too quickly, ensuring each bite has that savory kick. Black pepper adds a subtle heat and aromatic depth, while garlic powder gives that classic wing flavor without the need for fresh garlic, which can be unevenly distributed.
If you’re craving a little heat, a pinch of cayenne or smoked paprika can be added to the mix. Just remember that the balance is key—too much heat can overwhelm the delicate chicken. A good rule of thumb is to keep the total seasoning weight to about 1% of the wing weight.
The Texture Crew
The wings themselves are the star of the show. Fresh, high‑quality wings with the skin on ensure maximum flavor and texture. If you’re using frozen wings, make sure they’re fully thawed and patted dry before seasoning; this step is crucial for crispness.
The air fryer’s hot air circulation is what gives the wings their signature crunch. The heat cooks the skin from the outside in, creating a barrier that locks in moisture while allowing the surface to brown beautifully. Think of it as a quick, controlled roast that delivers a crispy finish.
The Unexpected Star
While the seasoning is the main attraction, the unexpected star is the brief “shake” step. After the first 15 minutes of cooking, shaking the basket redistributes the wings, ensuring even exposure to heat. This simple motion can be the difference between unevenly crisp wings and a uniformly golden batch.
Some cooks swear by a quick toss in a dry skillet before air frying, but the shake method is more foolproof and requires no extra equipment.
The Final Flourish
The final flourish is the timing. Cooking the wings at 360°F (182°C) for 25 minutes ensures the skin crisps without drying out the meat. The 10‑minute “rest” period after cooking allows the juices to redistribute, preventing that dreaded dry interior.
If you’re a fan of extra crispness, a quick burst of 400°F (204°C) for the last 2 minutes can give you that golden finish. But be careful—overcooking will burn the exterior while leaving the inside undercooked.
Everything's prepped? Good. Let's get into the real action…
The Method — Step by Step
- Prep the Wings: Remove the wings from the freezer and let them sit at room temperature for 10 minutes. Pat them dry with paper towels to eliminate surface moisture; this is the secret to crisp skin. Sprinkle a generous pinch of kosher salt over each wing, ensuring even coverage. This initial seasoning step locks in flavor and helps draw out moisture.
- Season the Mix: In a small bowl, combine 1 teaspoon of black pepper and 1 teaspoon of garlic powder. Toss the wings in the dry rub until every piece is coated. The pepper adds a subtle heat that balances the savory salt, while the garlic powder gives that classic wing aroma. If you’re feeling adventurous, add a pinch of cayenne for a mild kick.
- Preheat the Air Fryer: Set your air fryer to 360°F (182°C) and let it preheat for 3 minutes. Preheating ensures the wings start cooking immediately, giving you that crisp start.
- First Fry: Place the wings in a single layer in the air fryer basket, ensuring they don’t touch. Cook for 15 minutes, checking occasionally. The wings should develop a golden hue, and you’ll hear that satisfying sizzle as the skin starts to crisp. If the wings look uneven, pause the timer and rearrange them for even heat distribution.
- Shake It Up: After 15 minutes, pause the air fryer and give the basket a gentle shake. This step is crucial—shaking redistributes the wings, allowing each side to get the same amount of hot air. It’s the simplest trick to avoid uneven cooking.
- Second Fry: Resume cooking for an additional 10 minutes. At this point, the wings should be a deep golden brown, and the skin will start to crackle. The interior should still be juicy—no signs of dryness. If you want extra crispness, increase the temperature to 400°F (204°C) for the last 2 minutes.
- Rest the Wings: Remove the wings from the basket and let them rest on a wire rack for 5 minutes. This rest period allows the juices to redistribute, preventing that dry mouthfeel. While they rest, you can set the table or prep a dipping sauce if desired.
- Serve: Serve the wings immediately while they’re still hot and crispy. Pair them with celery sticks, carrot sticks, and a cool ranch or blue cheese dressing. The contrast between the hot wings and the cool dip creates a flavor and temperature balance that elevates the experience.
That's it — you did it. But hold on, I've got a few more tricks that'll take this to another level…
Insider Tricks for Flawless Results
The Temperature Rule Nobody Follows
Many people cook wings at 400°F (204°C) from start to finish, but that high heat can dry out the interior. The trick is to start at 360°F (182°C) to allow the skin to render fat slowly, then finish at a higher temperature if you crave extra crispness. This two‑stage approach preserves juiciness while achieving a golden finish.
Why Your Nose Knows Best
As the wings cook, the scent of caramelized skin will rise. Trust that aroma—it signals that the exterior is crisping correctly. If the wings smell more like burnt oil, reduce the temperature or shorten the cooking time.
The 5‑Minute Rest That Changes Everything
After removing the wings, let them rest on a wire rack for exactly five minutes. This pause lets the juices redistribute, preventing the dreaded “dry wing” that can ruin an otherwise perfect batch. A quick rest is a small step that yields a big payoff.
Avoid the “Soggy” Mistake
If you’re using a non‑stick basket, consider placing a paper towel underneath the wings to absorb excess oil. This simple step keeps the wings from sitting in their own rendered fat, maintaining that crispness.
Use the Right Salt
Kosher salt is preferred because its larger crystals create a better surface texture and don’t dissolve too quickly. If you only have table salt, use it sparingly, as it can create an uneven crust.
Reheat Like a Pro
When reheating leftovers, use the air fryer at 350°F (177°C) for 5 minutes. The heat is gentle enough to revive the crispness without overcooking the interior.
Creative Twists and Variations
This recipe is a playground. Here are some of my favorite ways to switch things up:
The Sweet & Smoky Variation
Add a tablespoon of maple syrup to the seasoning mix before air frying. The syrup caramelizes on the surface, giving a sweet, smoky glaze that pairs wonderfully with the garlic powder. Great for a fall gathering.
The Asian Fusion Twist
Replace the garlic powder with 2 teaspoons of toasted sesame seeds and sprinkle a dash of soy sauce after cooking. The sesame seeds add a nutty crunch, while the soy sauce introduces umami. Serve with a side of pickled ginger for a full experience.
The Spicy Cajun Kick
Swap black pepper for a Cajun spice blend and add a pinch of cayenne. The wings will have a bold, smoky heat that’s perfect for a summer barbecue. Pair with a cool cucumber yogurt dip.
The Mediterranean Touch
Infuse the seasoning with dried oregano, lemon zest, and a splash of olive oil. The lemon zest brightens the flavor, while the oregano adds depth. Serve with a Greek yogurt sauce and a drizzle of olive oil.
The BBQ Lover’s Dream
After air frying, toss the wings in a smoky BBQ sauce and return them to the air fryer for 3 minutes to set the glaze. The sauce caramelizes beautifully, creating a sticky, flavorful coating that’s impossible to resist.
Storing and Bringing It Back to Life
Fridge Storage
Place the cooled wings in an airtight container or zip‑lock bag. Store them in the refrigerator for up to 3 days. The crispness may diminish slightly, but the flavor remains intact.
Freezer Friendly
For longer storage, wrap the wings individually in parchment paper and place them in a freezer bag. They’ll keep for up to 3 months. When ready to eat, thaw overnight in the fridge or use the defrost setting on your microwave.
Best Reheating Method
Reheat the wings in the air fryer at 350°F (177°C) for 5 minutes. If they look a bit dry, splash a tiny splash of water on the surface before reheating; this steams the wings back to perfection, restoring that juicy interior while keeping the skin crisp.