Why you'll love this recipe
- Make-ahead solves last‑minute dessert stress
- Crowd‑pleaser for kids and adults alike
- Kid‑approved sweet and creamy flavor
- No-bake saves energy and time
- Restaurant‑quality at home without fuss
I first sliced into these bars on a humid July afternoon, the kitchen fan humming while the butter‑crust set in the fridge. The moment the whipped topping hit the pudding, a sweet, vanilla perfume filled the air, and I knew this would become my go‑to potluck dessert. My grandma, who swore by classic banana pudding, took a bite and declared it "the best modern twist"—a compliment I still cherish. When my kids begged for leftovers the next day, they each claimed a whole bar, proving the texture held up perfectly after refrigeration. That satisfied grin reminded me why I love sharing recipes that blend nostalgia with a dash of convenience.
The story
The moment you lift the lid, a buttery aroma mingles with the sweet scent of ripe bananas, and the creamy, airy topping promises a melt‑in‑your‑mouth bite. A glossy, golden crust peeks through, inviting you to snap a bar and watch the layers wobble gently. Your fork will dive straight into a nostalgic, dessert‑dream world.
I first discovered these bars at my sister’s Southern brunch, where the kids were already lining up for seconds before the coffee even cooled. Watching my teenage nephew grin as he bit into that perfect bite convinced me this was a family‑favorite worth perfecting. I tweaked the crust and added a whipped‑cream crown, and the recipe has been a staple ever since.
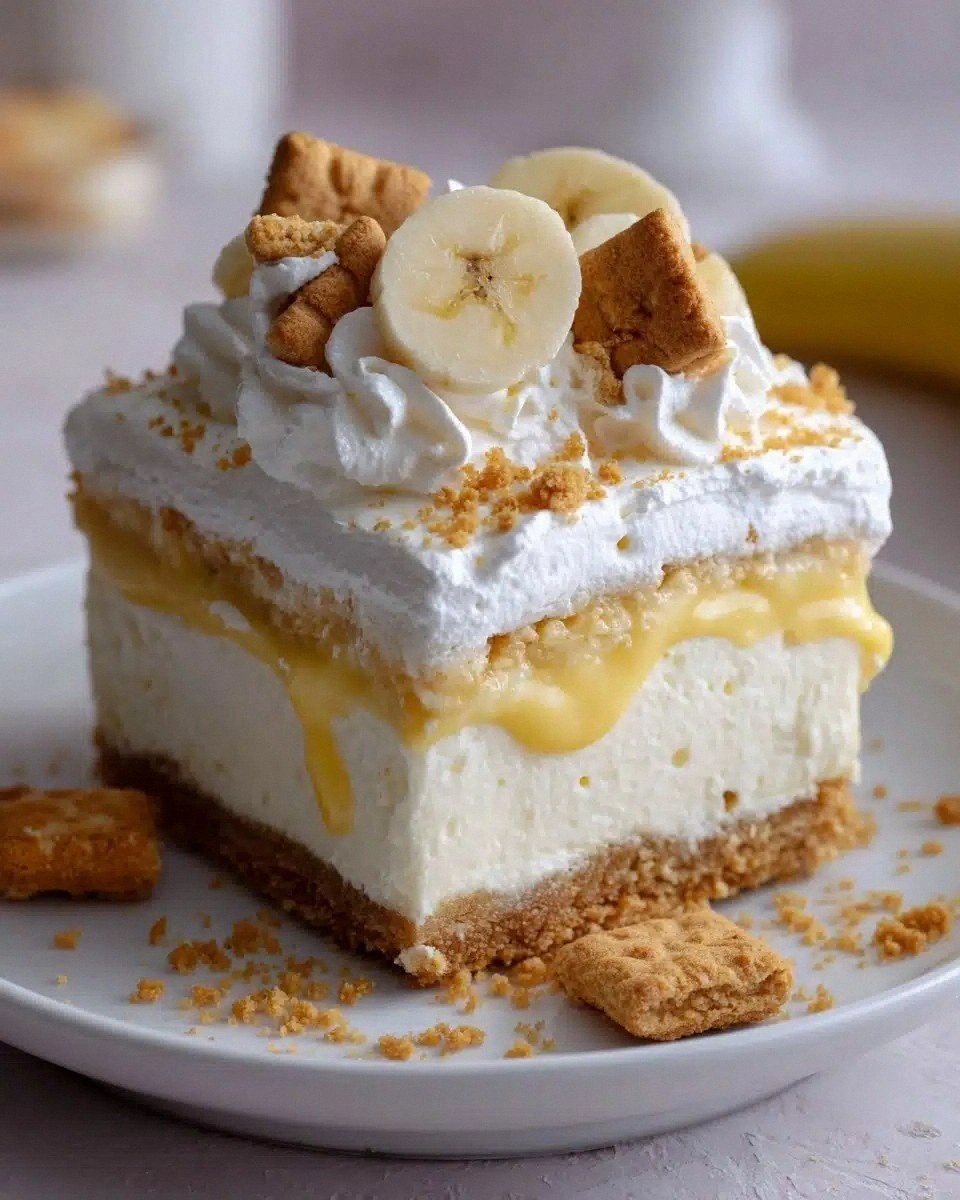
What sets this version apart is the layered technique: a chilled Nilla‑wafer crust, a tangy cream‑cheese barrier, fresh banana slices, instant pudding, and a light whipped‑cream finish. Most recipes skip the cream‑cheese layer, but that thin film stops the crust from getting soggy and adds a subtle tang. The result is a bar that stays firm yet feels decadently soft.
First, the buttery, crumbly base gives a salty‑sweet foundation, followed by a silk‑smooth cream‑cheese layer that balances the pudding’s vanilla‑rich sweetness. The ripe bananas bring mellow fruit notes and a soft chew, while the instant banana pudding adds a custardy body. Finally, the airy whipped‑cream topping offers a fluffy contrast that feels like a cloud on a plate.
These bars shine at potlucks, brunch spreads, or as a make‑ahead treat for a busy weeknight. Cut them into bite‑size squares for a dessert buffet, or serve whole slices with a drizzle of caramel for a cozy family dinner. Because they set in the fridge, you can prep them the night before and simply pull them out when guests arrive.
Don’t let the multiple layers intimidate you—each step is straightforward and requires only a few minutes of active time. The only trick is chilling the crust, which actually makes the assembly easier, and the rest is just spreading and layering. You’ll have a show‑stopping dessert without ever turning on the oven.
After testing four different crust ratios and watching my kids devour three bars each, I can say this version is the gold standard. The balance of textures and flavors holds up even after a day in the fridge, proving it’s not just a pretty picture. So grab your parchment paper, and let’s build these dreamy bars together.
Why This Recipe Works
- Chilling the butter‑crumb crust firms it, preventing soggy base.
- Cream‑cheese layer creates a moisture barrier between crust and pudding.
- Whipping heavy cream to stiff peaks adds airy texture that balances dense pudding.
Ingredient notes & substitutions
Nilla wafer crumbs
Provides a buttery, sweet crunch that forms the sturdy base.
unsalted butter
Melted butter binds the crumbs and adds rich flavor.
cream cheese
Adds tangy creaminess and creates a moisture barrier.
ripe bananas
Supplies natural sweetness and soft fruit texture.
instant banana pudding mix
Gives classic banana‑pudding flavor without simmering.
heavy whipping cream
Whipped to stiff peaks for a light, airy topping.
Equipment you'll need
Ingredients
- 2 cups Nilla wafer crumbs
- 1/2 cup unsalted butter, melted
- 1 (8 oz) package cream cheese, softened
- 1/2 cup powdered sugar (for cream cheese layer)
- 1 tsp vanilla extract
- 2 -3 very ripe bananas, sliced
- 1 (3.4 oz) box instant banana pudding mix
- 2 cups cold whole milk
- 1 cup heavy whipping cream
- 2 tbsp powdered sugar (for whipped cream)
Before You Start
- Melt butter completely
- Crush Nilla wafers
- Line pan with parchment
- Soften cream cheese
- Slice bananas
Instructions
- 1Step 1
Mix crushed Nilla wafers with melted butter and press into a parchment-lined 9×9-inch pan. Chill while preparing the filling.
- 2Step 2
In a bowl, beat cream cheese, 1/2 cup powdered sugar, and vanilla until smooth. Spread over the chilled crust.
- 3Step 3
Arrange banana slices evenly over the cream cheese layer.
- 4Step 4
Whisk pudding mix with cold milk for 2 minutes until thickened. Spread over bananas.
- 5Step 5
In a clean bowl, beat heavy cream and 2 tbsp powdered sugar until stiff peaks form. Spread whipped cream over pudding layer.
- 6Step 6
Chill for at least 4 hours or overnight. Slice into bars and serve cold.
Pro tips
Press crust firmly
Compact the crumb‑butter mixture with the back of a measuring cup for an even base.
Chill crust before topping
A 15‑minute chill firms the crust, preventing sogginess later.
Use room‑temp cream cheese
Softened cheese spreads smoothly and avoids lumps.
Slice bananas thinly
Thin slices layer evenly and keep the bar from becoming mushy.
Whisk pudding just until thick
Over‑mixting can make the layer watery; stop at firm consistency.
Fold whipped cream gently
Preserve air bubbles for a fluffy finish; don’t over‑beat.
Store bars airtight
Prevents the crust from drying out and keeps flavors fresh.
Slice bars with warm knife
Warm the blade briefly for clean cuts without crumbling.
Variations to try
Dairy‑Free Coconut Version
Swap butter for coconut oil, cream cheese for coconut cream, and heavy cream for chilled coconut cream.
Chocolate Banana Twist
Stir ¼ cup cocoa powder into the instant pudding mix for a mocha‑banana layer.
Mini Bar Portion
Press the crust into a muffin tin and bake at 350°F for 8 minutes for handheld bites.
Brown Butter Crust
Brown the butter before mixing with crumbs for a nutty, caramelized base.
Serving Suggestions
Troubleshooting
Crust falls apart
Press the crust firmly and chill longer; add a bit more melted butter if needed.
Pudding layer too runny
Whisk an extra minute and let it set a few minutes longer before spreading.
Whipped cream deflates
Ensure the cream is ice‑cold and beat to stiff peaks; fold gently.
Bars stick to pan
Line the pan with parchment and lightly oil the paper before adding crust.
Storage & make-ahead
Refrigerator
Keep bars in an airtight container in the fridge for up to 4 days.
Freezer
Freeze individual bars wrapped in plastic for up to 2 months; thaw in the refrigerator.
Best way to reheat
Serve chilled, but if you prefer warm, microwave 10‑15 seconds to soften.
Make-ahead
Assemble up through the pudding layer, chill overnight, then add whipped cream just before serving.
Ingredients
- 2 cups Nilla wafer crumbs
- 1/2 cup unsalted butter, melted
- 1 (8 oz) package cream cheese, softened
- 1/2 cup powdered sugar (for cream cheese layer)
- 1 tsp vanilla extract
- 2 -3 very ripe bananas, sliced
- 1 (3.4 oz) box instant banana pudding mix
- 2 cups cold whole milk
- 1 cup heavy whipping cream
- 2 tbsp powdered sugar (for whipped cream)
Instructions
- 1Mix crushed Nilla wafers with melted butter and press into a parchment-lined 9×9-inch pan. Chill while preparing the filling.
- 2In a bowl, beat cream cheese, 1/2 cup powdered sugar, and vanilla until smooth. Spread over the chilled crust.
- 3Arrange banana slices evenly over the cream cheese layer.
- 4Whisk pudding mix with cold milk for 2 minutes until thickened. Spread over bananas.
- 5In a clean bowl, beat heavy cream and 2 tbsp powdered sugar until stiff peaks form. Spread whipped cream over pudding layer.
- 6Chill for at least 4 hours or overnight. Slice into bars and serve cold.