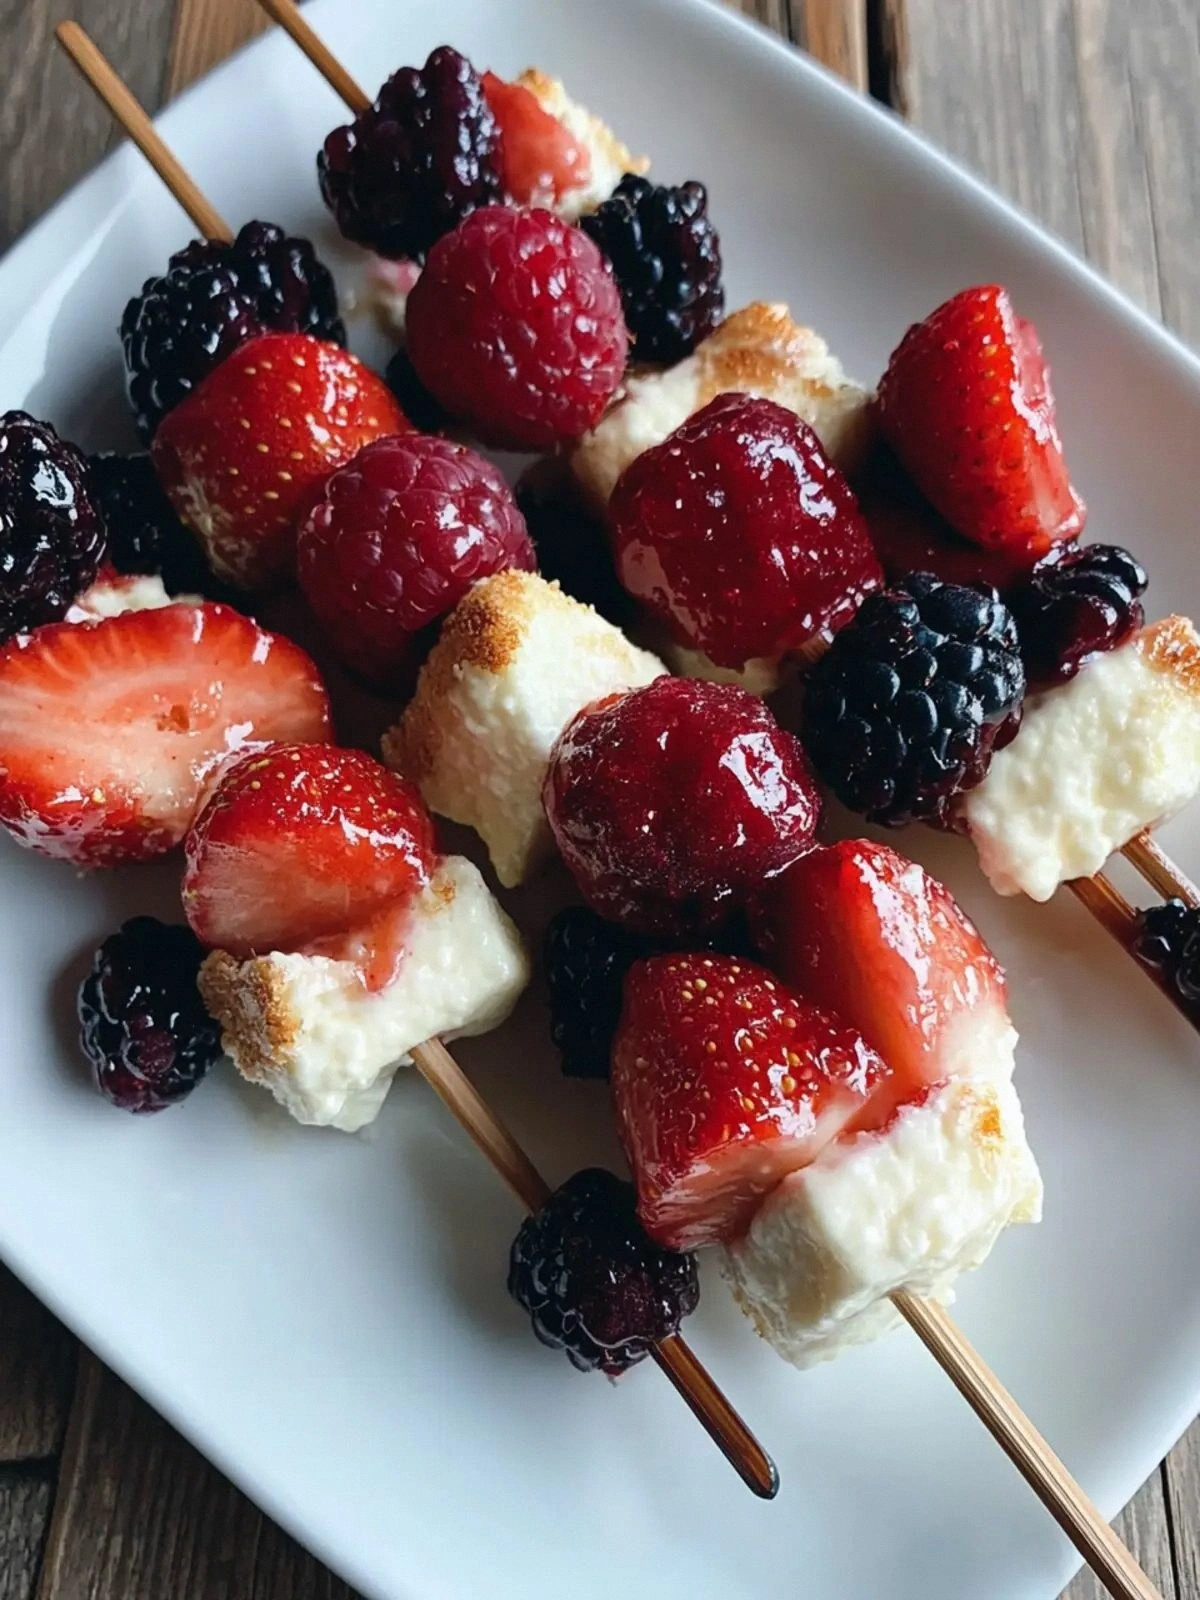
Picture this: I’m standing in a kitchen that smells like a bakery on a sunny Saturday, the countertop cluttered with jars of berries, a tub of cream cheese, and a wooden board that looks like it belongs in a rustic kitchen. I’ve been chasing that elusive, creamy bite that turns every fruit into a dessert, and after a disastrous attempt that left a half‑melted cheesecake on the floor, I finally cracked the code. The result? Berry Cheesecake Kabobs: Delig, a no‑bake, bite‑size masterpiece that feels like a party on a stick.
The first time I tasted one, the creamy filling clung to the berries like a velvet blanket, and the citrus zing from the lemon juice cut through the sweetness like a fresh breeze. The visual is a riot of colors—deep reds, bright blues, and ruby raspberries—each skewer a small canvas. The sound of the fork gliding through the fruit is almost meditative, and the texture is a delightful contrast between silky cream and juicy berries. I dared you to taste this and not go back for seconds, and I’ve watched friends devour them in record time.
What makes this version stand out is that it’s not just a dessert; it’s an experience. I’ve taken the classic no‑bake cheesecake concept and elevated it with a unique presentation, a burst of citrus, and a hint of honey that ties everything together. It’s hands down the best version you’ll ever make at home, and if you’ve ever struggled to get the right consistency or flavor balance, you’re not alone—this recipe has the fix.
Imagine pulling these out of the fridge, the kitchen smelling incredible, and handing them to guests who instantly recognize that this is something special. The anticipation of the first bite, the sweet cream, the burst of fresh fruit, and the subtle tartness—it’s a symphony that plays in your mouth. And the best part? No oven, no fuss, just a handful of ingredients and a few minutes of prep.
What Makes This Version Stand Out
This recipe is a game‑changer for anyone who loves cheesecake but hates the oven. The skewered format makes it an instant crowd‑pleaser at parties, brunches, or even a quick sweet fix after dinner. The use of fresh berries keeps the flavors bright and seasonal, while the lemon juice adds a refreshing twist that prevents the filling from becoming too sweet. The honey drizzle at the end gives a glossy finish and a subtle caramel note that ties everything together.
The texture is a masterpiece of contrast. The creamy filling is silky and smooth, the berries are juicy and vibrant, and the wooden skewers add a rustic charm. The combination of cream cheese, heavy cream, and sugar creates a rich yet light filling that melts in your mouth, and the berries provide a natural crunch that makes each bite exciting. The no‑bake method means you can prep ahead of time and serve on demand.
The flavor profile is balanced. The vanilla gives depth, the lemon juice cuts through the sweetness, and the honey adds a gentle caramel undertone. The berries bring their natural tartness, creating a harmonious dance of sweet and tart that feels like a summer breeze. It’s a recipe that feels indulgent but is actually healthy, thanks to the fresh fruit and minimal added sugars.
Simplicity is a virtue here. No complicated steps, no fancy equipment, just a bowl, a spoon, and a wooden board. The ingredients are pantry staples or easy to find at any grocery store, and the assembly is almost child‑friendly. The recipe is also highly adaptable—swap out berries for seasonal fruit, or adjust the sweetness to taste.
Crowd reaction is guaranteed. At my last gathering, the first skewer was gone in seconds, and the second was a hit. The visual appeal alone draws people in, and the taste keeps them coming back. I dare you to serve these at your next event and watch the plates disappear.
Alright, let's break down exactly what goes into this masterpiece…
Inside the Ingredient List
The Creamy Core
Cream cheese is the heart of this recipe. It provides the rich, tangy base that holds the berries together. Using 8 ounces of full‑fat cream cheese gives the filling a silky texture that doesn’t separate when chilled. If you prefer a lighter version, you can substitute half the cream cheese with Greek yogurt, but be prepared for a slightly tangier finish.
The heavy cream is essential for achieving that luscious, airy consistency. It lightens the filling without overpowering the fruit. If you’re allergic to dairy, a dairy‑free coconut cream can replace it, though the flavor will shift subtly toward coconut.
Vanilla extract adds depth and balances the sweetness of the sugar and honey. A teaspoon is enough to permeate the filling without dominating the berry flavors. For a more floral note, try a vanilla bean instead of extract.
The Sweet Layer
Granulated sugar is the sweetener that balances the tartness of the berries and the tang of the cream cheese. Using a quarter cup keeps the filling sweet but not cloying. If you’re watching your sugar intake, you can replace it with a sugar substitute like erythritol, but keep in mind the texture may change slightly.
The honey drizzle at the end adds a natural caramel sweetness and a glossy finish. It also helps to bind the berries together slightly, giving each skewer a cohesive look. A tablespoon of honey is enough to coat the skewers without making them sticky.
The Fresh Fruit
Strawberries, blueberries, and raspberries are the stars of this recipe. Twelve ounces of strawberries provide a juicy, slightly sweet flavor, while six ounces each of blueberries and raspberries add tartness and visual contrast. When selecting berries, choose ones that are firm, brightly colored, and free from blemishes for the best flavor.
If you’re out of season, you can swap in other berries like blackberries or even diced mango for a tropical twist. Just be sure to adjust the lemon juice slightly to maintain the right balance of tartness.
The Final Flourish
Wooden skewers are the simplest and most sustainable choice. Eight pieces are enough to hold all the layers and give you a balanced portion for each serving. To avoid the skewers absorbing too much liquid, soak them in water for 10 minutes before using.
If you prefer a more elegant presentation, use bamboo skewers or stainless‑steel sticks. Just remember that bamboo can dry out if left too long in the fridge, so use them within a day of assembly.
Everything's prepped? Good. Let's get into the real action...
The Method — Step by Step
- In a medium bowl, combine the cream cheese, granulated sugar, vanilla extract, heavy cream, and lemon juice. Beat the mixture with an electric mixer on medium speed until it’s smooth, glossy, and no lumps remain. This step is the foundation; a silky filling is key to a perfect bite. If the mixture looks too thick, add a splash of milk to reach a pourable consistency.
- Cover the bowl and chill the filling in the refrigerator for at least 30 minutes. Chilling allows the flavors to meld and the filling to thicken slightly, making it easier to pipe onto the skewers. The cooler the filling, the less it will sag on the skewers.
- While the filling chills, wash and dry the berries. Slice the strawberries in half lengthwise; keep them whole if they’re small. Pat the blueberries and raspberries dry with a paper towel to prevent excess moisture, which can make the skewers soggy.
- Scoop a small dollop of the chilled filling onto a piping bag or a small spoon. Begin threading the skewers: first a cream cheese dollop, then a strawberry half, followed by a blueberry, a raspberry, and repeat until the skewer is almost full. The alternating pattern creates a visual and flavor rhythm that’s satisfying to bite into.
- Continue this process for all eight skewers. The filling should be firm enough to hold the fruit in place but still creamy. If the filling starts to soften, return it to the fridge for a few minutes.
- Arrange the assembled skewers on a parchment‑lined tray. Drizzle a tablespoon of honey over the top of each skewer, allowing it to seep into the gaps between fruit. The honey not only adds sweetness but also gives a beautiful sheen.
- Refrigerate the skewers for at least one hour, or until the filling sets firmly. This step ensures each bite holds together and the flavors meld. If you’re short on time, you can serve them immediately, but they’ll be softer.
- Optional: For extra crunch, sprinkle crushed graham crackers or toasted coconut flakes between layers before the final filling dollop. This adds texture and a nutty flavor that complements the berries.
- Just before serving, garnish each skewer with a fresh mint leaf or a dusting of powdered sugar for a touch of elegance. The mint adds a cool contrast that brightens the overall profile.
- Serve immediately, or keep chilled until ready to serve. If you need to transport them, pack them in a shallow container and keep them cold to prevent the filling from melting.
That's it — you did it. But hold on, I've got a few more tricks that'll take this to another level...
Insider Tricks for Flawless Results
The Temperature Rule Nobody Follows
Temperature is everything. If the filling is too warm, it will slide off the skewers; if it’s too cold, it won’t set properly. I keep my refrigerator at 35°F during assembly. A quick test: place a small spoonful of filling on a plate and see if it holds its shape after a minute. If it’s still liquid, give it a few more minutes in the fridge.
Why Your Nose Knows Best
Smell the berries before you use them. Fresh berries emit a sweet, almost citrusy aroma that signals ripeness. If the aroma is flat or off, the fruit might be past its prime. The aroma will also give you a hint about the overall flavor balance; a strong berry scent will allow the cream cheese to shine.
The 5‑Minute Rest That Changes Everything
After assembling the skewers, let them rest for 5 minutes before refrigerating. This brief pause allows the filling to settle into the fruit, ensuring each layer is cohesive. A friend tried skipping this step once, and the result was a mess of melted filling. Lesson learned: rest, then chill.
Honey vs. Syrup: A Quick Decision
If you’re looking for a richer, caramelized flavor, swap the honey for a light maple syrup. The syrup will provide a deeper sweetness and a slightly thicker glaze. Just remember to use a smaller amount; syrup is more potent.
The Final Touch: A Dash of Salt
A pinch of sea salt on the filling before piping can elevate the flavors. The salt balances the sweetness and enhances the berry’s natural tang. I always add a tiny pinch to each skewer for that subtle finish.
Creative Twists and Variations
This recipe is a playground. Here are some of my favorite ways to switch things up:
Tropical Escape
Swap the berries for diced mango, pineapple, and a splash of coconut milk in the filling. Add a pinch of lime zest for extra zing. The result is a beach‑inspired dessert that feels like a vacation.
Chocolate‑Infused Delight
Fold a tablespoon of melted dark chocolate into the cream cheese mixture. Replace the honey drizzle with a thin chocolate sauce. The chocolate pairs beautifully with the berries and adds a sophisticated twist.
Minty Fresh
Add a handful of chopped fresh mint to the filling. Garnish each skewer with a mint sprig and a drizzle of honey. The mint provides a cool contrast that refreshes the palate.
Spiced Berry
Stir a pinch of ground cinnamon and a dash of nutmeg into the filling. The spices add warmth that complements the berry sweetness. It’s perfect for fall or winter gatherings.
Gluten‑Free Option
Use gluten‑free crackers or coconut flakes as the crunchy layer between the filling and fruit. This keeps the recipe gluten‑free while adding texture. The coconut flakes also bring a subtle tropical flavor.
Storing and Bringing It Back to Life
Fridge Storage
Store the finished skewers in an airtight container in the refrigerator for up to 48 hours. Keep them on a plate lined with parchment to prevent sticking. The filling remains firm, and the berries stay juicy.
Freezer Friendly
For longer storage, wrap each skewer individually in plastic wrap and place them in a freezer bag. Freeze for up to two weeks. When ready to serve, thaw in the refrigerator overnight and give them a quick drizzle of honey.
Best Reheating Method
If the filling has softened, add a splash of heavy cream or milk before serving to restore its creaminess. Warm the skewers gently in a microwave at 30% power for 10–15 seconds. The key is to avoid overheating, which can cause the filling to separate.