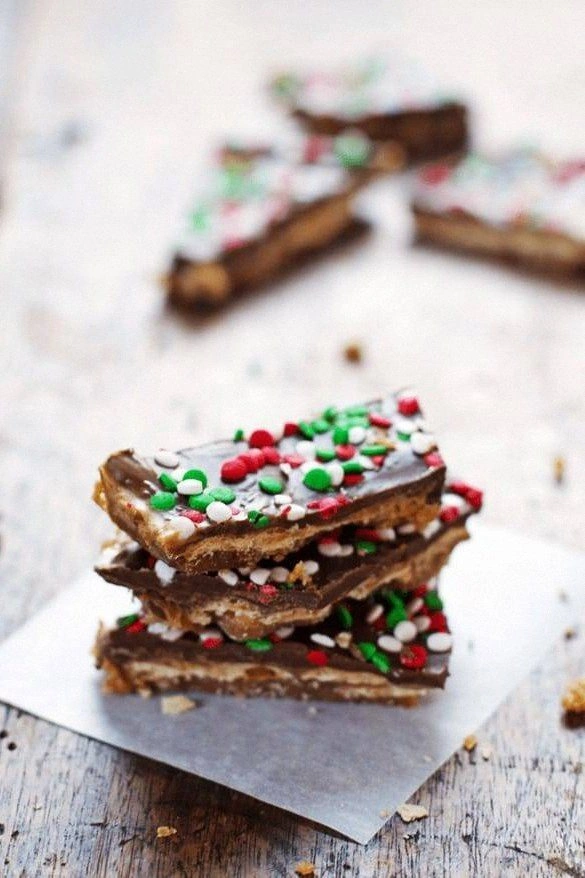
I was halfway through a Saturday night binge‑watching my favorite sitcom when a sudden craving hit me like a bolt of lightning—something salty, something sweet, and something that could make my couch‑potato heart sing. I raided the pantry, found a lonely bag of saltine crackers, a jar of peanut butter that had been flirting with the back of the fridge for months, and a bar of chocolate that was practically melting in the heat of my excitement. I tossed everything together, and what came out of the oven was nothing short of a culinary epiphany. This isn’t just a snack; it’s a full‑blown flavor explosion that makes your taste buds do the cha‑cha.
Picture this: the kitchen filled with the warm, buttery aroma of caramelized sugar, the faint scent of toasted peanuts whispering from the pan, and the deep, seductive perfume of melted chocolate swirling like midnight silk. The sound? A gentle sizzle as the butter meets the sugar, followed by a soft pop when the saltines hit the hot mixture, like fireworks in a tiny pan. Your fingertips feel the heat of the skillet, the slight resistance of the thickening sauce, and the inevitable anticipation of that first bite. When you finally break a piece, the snap is crisp, the chocolate is glossy, and the peanut butter is creamy, all while a pinch of flaky sea salt adds that final wink.
Most recipes for chocolate peanut butter saltine toffee either over‑sweeten the mix or under‑season it, leaving you with a bland, clumpy mess that sticks to the roof of your mouth. I’ve tried a dozen versions, and they all missed one crucial element: the balance between salty crunch and sweet silk. This version, however, nails it by using a precise butter‑to‑sugar ratio, a dash of vanilla that lifts the whole thing, and a surprise dash of espresso powder that deepens the chocolate flavor without tasting like coffee. The result? Hands down the best version you’ll ever make at home.
And guess what? I’m about to spill the beans on the secret ingredient that turns this from good to legendary: a splash of heavy cream added at the very end, just before the chocolate is folded in. It creates a glossy sheen and a buttery mouthfeel that makes every bite melt like a dream. I dare you to taste this and not go back for seconds. Let me walk you through every single step — by the end, you’ll wonder how you ever made it any other way.
What Makes This Version Stand Out
- Flavor Harmony: The sweet, salty, and nutty notes are balanced so perfectly that no single ingredient overpowers the others, creating a symphony on the palate.
- Texture Contrast: You get a crunchy saltine base, a silky chocolate coating, and a creamy peanut butter swirl that melts in your mouth.
- Simplicity: Only ten ingredients, all pantry staples, yet the technique feels like a pro‑level confectionery hack.
- Unique Twist: A splash of heavy cream at the end gives the chocolate a glossy finish and a richer body.
- Crowd Reaction: One bite and you’ll hear the “wow” chorus from friends—perfect for parties or a solo indulgence.
- Ingredient Quality: Using real butter and high‑quality chocolate makes a world of difference compared to shortcuts.
- One‑Pan Method: Everything cooks in a single skillet, meaning less cleanup and more time to enjoy the results.
- Make‑Ahead Potential: This toffee keeps for weeks, and the flavors actually develop a day after baking.
Alright, let's break down exactly what goes into this masterpiece...
Inside the Ingredient List
The Flavor Base
Butter is the golden heart of this recipe. It provides richness, carries the caramelization of the sugar, and creates that buttery aroma that makes your kitchen feel like a bakery. Using unsalted butter lets you control the salt level precisely, and if you skip it for margarine, expect a greasy mouthfeel that will ruin the texture. For the best results, choose European‑style butter with at least 82% fat.
Brown sugar is the sweet engine that drives the caramel. Its molasses content adds depth, a hint of bitterness that balances the peanut butter’s earthiness, and a beautiful amber color. If you substitute white sugar, the toffee will lack that complex flavor and turn a pale, uninteresting hue. Look for a dark, moist brown sugar; if it’s clumpy, give it a quick microwave burst to soften.
The Texture Crew
Saltine crackers are the unsung heroes here. Their light, airy structure absorbs the buttery sauce just enough to stay crisp, while the salty crunch juxtaposes the sweet coating. Crushed too fine, they become mushy; left whole, they float on top and never truly meld. Break them into bite‑size shards for the perfect bite‑size contrast.
Peanut butter brings a creamy, nutty richness that grounds the sweetness. I recommend using a natural, unsweetened variety for authentic flavor; added sugars in commercial sticks can make the mixture overly sweet and cause the sauce to seize. If you’re allergic or want a twist, try almond butter—just know the flavor will shift toward a milder, buttery note.
The Unexpected Star
Heavy cream is the secret weapon that transforms the chocolate glaze from dull to dazzling. Adding a splash right before the chocolate melts creates an emulsion that yields a glossy, velvety finish and prevents the chocolate from becoming grainy. Skipping this step is the most common mistake that leads to a dull, cracked coating.
Sea salt flakes on top are the final punctuation mark—a tiny crunch that bursts with briny brightness, cutting through the sweetness. If you use regular table salt, you’ll miss that delicate pop. Opt for flaky Maldon or Hawaiian sea salt for the best texture.
The Final Flourish
Chocolate chips (or a chopped block of high‑quality dark chocolate) provide the rich, indulgent coating that makes this treat feel luxurious. Choose at least 60% cacao for a balanced bitter‑sweet profile; lower percentages turn the glaze gummy. If you prefer a milk‑chocolate vibe, go ahead, but remember the sweetness will increase, so you may want to cut back a tablespoon of brown sugar.
Vanilla extract adds a fragrant undertone that lifts the entire flavor profile. A splash of espresso powder deepens the chocolate without making the dish taste like coffee; it’s a pro tip that many overlook. Finally, a pinch of extra salt in the sauce ensures the flavor stays bright and not cloyingly sweet.
Everything's prepped? Good. Let's get into the real action...
The Method — Step by Step
Gather all your ingredients and measure them precisely; a kitchen scale is worth its weight in gold for this recipe. I like to line a 9×13‑inch baking pan with parchment paper, then set it aside—this will be your toffee runway. Heat a large, heavy‑bottomed skillet over medium heat, and melt the butter, watching it foam and turn a golden amber. When the butter starts to brown at the edges, that’s your cue to add the brown sugar and corn syrup.
Stir the sugar mixture constantly with a silicone spatula; you’ll hear a gentle hiss as the sugar dissolves. After about 3‑4 minutes, the mixture will become a thick, glossy caramel that coats the back of the spoon. Watch for the color change—if it darkens too quickly, lower the heat to avoid a burnt flavor. This is the moment of truth; the scent should be sweet, buttery, with a hint of nuttiness.
Now, whisk in the smooth peanut butter, vanilla, and a pinch of sea salt. The sauce will thicken dramatically, pulling away from the sides of the pan—this is the perfect visual cue that the base is ready. Kitchen Hack: If the mixture looks grainy, drizzle in a tablespoon of warm water and whisk vigorously; the emulsion will smooth out.
Quickly add the broken saltine shards, tossing them gently so each piece gets a glossy coating. The crackers should float lightly, not sink. Let them sit for a minute to absorb the buttery sauce, then spread the mixture evenly in the prepared pan, using the back of a spoon to press it down into a uniform layer.
While the base sets, preheat your oven to 350°F (175°C). Place the pan in the oven for exactly 8‑10 minutes; you want the edges to turn a light golden brown while the center stays soft. Watch Out: Over‑baking will make the toffee too hard, turning those delightful cracks into brittle shards that shatter on the first bite.
While the base bakes, heat a second saucepan over low heat and melt the chocolate chips with the heavy cream. Stir constantly; the cream should create a glossy, fluid glaze that coats the back of a spoon effortlessly. If the chocolate seizes, remove from heat and add a splash more cream, then whisk back to smoothness.
Remove the pan from the oven; the base will still be slightly soft, which is exactly what you want. Pour the chocolate‑cream mixture over the warm saltine layer, using a spatula to spread it into an even blanket. The chocolate should spread like liquid silk, hugging every crack and crevice.
Immediately sprinkle the flaky sea salt over the chocolate while it’s still glossy. The salt crystals will sink just enough to create speckles that catch the light. Let the whole thing cool on a wire rack for at least 45 minutes, or until the chocolate has fully set.
Once set, lift the parchment paper and place the slab on a cutting board. Using a sharp, heated knife, score the toffee into bars or bite‑size squares. The heat helps the knife glide through the chocolate without cracking the pieces.
Transfer the pieces to a serving platter, and admire your handiwork. The aroma alone should make your guests swoon. Serve immediately, or store in an airtight container for later indulgence. And now the fun part—watching everyone’s faces light up as they bite into that perfect combination of salty, sweet, and buttery bliss.
Insider Tricks for Flawless Results
The Temperature Rule Nobody Follows
Never let the caramel exceed 340°F (170°C). Above this, the sugars will break down into bitter compounds, and you’ll end up with a burnt aftertaste that ruins the whole batch. Use an instant‑read thermometer and pull the pan off the heat the moment the sauce reaches 330°F. Trust me, that slight under‑cook preserves a buttery sweetness that’s pure gold.
Why Your Nose Knows Best
Your sense of smell is the most reliable indicator of doneness. When the butter‑sugar mixture starts to emit a nutty, toasty aroma, you’re at the perfect stage for adding the peanut butter. If you rely solely on a timer, you’ll miss the subtle shift from sugary to caramelized, and the final texture will suffer. I always pause, inhale deeply, and let my nose guide the next move.
The 5‑Minute Rest That Changes Everything
After you pull the pan from the oven, let the base rest for exactly five minutes before pouring the chocolate. This brief cooling period allows the caramel to thicken just enough to hold the chocolate without sliding off. Skipping this rest leads to a soggy bottom and a glossy mess that never sets properly.
Chocolate Tempering Shortcut
While true tempering is a chocolate maker’s art, you can achieve a shiny, snap‑worthy finish by adding a tablespoon of vegetable oil to the melted chocolate. It lowers the tempering point just enough to create a glossy sheen without the need for a marble slab. A friend tried skipping the oil once—let’s just say the chocolate looked dull and the snap was missing.
The Salt Balance Secret
Always finish with flaky sea salt, not just a pinch of table salt. The larger crystals provide a burst of brine that cuts through the sweetness in each bite. If you use too much, the salt will dominate; the sweet‑to‑salty ratio should be about 1:20 by weight. Kitchen Hack: Weigh your salt with a digital scale for precision—just 2 grams will do the trick.
Creative Twists and Variations
This recipe is a playground. Here are some of my favorite ways to switch things up:
Nutty Crunch Variation
Swap half of the saltines for toasted almond slivers. The almonds add a buttery crunch that pairs beautifully with the peanut butter, and the visual contrast looks stunning when the chocolate hardens.
Spicy Kick
Add a teaspoon of cayenne pepper to the caramel before mixing in the peanut butter. The heat subtly lifts the chocolate’s richness and creates a surprising zing that will have your guests reaching for more.
White Chocolate Dream
Replace dark chocolate chips with white chocolate and a dash of vanilla bean paste. This creates a milky, buttery coating that’s perfect for those who love a sweeter profile.
Coffee Lover’s Delight
Incorporate a tablespoon of instant espresso powder into the chocolate‑cream mixture. The coffee notes deepen the cocoa flavor and add a sophisticated edge.
Vegan Friendly
Swap butter for coconut oil, use a plant‑based chocolate, and choose a smooth almond butter. The texture remains indulgent, and the result is a vegan treat that still hits every flavor note.
Storing and Bringing It Back to Life
Fridge Storage
Place the cooled bars in an airtight container lined with parchment paper. They’ll stay fresh for up to two weeks in the refrigerator. The cool environment keeps the chocolate glossy and prevents the peanut butter from going oily.
Freezer Friendly
Wrap each piece individually in plastic wrap, then seal the whole batch in a zip‑top freezer bag. Frozen toffee can last three months. When you’re ready to enjoy, let it thaw at room temperature for 20 minutes, then give it a quick flash in the microwave (10‑15 seconds) to revive the melt‑in‑your‑mouth texture.
Best Reheating Method
Before reheating, add a tiny splash (about a teaspoon) of water to the surface of each piece and cover with foil. The steam generated brings back that fresh‑out‑of‑the‑oven softness without drying out the chocolate. Heat in a 300°F oven for 5‑7 minutes, and you’ll have a toffee that tastes like it just left the pan.