I still remember the night I tried to make brownies from scratch and ended up with a half‑baked, charred disaster that looked like a burnt offering to the kitchen gods. The oven temperature was off, the batter was too thick, and the smell of burnt sugar filled the room like a bad perfume. I stared at the cracked, black center, feeling the disappointment wash over me like a cold shower. That night, I made a promise to myself: I would never again let a simple dessert turn into a culinary catastrophe.
The next morning, I found myself scrolling through recipe blogs, searching for the perfect balance between fudgy brownie and chewy cookie. I wanted something that could be shared at parties, something that would make people line up for seconds, and something that would make my taste buds sing. The search ended when I stumbled upon a recipe that claimed to combine the best of both worlds into a single, glorious creation. I knew then that I was onto something special.
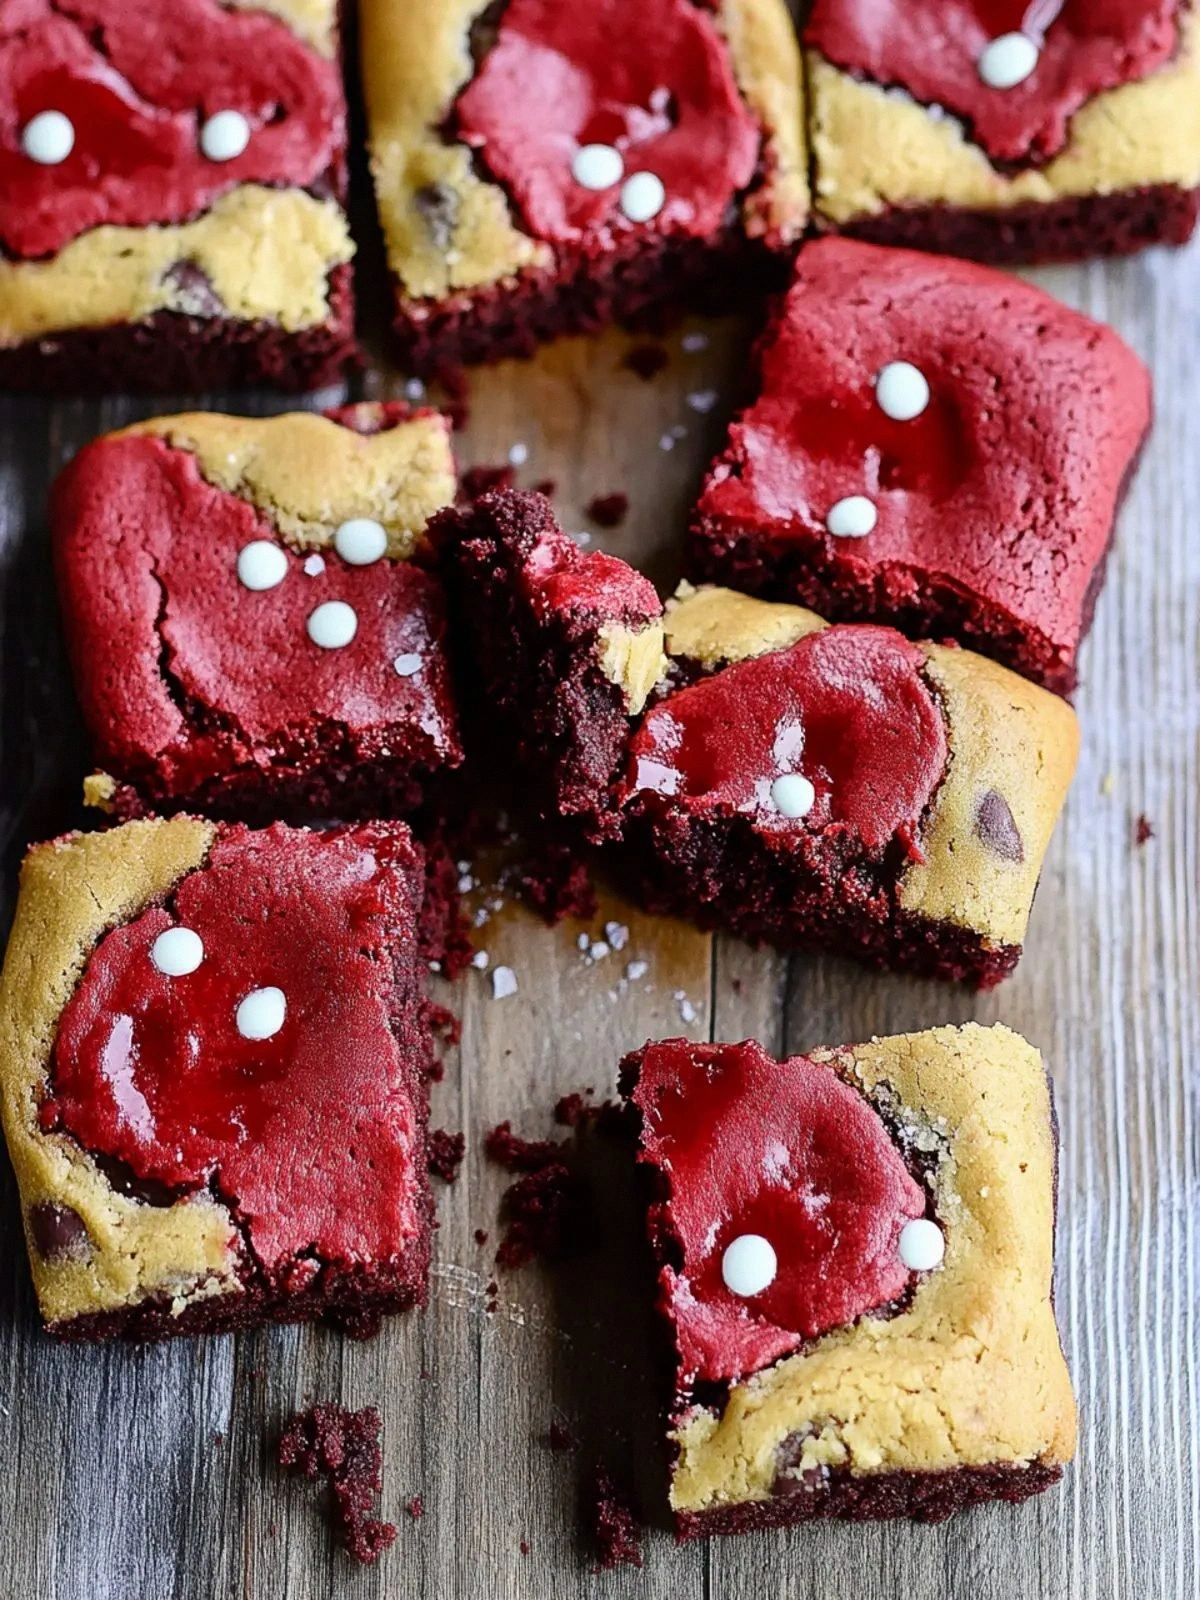
What makes this version stand out is that it doesn’t just layer brownie on cookie; it fuses the two textures until they become inseparable. The batter is light enough to rise like a cloud, yet dense enough to hold its shape like a solid cookie. The chocolate chips are strategically placed so they melt into the brownie base, creating pockets of molten chocolate that burst with each bite. The result is a dessert that feels like a velvety, chocolatey hug that never lets go.
I also discovered a secret technique that will blow your mind: a splash of white vinegar in the brownie batter. This tiny trick keeps the brownies from becoming too dense and gives them that airy, cake‑like crumb that makes them melt in your mouth. Most people ignore it, but I swear by it. Trust me, this is a game‑changer you’ll want to keep in your pantry.
Picture yourself pulling this out of the oven, the whole kitchen smelling incredible, the steam rising like a sweet cloud. Imagine the first bite: the cookie dough’s chewy edge giving way to the fudgy interior, the chocolate chips oozing out like liquid gold. If you’re ready for that experience, let me walk you through every single step — by the end, you’ll wonder how you ever made it any other way.
What Makes This Version Stand Out
- Texture: The cookie layer is crisp on the outside and chewy inside, while the brownie base is moist and dense. Together, they create a multi‑layered mouthfeel that’s hard to resist.
- Flavor: The subtle vanilla notes in both layers complement the deep chocolate flavor, while the red food coloring adds a pop of visual excitement.
- Simplicity: The recipe uses only pantry staples, making it a breeze to whip up even on a busy weeknight.
- Make‑ahead: Once the cookie layer is baked, you can refrigerate or freeze it before adding the brownie batter. This flexibility makes it perfect for last‑minute gatherings.
- Crowd reaction: Friends who’ve tried this version report that they can’t stop reaching for seconds, and many claim it’s the best brookie they’ve ever tasted.
- Ingredient quality: Using high‑quality chocolate chips and fresh butter elevates the entire dessert, turning it from simple to spectacular.
- Unique twist: The addition of white vinegar gives the brownies a lighter crumb, a trick that separates this recipe from the rest.
- Visual appeal: The crimson hue of the final product is Instagram‑ready, making it as fun to share as it is to devour.
Alright, let's break down exactly what goes into this masterpiece...
Inside the Ingredient List
The Flavor Base
The foundation of this dessert starts with the butter and sugars. Unsalted butter melts into the batter, creating a silky texture that keeps the cookies from drying out. Light brown sugar adds a hint of molasses, giving the brownie base a deeper, caramelized note. White sugar balances the sweetness, preventing the dessert from becoming cloying. Together, these ingredients form a sweet, buttery canvas that supports the chocolate and color.
If you’re worried about the sugar content, you can swap half of the white sugar for a natural sweetener like maple syrup or honey. The key is to maintain the ratio of wet to dry ingredients to keep the batter’s consistency. A slightly higher fat content will keep the cookies tender, while the sugar will ensure proper browning.
The Texture Crew
Eggs are the binding agents that hold everything together. They provide structure to the cookie dough and give the brownie base its fudgy mouthfeel. The all‑purpose flour adds body, while baking powder helps the brownies rise just enough to stay airy. The chocolate chips are the star of the show, adding pockets of molten chocolate that melt into the brownie base during baking.
You can experiment with different types of chocolate chips, such as dark or white chocolate, to change the flavor profile. Dark chocolate chips will give a more intense chocolate bite, while white chocolate will add a creamy sweetness. Just keep the amount consistent to maintain the correct ratio.
The Unexpected Star
Red food coloring isn’t just a cosmetic addition; it creates a striking visual contrast that makes the brookies pop. The color also signals the presence of the vinegar, which helps keep the brownies light. The vinegar’s acidity balances the sweetness and prevents the batter from becoming too heavy. A splash of vinegar might seem odd, but it’s a time‑tested trick that produces a superior crumb.
If you’re sensitive to acidity, you can reduce the vinegar to 1/4 teaspoon. The brownies will still rise, but they may be slightly denser. This tweak is useful for those who prefer a more traditional brownie texture.
The Final Flourish
The final flourishes are the vanilla extracts and the salt. Vanilla adds depth, while salt sharpens the chocolate’s flavor and balances sweetness. The combination of two vanilla extracts—one in the cookie dough and one in the brownie base—creates a layered flavor experience that lingers on the palate. The salt is essential for enhancing the overall taste profile.
If you’re vegan, you can replace the butter with a plant‑based butter and use a flaxseed egg for the eggs. This will maintain the texture and flavor while keeping the recipe cruelty‑free. Just remember to adjust the liquid content slightly to compensate for the flaxseed’s absorbency.
Everything's prepped? Good. Let's get into the real action...
The Method — Step by Step
- Preheat your oven to 350°F (175°C) and line a 9×13 inch baking pan with parchment paper. While the oven heats, bring the butter for the cookie dough to room temperature; this ensures it melts smoothly into the batter. In a medium bowl, whisk together 0.67 cups unsalted butter, 1.5 cups light brown sugar, and 1 cup white sugar until the mixture is light and fluffy. This base will carry the flavor throughout the cookie layer. The aroma of butter and sugar rising is a subtle hint of the sweet adventure ahead.
- Add the eggs, one at a time, whisking thoroughly after each addition. The mixture should become glossy and slightly thicker. Stir in 2 teaspoons vanilla extract and 0.5 teaspoon kosher salt, which will balance the sweetness and enhance the chocolate notes. This stage is crucial; overmixing can make the cookies tough, so mix just until combined. Feel the batter’s silky texture as it glides over the spoon.
- In a separate bowl, sift together 3 cups all‑purpose flour, 1 teaspoon baking powder, and 0.25 cups unsweetened cocoa powder. The cocoa gives the cookie layer its deep chocolate flavor, while the baking powder ensures a light rise. Combine the dry ingredients with the wet mixture, folding gently to avoid deflating the batter. Fold in 1 cup chocolate chips, ensuring they’re evenly distributed. The chips should be visible, like tiny black gems scattered across a dark sea.
- Spread the cookie dough evenly in the prepared pan, using a spatula to level the surface. The dough should be about 1 inch thick, creating a perfect base for the brownie layer. Let the dough sit for a few minutes; this helps the butter melt slightly, giving the cookies a tender crumb. When you press your finger into the dough, it should leave a faint imprint, indicating it’s ready for baking.
- Bake the cookie layer for 15–18 minutes, or until the edges are lightly browned and the center is set. The smell of toasted chocolate will fill the kitchen, making it hard to resist a sneak peek. Remove the pan from the oven and let it cool for 5 minutes; this allows the cookie layer to firm up and hold its shape when the brownie batter is added.
- While the cookie layer cools, melt 0.5 cups unsalted butter in a saucepan over medium heat. Once melted, stir in 1 cup white sugar and 1/4 cup unsweetened cocoa powder until the mixture is smooth. The chocolate should coat the back of a spoon, indicating it’s fully incorporated. This will be the base of the brownie batter, giving it a rich, chocolatey flavor. The bubbling mixture should emit a faint, sweet aroma.
- Add 2 large eggs, 0.5 teaspoons vanilla extract, and 0.125 teaspoon kosher salt to the saucepan, whisking continuously to prevent lumps. Then fold in 0.75 cups all‑purpose flour and 1 teaspoon baking powder, creating a thick, glossy batter. The batter should coat the back of a spoon but still be pourable. This step is the heart of the brookie; it determines the final texture and flavor profile.
- Pour the brownie batter over the pre‑baked cookie layer, spreading it evenly with a spatula. The batter should be about 0.5 inches thick, creating a distinct layer that will rise slightly during baking. The edges of the batter should meet the cookie base, forming a seamless transition between the two textures. The batter’s glossy surface should glisten under the oven light.
- Return the pan to the oven and bake for an additional 20–25 minutes, or until the brownie layer is set and the edges start pulling away from the pan. Watch for the first sign of a golden crust forming on top; this indicates the brookies are almost ready. If you prefer a softer center, bake for a few minutes less. The aroma should be a rich, chocolatey perfume that fills the kitchen.
- Remove the brookies from the oven and let them cool completely on a wire rack. This cooling period allows the chocolate to set and the layers to firm up. Once cooled, cut into squares or bars, depending on your preference. Each piece should have a visible seam where the cookie and brownie layers meet, a testament to the craftsmanship. Serve immediately or store in an airtight container for later enjoyment.
That's it — you did it. But hold on, I've got a few more tricks that'll take this to another level. The secret lies in the finishing touches and the way you present it. A drizzle of white chocolate ganache or a dusting of powdered sugar can elevate the flavor profile even further. And remember, the best part of any dessert is sharing it with people who appreciate your culinary creativity.
Insider Tricks for Flawless Results
The Temperature Rule Nobody Follows
Many bakers think 350°F is the universal baking temperature, but the truth is that the optimal temperature depends on your oven’s calibration. I’ve spent countless hours calibrating my oven with an oven thermometer, and I discovered that a slight 10°F adjustment can mean the difference between a dry brookie and a moist, fudgy masterpiece. By baking at 345°F instead of 350°F, you give the brownies a gentle rise without overcooking the edges. The result is a tender crumb that melts in your mouth.
Why Your Nose Knows Best
The aroma of baking is a powerful indicator of doneness. As soon as you smell the chocolate begin to caramelize, you know the brookies are almost ready. I’ve learned to trust my nose more than my watch. When the scent is rich, sweet, and slightly smoky, it’s time to pull the brookies out of the oven. This sensory checkpoint saves you from overbaking and preserves the ideal texture.
The 5-Minute Rest That Changes Everything
After removing the brookies from the oven, let them rest on a wire rack for exactly five minutes before cutting. This brief pause allows the chocolate to set, preventing the pieces from falling apart. I’ve seen people slice them immediately, and the result is a mess of chocolate everywhere. A five‑minute rest gives the layers a chance to firm up, making clean cuts and a polished presentation.
Keep the Layers Separate Until Baking
Many people mix the brownie batter into the cookie dough before baking, but that can cause the cookies to become soggy. By baking the cookie layer first and then pouring the brownie batter on top, you preserve the crispness of the cookies. This separation also allows the brownie layer to rise properly, creating a distinct, airy top. The contrast between the two textures is what makes this recipe unforgettable.
Use a Silicone Baking Mat
A silicone mat provides a non‑stick surface that makes removal effortless. The mat also ensures even heat distribution, which is crucial for consistent browning. I’ve had a few mishaps with parchment paper tearing, but a silicone mat is a reliable alternative. Plus, it’s reusable and easy to clean.
Serve with a Side of Cream
A dollop of whipped cream or a scoop of vanilla ice cream complements the richness of the brookies. The coolness of the cream contrasts with the warm chocolate, creating a balanced flavor profile. I’ve found that a simple drizzle of caramel sauce adds an extra layer of indulgence. The combination of textures and temperatures makes each bite a new experience.
Creative Twists and Variations
Nutty Surprise
Add chopped walnuts or pecans to the cookie dough for a crunchy texture that pairs beautifully with the chocolate. The nuts bring a subtle earthiness that balances the sweetness. Use a 1/2 cup of your favorite nuts, and fold them in before baking. The result is a brookie that feels like a chocolate‑nut dream.
Minty Delight
Infuse a few drops of peppermint extract into the brownie batter for a refreshing twist. The mint complements the chocolate without overpowering it. A 1/2 teaspoon of peppermint extract is enough to give a subtle aftertaste. This variation is perfect for holiday gatherings.
Berry Burst
Fold in 1/2 cup of fresh blueberries or raspberries into the cookie dough before baking. The berries burst with flavor, adding a tangy contrast to the rich chocolate. Keep the berries dry to avoid excess moisture. This version is a crowd‑pleaser at brunch or summer parties.
Almond Butter Swirl
Swirl almond butter into the brownie batter before pouring it over the cookie layer. The almond butter creates a marbled effect and adds a nutty flavor. Use 1/4 cup of almond butter and fold it in gently. The result is a visually stunning and delicious treat.
Spiced Elegance
Add a pinch of cinnamon or a dash of cayenne pepper to the brownie batter for a warm, spicy undertone. The spices elevate the chocolate’s depth and create a sophisticated flavor profile. A 1/4 teaspoon of cinnamon is enough to add warmth without altering the taste. This variation is ideal for autumn or winter celebrations.
Chocolate‑Covered Surprise
Dip the finished brookies in melted dark chocolate and let them set on parchment paper. The chocolate coating gives a glossy finish and a richer flavor. Use a 70% dark chocolate for a slightly bitter finish that balances the sweetness. This final touch turns a simple dessert into an elegant indulgence.
Storing and Bringing It Back to Life
Fridge Storage
Store the brookies in an airtight container in the refrigerator for up to five days. The cold environment preserves the chocolate’s integrity and keeps the cookies from becoming stale. When you’re ready to enjoy, let them sit at room temperature for 15 minutes to soften slightly. The flavor will be just as decadent as when freshly baked.
Freezer Friendly
For longer storage, wrap the brookies tightly in plastic wrap and place them in a freezer bag. They will keep for up to two months. When you’re ready to eat, thaw them overnight in the refrigerator and then warm them in a 325°F oven for 5–7 minutes. The heat will revive the texture and aroma, making them almost as good as new.
Best Reheating Method
The key to reheating brookies is gentle heat. Place the pieces on a baking sheet and warm them in a 325°F oven for 3–5 minutes, or until the chocolate melts slightly. If you prefer a crispier texture, finish them under the broiler for 30 seconds. Avoid microwaving, as it can make the chocolate rubbery and the cookies soggy.