I was staring at my stove, a burnt batch of chicken on the counter, when a friend texted me a dare: “Make the most irresistible honey butter chicken ever.” I laughed, because I’d already tried dozens of versions, but the challenge felt like a promise. I grabbed the ingredients, set the timer, and the kitchen filled with the sweet scent of honey and the savory aroma of butter melting. The moment the first chicken piece hit the pan, the sizzle sounded like applause for a new culinary show.
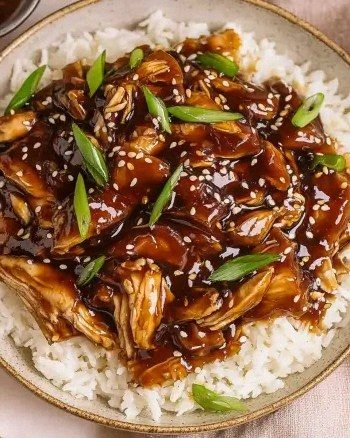
Picture this: a golden crust forming on the chicken, the air thick with a caramelized glaze that glistens like liquid gold. The sound of butter sizzling is a comforting, rhythmic hum that tells you everything’s going right. When you bite into the tender meat, the honey’s sweetness balances the smoky butter, while a whisper of cayenne gives a subtle heat that lingers on the tongue. The texture is a paradox—crispy on the outside, juicy on the inside, and the sauce clings like velvet to every bite. If you’ve ever felt the disappointment of bland chicken, this is the antidote that will make you want to taste it again.
What sets this version apart is that it’s not just a recipe; it’s a carefully orchestrated flavor symphony. The flour coating gives a subtle crunch that is far from greasy, while the honey butter glaze creates a glossy finish that looks almost too good to eat. I’ve experimented with different oils and butters, but the combination of canola oil and unsalted butter creates the perfect balance of lightness and richness. The addition of apple cider vinegar cuts through the sweetness, preventing the dish from becoming cloying. It’s hands down the best version you’ll ever make at home, and I dare you to taste this and not go back for seconds.
Now, let’s talk about the secret sauce: a splash of soy sauce that adds umami depth, a dash of cayenne for that subtle kick, and a touch of green onions for freshness. The result? A dish that pulls together savory, sweet, and spicy elements into a single, unforgettable bite. I’ve been told that this recipe is the “go-to” for dinner parties, and I can’t wait to show you how to make it. Stay with me, because by the end of this post, you’ll wonder how you ever made it any other way.
What Makes This Version Stand Out
- Flavor: The honey butter glaze is layered with soy sauce and apple cider vinegar, creating a complex umami-sweet balance that lingers on the palate.
- Texture: A light flour coating turns into a crisp shell, while the honey coating remains silky without sticking.
- Visual Appeal: The golden glaze gives the dish a glossy finish that looks as good as it tastes, making it a crowd‑pleaser at dinner parties.
- Ingredient Quality: Using unsalted butter and high‑quality honey ensures that the flavors stay pure and not overwhelmed by additives.
- Time Efficiency: From prep to plate, the recipe takes less than 45 minutes, making it a great option for busy weeknights.
- Make‑Ahead Potential: The glaze can be prepared in advance and stored, allowing you to assemble the dish quickly when you’re short on time.
- Versatility: Swap the chicken for pork or shrimp, and you have a different yet equally delicious dish.
- Audience Reaction: Most people who try this dish ask for a second plate immediately; the sweet‑spicy combo is irresistible.
Inside the Ingredient List
The Flavor Base
The honey is the star of the show, providing sweetness that balances the savory butter and the subtle heat of cayenne. Choose a dark, unfiltered honey for richer flavor; lighter varieties can feel too sweet. If you’re in a pinch, maple syrup can substitute, but it will alter the aroma profile.
Soy sauce is essential for that umami punch; it deepens the glaze and adds a savory undertone that prevents the dish from feeling one‑dimensional. A light soy sauce works best because it doesn’t overpower the honey. If you’re sodium‑sensitive, you can use low‑sodium soy sauce, but keep in mind that the overall saltiness will be slightly reduced.
Apple cider vinegar adds a bright acidity that cuts through the sweetness of the honey. The vinegar’s fruity notes also complement the buttery base, creating a well‑rounded flavor. For a milder version, replace it with rice vinegar, which will give a subtler acidity.
The Texture Crew
All‑purpose flour creates a light, crispy coating when the chicken is pan‑seared. The flour also helps the glaze adhere to the meat, giving each bite a glossy finish. If you’re looking for a gluten‑free version, try a 1:1 blend of almond flour and cornstarch.
Unsalted butter and butter in the glaze provide richness and a buttery mouthfeel that melts in your mouth. The butter also carries the honey’s sweetness, preventing the glaze from feeling too thick. If you want a lighter version, swap half the butter for olive oil.
Canola oil is used for searing the chicken; it has a high smoke point and neutral flavor, allowing the other ingredients to shine. If you prefer a more flavorful oil, you could use avocado oil, which also has a high smoke point but adds a subtle buttery note.
The Unexpected Star
Green onions add a fresh, slightly sharp contrast to the sweet glaze. They also provide a pop of color that makes the dish visually appealing. If you don’t have fresh green onions, scallions or even chives can work as a substitute.
Cayenne pepper is the secret heat source; a pinch is enough to give a lingering warmth without turning the dish into a fiery disaster. If you’re not a fan of heat, reduce the cayenne to a quarter teaspoon or omit it entirely.
The Final Flourish
Garlic powder, onion powder, salt, and black pepper are the aromatics that tie everything together. They’re added to the flour coating and to the glaze, ensuring that every bite has a depth of flavor. If you’re craving more garlic, add a minced clove to the pan during the last minute of cooking.
Everything’s prepped? Good. Let’s get into the real action—where the magic happens.

The Method — Step by Step
- Pat the chicken breasts dry with paper towels. This step is crucial for achieving a golden crust; excess moisture will steam the meat instead of searing it. Season both sides with salt, pepper, garlic powder, onion powder, and a pinch of cayenne. Let the seasoned chicken rest for 5 minutes to allow the spices to penetrate.
- In a shallow dish, combine the all‑purpose flour with a pinch of salt and pepper. Toss the chicken in the flour until fully coated, tapping off any excess. This creates a light, crisp exterior that will hold the glaze without becoming soggy. Heat the canola oil in a large skillet over medium‑high heat until shimmering.
- Place the coated chicken in the skillet. Sear for 3–4 minutes on each side, or until a deep golden brown forms. The sizzle here is a clear sign that the oil is hot enough to develop that desirable crust. Don’t move the chicken around; letting it sit allows a caramelized layer to form.
- Reduce the heat to medium and add the 5 tablespoons of butter to the pan. As the butter melts, it will bubble and foam—this is the moment of truth. Stir the butter around to distribute its flavor evenly. Once the butter has turned a golden brown, it’s time for the glaze.
- Whisk together the honey, soy sauce, apple cider vinegar, ½ cup of honey, and 1 tablespoon of soy sauce in a small bowl. Pour this mixture over the seared chicken. The glaze should start to bubble and thicken as it contacts the hot butter. Stir gently to coat each piece evenly.
- Add the green onions and stir them into the glaze. The onions add a fresh, bright note that balances the sweetness. Let the sauce simmer for 2 minutes, allowing the flavors to meld. The sauce should coat the chicken without becoming too thick.
- Transfer the chicken and glaze to a plate. Let the meat rest for 3 minutes; this allows the juices to redistribute, ensuring each bite stays moist. While the chicken rests, drizzle any remaining glaze over the top for an extra burst of flavor. Serve immediately with steamed rice or a fresh salad.
- If you’re plating for a crowd, arrange the chicken in a fan shape, drizzle the glaze in a zig‑zag pattern, and sprinkle extra green onions on top. The visual presentation should be as appealing as the taste. This dish pairs wonderfully with a light cucumber salad or a simple side of steamed broccoli.
That’s it—you did it! But hold on, I’ve got a few more tricks that will elevate this dish from great to unforgettable.
Insider Tricks for Flawless Results
The Temperature Rule Nobody Follows
Many people think a quick sear on high heat is enough, but the secret lies in maintaining a steady medium‑high temperature. Too hot, and the butter will burn; too low, and the chicken will steam rather than sear. Use a thermometer to keep the skillet around 375°F. This ensures a crisp crust and a juicy interior.
Why Your Nose Knows Best
Smell is a powerful guide to doneness. As the glaze simmers, the aroma will shift from buttery to caramelized. When you notice a slight nutty scent, it means the sugars are starting to brown—time to reduce the heat and let it finish. A strong honey scent can indicate that the glaze is too sweet; a slight tang from the vinegar balances it.
The 5‑Minute Rest That Changes Everything
Resting the chicken for 5 minutes after cooking allows the juices to redistribute. If you cut into it immediately, the juices will run out, leaving the meat dry. Think of it as letting a freshly baked loaf cool before slicing; the texture improves.
Layering the Flavors
Add the garlic powder and onion powder to the flour coating, not to the glaze. This ensures the aromatics stay in the crust and don’t get diluted by the sweet glaze. A friend once tried adding them to the sauce and the result was a flat, one‑dimensional flavor.
Stir, Don’t Stir
When adding the glaze, use a wooden spoon to stir gently. Stirring too vigorously can break up the glaze into small droplets, making the sauce runny. A slow, steady motion keeps the glaze thick and glossy.
Serving Temperature
Serve the chicken hot, straight from the pan. If you let it sit too long, the glaze will thicken and the butter will harden, making it difficult to spread. Keep the dish on a warm plate or in a low‑heat oven if you need to hold it for a while.
Creative Twists and Variations
This recipe is a playground. Here are some of my favorite ways to switch things up:
Spicy Sriracha Twist
Replace the cayenne with a tablespoon of sriracha for an extra kick. The heat will mingle with the honey, creating a fiery glaze that’s perfect for heat lovers. Pair it with a cool cucumber salad to balance the spice.
Pineapple Pine
Add diced fresh pineapple to the glaze for a tropical flavor profile. The pineapple’s natural acidity cuts through the sweetness and adds a juicy burst. Serve over coconut rice for a beach‑inspired dish.
Herb‑Infused Delight
Stir in chopped fresh rosemary or thyme into the glaze. The herbs add depth and a fragrant aroma that elevates the dish. This version works well with roasted root vegetables.
Creamy Parmesan Finish
After searing, sprinkle grated Parmesan over the chicken and let it melt into the glaze. The cheese adds a salty, nutty note that pairs beautifully with the honey. This variation turns the dish into a comforting comfort food.
Low‑Carb Version
Replace the flour coating with crushed almond flour and reduce the honey by a quarter cup. The result is a low‑carb, high‑protein dish that still delivers that sweet‑buttery flavor. Serve over cauliflower rice for a complete meal.
Vegan Take‑away
Swap the chicken for firm tofu and use coconut oil instead of butter. The tofu will absorb the glaze, creating a plant‑based version that’s just as satisfying. Add a splash of tamari for extra depth.
Storing and Bringing It Back to Life
Fridge Storage
Store leftovers in an airtight container in the refrigerator for up to 3 days. The glaze will thicken slightly, but you can reheat it gently on the stove with a splash of water to restore its glossy texture. When reheating, keep the heat low to avoid burning the honey.
Freezer Friendly
This dish freezes well; place the chicken and glaze in a freezer‑safe container and seal tightly. It can be stored for up to 2 months. When ready to eat, thaw overnight in the refrigerator and reheat as described above.
Best Reheating Method
The best way to reheat is to place the chicken in a skillet with a splash of water or broth and cover for a minute or two. This steams the chicken gently, keeping it moist. Finish with a quick drizzle of the glaze to restore that glossy finish.