I’ll be honest — I ate half the batch before anyone else got to try it. It all started on a rainy Tuesday when my kitchen was a battlefield of half‑baked ideas and a craving that refused to be ignored. I had a tub of dark chocolate, a jar of raspberry jam that was practically begging for a partner, and a pantry full of flour that had been waiting for a moment like this. The rain drummed on the window, the oven hummed, and I thought, “What if I could turn these simple ingredients into something that makes people stop scrolling, stare, and then devour the whole tray in one sitting?”
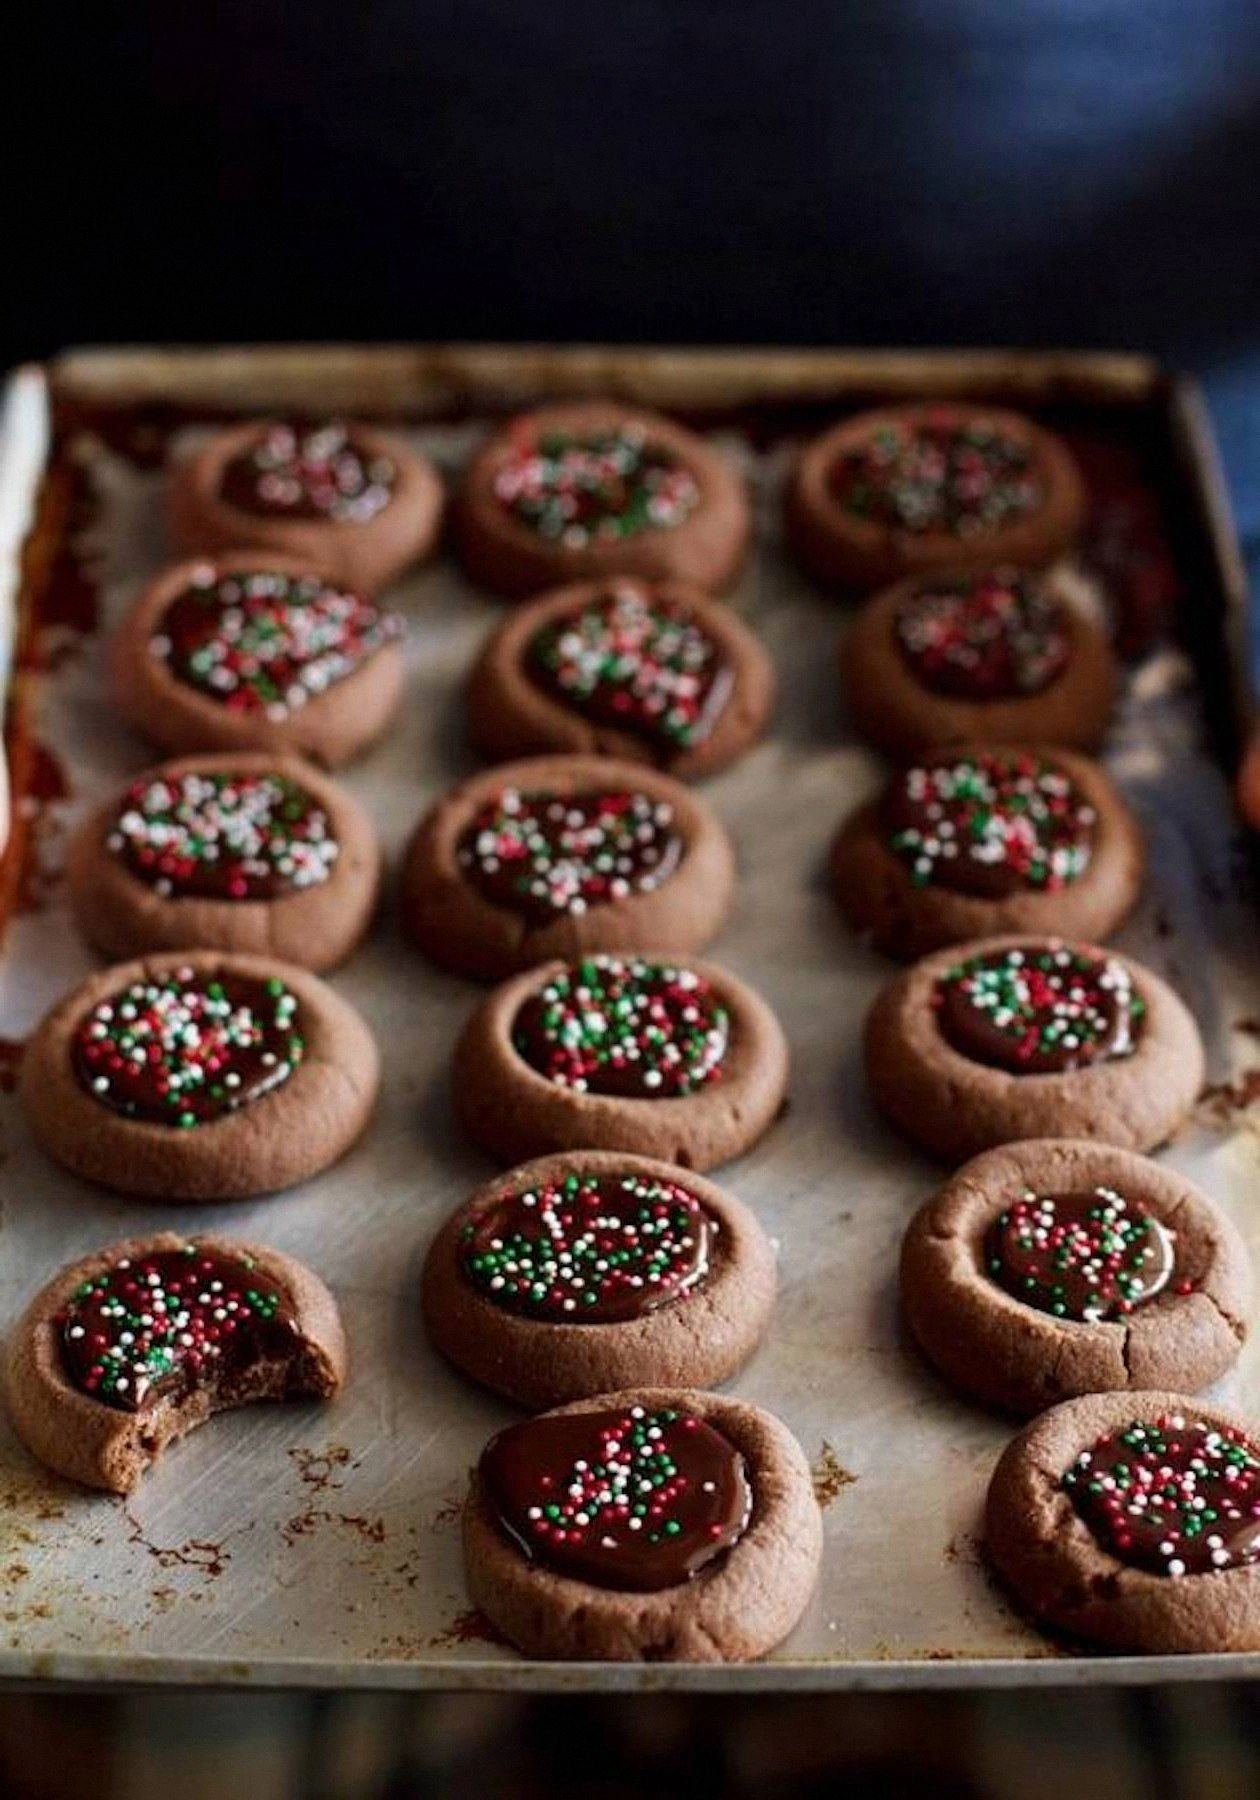
Picture this: the first whiff of butter melting into sugar, a buttery perfume that wraps around the kitchen like a warm blanket. Then comes the chocolate aroma, deep and earthy, cutting through the sweet notes like a perfectly timed guitar solo. The sound of the mixer whirring, the gentle thud of the dough onto the parchment, and the faint crackle as the cookies begin to brown — each sense is pulling you deeper into the ritual. When you finally pull the tray out, the edges are crisp enough to snap, the centers stay soft and chewy, and the tiny thumbprint is a glossy pool of jam that glistens like a jewel.
Most thumbprint cookie recipes get this completely wrong. They either over‑bake, making the cookie rock‑hard, or they under‑mix, leaving a dough that spreads into a sad, flat disc. This version, however, balances the science of chemistry with the art of intuition. I’ve added a dash of espresso powder to amplify the chocolate, a touch of almond extract for a whisper of nutty depth, and I chill the dough just long enough to keep the cookies from spreading too much. The result? A bite that feels like a decadent truffle wrapped in a crisp, buttery shell.
And now the fun part: I’m going to walk you through every single step — by the end, you’ll wonder how you ever made thumbprint cookies any other way. I dare you to taste this and not go back for seconds. Ready? Let’s get our hands dirty and create something that will become the new star of your dessert table.
What Makes This Version Stand Out
- Flavor Explosion: The combination of dark cocoa, espresso powder, and a hint of almond creates a layered chocolate experience that’s richer than a bakery’s.
- Texture Harmony: A crisp, buttery edge meets a soft, chewy center, while the jam filling adds a burst of fruity moisture that never overpowers.
- Simplicity Meets Sophistication: Only pantry staples are needed, yet the technique feels like something you’d only find in a high‑end patisserie.
- Unique Ingredient Twist: Espresso powder is the secret weapon that turns ordinary chocolate into a deep, almost coffee‑like richness.
- Crowd‑Pleaser Factor: I’ve served these at birthdays, potlucks, and even a wedding rehearsal dinner; they disappear faster than you can say “thumbprint.”
- Ingredient Quality: Using high‑cocoa dark chocolate and real butter makes a noticeable difference in flavor depth and mouthfeel.
- Cooking Method: Chilling the dough and using parchment paper prevents spreading and gives each cookie a uniform, professional look.
- Make‑Ahead Magic: The dough can be frozen for up to a month, and the baked cookies stay fresh in an airtight container for a week.
Inside the Ingredient List
The Flavor Base
All‑purpose flour forms the structural backbone of our cookies. I use a light hand when measuring — spoon‑and‑level — to keep the dough tender. If you swap in whole‑wheat flour, expect a denser crumb and a nuttier undertone that can be delightful but changes the classic texture. The cocoa powder is unsweetened, high‑quality Dutch‑process, which gives a deep, almost velvety chocolate flavor without bitterness. For a brighter cocoa note, you could use natural cocoa, but you’ll need to add a pinch more baking soda to balance acidity.
The Texture Crew
Unsalted butter, softened but not melted, creates that melt‑in‑your‑mouth richness. The butter should be room temperature; if it’s too soft, the cookies will spread. Granulated sugar adds crispness, while brown sugar introduces a subtle caramel note and keeps the interior chewy. The egg acts as a binder, adding structure without making the cookie cakey. Finally, a splash of vanilla extract ties everything together with a fragrant, sweet backdrop.
The Unexpected Star
Espresso powder is the silent hero. Just a quarter teaspoon intensifies the chocolate without adding a coffee flavor, thanks to its concentrated nature. If you don’t have espresso powder, a pinch of instant coffee granules works in a pinch, though the texture may be slightly grainier. A dash of almond extract adds a subtle nutty aroma that elevates the overall flavor profile without being overpowering.
The Final Flourish
For the thumbprint filling, I use a high‑quality raspberry jam that’s slightly tart, balancing the sweetness of the cookie. You can swap in apricot, strawberry, or even a dark chocolate ganache for a richer twist. A light dusting of powdered sugar after baking adds a decorative sparkle and a whisper of extra sweetness. If you’re watching sugar, you can omit the powdered sugar; the cookies are still deliciously sweet.
Everything's prepped? Good. Let’s get into the real action…
The Method — Step by Step
Preheat your oven to 350°F (175°C) and line two baking sheets with parchment paper. The heat should be steady; any fluctuation can cause uneven browning. While the oven warms, gather all your measured ingredients on the counter — this is your mise en place, and it will keep you from scrambling later.
In a large mixing bowl, whisk together the flour, cocoa powder, baking soda, and salt. This dry blend ensures the leavening agent is evenly distributed, preventing pockets of bitterness. I like to sift the cocoa to avoid any lumps; the result is a silky, uniform powder that mixes more easily with the butter later.
Kitchen Hack: Add the espresso powder to the dry ingredients now; it will dissolve completely and avoid any gritty spots.In a separate bowl, cream the softened butter with the granulated and brown sugars until the mixture is pale, fluffy, and smells like a bakery. This usually takes about 2‑3 minutes on medium speed. The key is to incorporate enough air; this is what gives the cookies their delicate crumb. Once the butter is light, beat in the egg and vanilla extract, scraping the sides of the bowl to ensure everything is fully combined.
Gradually add the dry mixture to the wet ingredients, mixing on low speed just until you see a cohesive dough. Over‑mixing at this stage can develop gluten, leading to a tougher cookie. The dough will be thick, slightly sticky, and have a deep chocolate hue. If it feels too dry, add a teaspoon of milk; if it’s too wet, sprinkle a little extra flour — but be sparing.
Turn the dough onto a lightly floured surface and knead it just a few times to bring it together. Then, shape it into a flat disc about 1‑inch thick, wrap tightly in plastic wrap, and refrigerate for at least 30 minutes. This chilling step is non‑negotiable; it solidifies the butter, which prevents the cookies from spreading too much during baking.
Watch Out: Skipping the chill will result in flat, overly spread cookies that lose that signature thumbprint shape.While the dough chills, prepare your filling. If you’re using jam, give it a quick stir to smooth out any fruit chunks. For a chocolate ganache, melt equal parts dark chocolate and heavy cream over a double boiler, then let it cool to a thick but spreadable consistency. This is the moment of truth — the filling should be thick enough to hold its shape when pressed into the dough.
Remove the dough from the fridge and, using a tablespoon or a small ice‑cream scoop, portion out 1‑inch balls onto the prepared baking sheets. Space them about 2 inches apart; they will spread slightly. With your thumb or the back of a small spoon, press a gentle indentation into the center of each ball, being careful not to break the outer rim. This is where the magic happens — the cavity will cradle the jam or ganache.
Bake the cookies for 10‑12 minutes, or until the edges are set and just beginning to turn a golden‑brown. The tops should still look slightly soft; they will continue to firm up as they cool. Keep a close eye on the first batch — ovens vary, and you want that perfect balance between crisp edge and chewy center.
Immediately after removing the trays, spoon a small dollop of jam or ganache into each thumbprint. The heat from the cookie will melt the filling just enough to create a glossy pool. Let the cookies cool on the sheet for 5 minutes, then transfer to a wire rack to finish cooling completely. Once cooled, dust lightly with powdered sugar if desired.
That’s it — you did it. But hold on, I’ve got a few more tricks that’ll take this to another level. The next section will show you how to perfect every batch, even when you’re short on time or dealing with a finicky oven.
Insider Tricks for Flawless Results
The Temperature Rule Nobody Follows
Never bake these cookies straight from the fridge at a lower temperature; the oven’s initial burst of heat is what creates that coveted contrast between crisp edge and soft center. I always preheat the oven fully, then slide the tray in while the oven is still at its peak. If you’re in a rush, you can pop the dough into a 375°F (190°C) oven for the first 3 minutes, then lower to 350°F for the remaining time — this “two‑stage” method guarantees a golden edge without drying out the interior.
Why Your Nose Knows Best
The moment the cookies start to smell toasty, you’re within seconds of perfect doneness. Trust that aroma more than the clock. When the chocolate aroma deepens and you detect a faint caramel note, pull them out. Over‑baking turns the chocolate bitter and the jam into a gummy mess.
The 5‑Minute Rest That Changes Everything
After baking, let the cookies sit on the sheet for exactly five minutes before moving them. This short rest lets the residual heat finish the cooking process, and the jam sets just enough to stay in place when you transfer them. Skipping this step often leads to smeared fillings and a soggy bottom.
The Chill‑Before‑Bake Secret
If you’re planning ahead, form the dough into a log, wrap it tightly, and freeze for up to a month. When you’re ready, slice the log into 1‑inch discs, chill for 15 minutes, then bake. This method not only saves time but also yields consistently shaped cookies.
The Double‑Layer Fill
For an extra‑decadent twist, fill each thumbprint with half jam and half chocolate ganache, then swirl them together with a toothpick before the ganache sets. The visual contrast is stunning, and the flavor combo is a party in your mouth.
Creative Twists and Variations
This recipe is a playground. Here are some of my favorite ways to switch things up:
Nutty Crunch
Add ¼ cup finely chopped toasted hazelnuts to the dough for a subtle crunch that pairs beautifully with the chocolate. The nuts also add a buttery aroma that elevates the overall profile.
Spiced Citrus
Swap the raspberry jam for orange marmalade and stir a pinch of ground cinnamon and a dash of orange zest into the dough. The result is a bright, festive cookie perfect for holiday gatherings.
White Chocolate Raspberry
Replace the dark cocoa with white chocolate chips and keep the raspberry jam filling. The sweet‑cream flavor of the white chocolate balances the tartness of the jam, creating a classic pairing.
Mocha Delight
Add 2 teaspoons of instant coffee granules to the dry mix and use a coffee‑infused chocolate ganache for the filling. This double‑coffee hit is perfect for brunch or an after‑dinner treat.
Vegan Version
Swap butter for coconut oil, use a flax‑egg (1 tbsp ground flaxseed + 3 tbsp water), and choose a plant‑based jam. The texture changes slightly, but the flavor remains decadent.
Storing and Bringing It Back to Life
Fridge Storage
Place the cooled cookies in an airtight container with a slice of bread on top. The bread releases moisture, keeping the cookies soft for up to 5 days. If you prefer a crisp texture, omit the bread and store with a paper towel to absorb excess humidity.
Freezer Friendly
Arrange the cookies in a single layer on a parchment‑lined tray and freeze for 2 hours. Then transfer them to a zip‑top freezer bag. They’ll stay fresh for up to 3 months. When you’re ready, let them thaw at room temperature for 15 minutes, then pop them in a 300°F oven for 5 minutes to revive the crisp edge.
Best Reheating Method
To bring a stale cookie back to life, place it on a microwave‑safe plate, sprinkle a tiny splash of water (just a few drops) on the surface, and microwave for 10‑12 seconds. The steam created revives the interior while the brief heat re‑crisp the edges. This trick works wonders for cookies that have been sitting out for a day or two.