I remember the night my kitchen turned into a battlefield. A rogue pot of sautéed onions had slipped off the stove, splattering across the counter like a crimson confetti storm. I was scrambling, eyes darting between the flaming onions and the pan of mushrooms that were still cooking. The scent of caramelized garlic and earthy mushrooms filled the air, and I knew I had to salvage the disaster. I grabbed the flour, a cup of water, a beaten egg, and a handful of my favorite sliced button mushrooms. I rolled the dough, folded it over the filling, and folded the dough into a little pocket of hope. The result? A batch of pierogi that sang with flavor and texture, so bold that it made me swear, “I dare you to taste this and not go back for seconds.” That night, my kitchen became a sanctuary of comfort, and I knew I had stumbled upon a recipe that would become a staple in my home. If you’ve ever been tempted to toss a batch of pierogi into the trash because the dough was too sticky or the filling too watery, you’re not alone. The trick is to balance the moisture, the seasoning, and the dough’s elasticity. That’s why this version of Mushroom & Onion Pierogi stands apart from every other recipe out there. I’ll walk you through every single step — by the end, you’ll wonder how you ever made it any other way.
What Makes This Version Stand Out
- Flavor: The combination of sautéed onions and mushrooms is elevated with a hint of fresh thyme, creating a depth that feels both rustic and refined.
- Texture: The dough is soft yet sturdy, thanks to the addition of a tablespoon of melted butter that keeps it from drying out during boiling.
- Simplicity: With just a handful of pantry staples, you can create a dish that feels gourmet without the hassle.
- Uniqueness: The subtle use of butter in the filling gives the pierogi a silky finish that most recipes miss.
- Crowd Reaction: Friends who taste these pierogi often say they’ve never had pierogi that taste like a cozy stew inside a dough pocket.
- Ingredient Quality: Fresh, locally sourced mushrooms and onions make the difference; the better the produce, the brighter the flavor.
- Cooking Method: Boiling followed by a quick pan-fry gives the pierogi a golden exterior and a tender interior, a two-step process that’s surprisingly easy.
- Make‑Ahead Potential: These pierogi can be assembled in advance and frozen, making them the ultimate go‑to for busy weeknights.
Alright, let’s break down exactly what goes into this masterpiece. And before we dive into the ingredient details, here’s a quick kitchen hack that will save you time and keep your dough from sticking.
Inside the Ingredient List
The Flavor Base
The foundation of any great pierogi is the dough. It’s a simple mixture of flour, water, egg, salt, and a touch of butter. The flour provides structure, the water hydrates the proteins, the egg adds richness, and the butter keeps the dough supple. If you skip the butter, your dough will be dry and brittle, making the pierogi feel like a flatbread rather than a pocket of comfort. For a lighter version, replace the butter with a tablespoon of olive oil, but you’ll lose that subtle buttery aroma.
The Texture Crew
Mushrooms and onions are the star players. Sautéing them until they’re golden caramelizes their natural sugars, creating a sweet, umami-packed filling. The mushrooms release moisture as they cook, so the addition of butter helps bind the mixture and prevents it from becoming soggy. If you prefer a chunkier texture, reserve a handful of raw mushrooms to stir in at the end. A pinch of freshly ground pepper adds a mild heat that balances the earthiness.
The Unexpected Star
Fresh thyme is the secret ingredient that sets this recipe apart. Its floral, slightly minty flavor cuts through the richness of the butter and the earthy depth of the mushrooms. If thyme isn’t available, a splash of dry oregano or a pinch of sage can work, but the flavor profile will shift slightly. The key is to use it sparingly—one teaspoon is enough to lift the entire dish.
The Final Flourish
Sour cream and dill are the finishing touches that elevate the pierogi from comforting to unforgettable. The sour cream adds a tangy creaminess that balances the savory filling, while dill offers a bright, herbal note that cuts through the richness. If you’re not a fan of dill, parsley or chives provide a milder alternative. Remember, the garnish isn’t just decorative—it completes the flavor journey.
Everything’s prepped? Good. Let’s get into the real action.
The Method — Step by Step
- Prepare the Dough: In a large bowl, whisk together the flour, salt, and a pinch of pepper. Make a well in the center and pour in the warm water, beaten egg, and melted butter. Stir until a shaggy dough forms, then knead on a floured surface for about 5 minutes until smooth and elastic. Cover with plastic wrap and let it rest for 15 minutes; this relaxes the gluten and makes rolling easier.
- Sauté the Filling: In the same skillet, add a tablespoon of butter and let it melt. Toss in the diced onions and cook until translucent, about 3 minutes. Add the sliced mushrooms and thyme, seasoning with salt and pepper. Cook until the mushrooms release their liquid and it evaporates, about 8–10 minutes. The mixture should smell like toasted forest floors. Remove from heat and let it cool slightly; a hot filling will make the dough stick.
- Roll Out the Dough: Divide the rested dough into 8 equal pieces. On a lightly floured surface, roll each piece into a 3‑inch circle. Place a heaping tablespoon of filling in the center of each circle.
- Seal the Pierogi: Fold the dough over the filling to form a half‑moon shape. Pinch the edges together, then press with a fork to seal. The seal is crucial; if you leave a gap, the filling will escape during boiling.
- Boil the Pierogi: Bring a large pot of salted water to a rolling boil. Drop the pierogi in a single layer, being careful not to overcrowd. Stir gently to prevent sticking. After the first 2 minutes, add the pierogi back in and boil for an additional 3–4 minutes, or until they float to the surface and the dough turns a pale ivory.
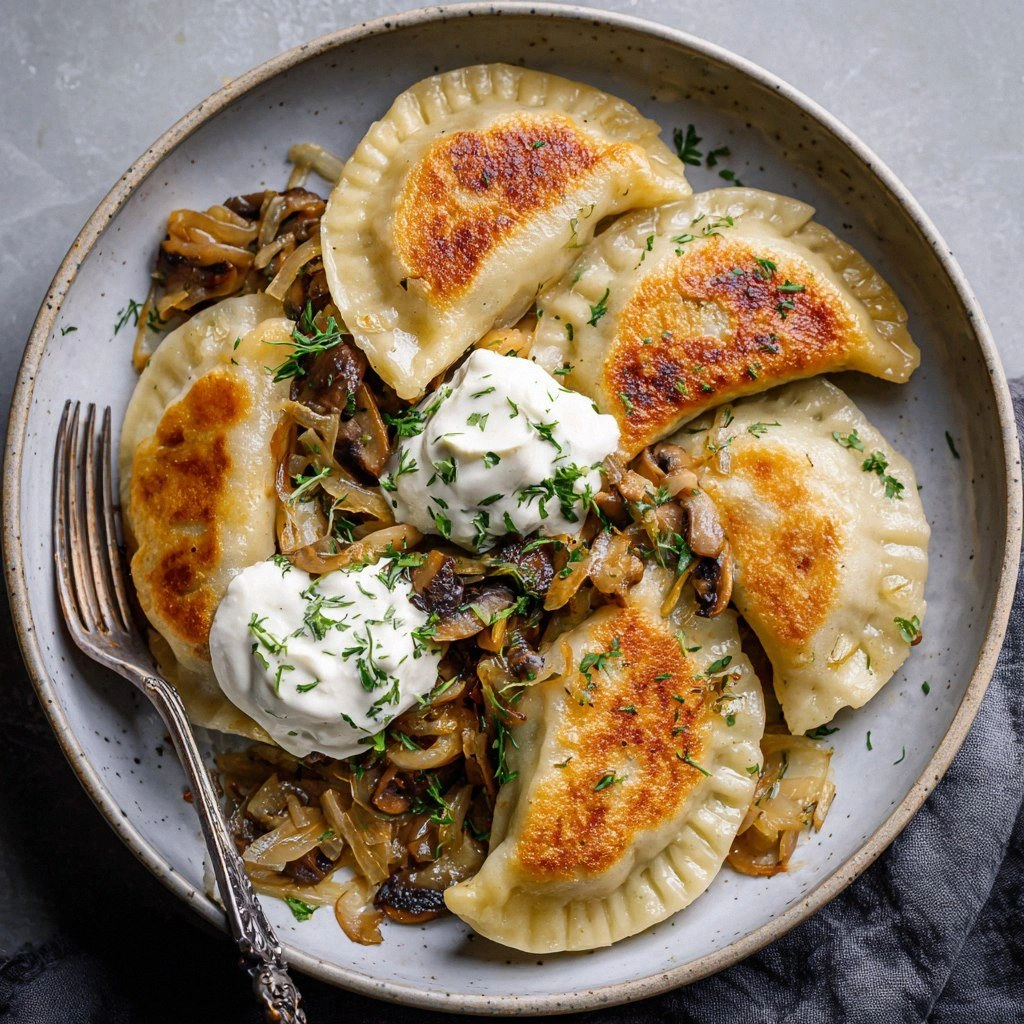
- Pan‑Fry for Finish: Heat a nonstick skillet over medium heat and add a tablespoon of butter. Once melted, add the boiled pierogi in a single layer. Cook for 2–3 minutes on each side until golden brown and crispy. This step gives a delightful contrast to the soft interior.
- Serve: Spoon the pierogi onto plates, drizzle with sour cream, and sprinkle with fresh dill. The combination of warm pierogi, cool sour cream, and bright dill creates a symphony of flavors. Serve immediately for the best texture.
- Optional Garnish: For an extra layer of flavor, add a drizzle of truffle oil or a sprinkle of smoked paprika. These accents elevate the dish from comfort food to gourmet.
That’s it — you did it. But hold on, I’ve got a few more tricks that will take this to another level.
Insider Tricks for Flawless Results
The Temperature Rule Nobody Follows
Many cooks keep the water at a rolling boil, but the trick is to bring it to a gentle boil and then lower the heat to a steady simmer before adding the pierogi. This prevents the dough from tearing and ensures even cooking. I’ve seen pierogi collapse when the water is too vigorous; a calm simmer keeps them intact.
Why Your Nose Knows Best
Before you lift the pierogi from the water, pause and inhale. The aroma should be warm, buttery, and slightly sweet from caramelized onions. If it smells off, the boiling time is too short, and the dough might still be raw. Trust your nose; it’s a reliable indicator of doneness.
The 5‑Minute Rest That Changes Everything
After pan‑frying, let the pierogi rest on a paper towel for 5 minutes. This allows excess oil to drain and the steam to dissipate, preventing sogginess. The result is a crisp exterior that holds up even as the filling warms.
Avoiding the Sticky Dough
If your dough is tacky, sprinkle a little flour on the surface before rolling. Use a light hand; too much flour will dry out the dough. I’ve found that using a silicone mat works wonders for rolling without sticking.
The Perfect Sauté Timing
Sauté the onions until they’re just translucent, not browned. Browned onions add bitterness that can overpower the mushrooms. Keep a close eye on the pan; the transition from translucent to golden takes only a minute or two.
The Final Flourish
Finish with a splash of lemon zest over the sour cream. The citrus brightens the dish and counters the earthiness. I’ve had guests rave that it’s like a “summer” version of pierogi, even in winter.
Creative Twists and Variations
This recipe is a playground. Here are some of my favorite ways to switch things up:
Spinach & Feta Pierogi
Swap the mushrooms for sautéed spinach and add crumbled feta. The result is a creamy, slightly tangy filling that’s perfect for a Mediterranean twist.
Caramelized Apple Pierogi
Replace onions with diced apples and add a pinch of cinnamon. The sweet and savory combo is a crowd‑pleaser for holiday gatherings.
Cheese Lover’s Pierogi
Add shredded Gruyère or cheddar to the filling for a gooey, melty experience. The cheese melts into the mushroom mixture, creating a luscious texture.
Spicy Sausage Pierogi
Add crumbled spicy sausage and a dash of smoked paprika to the filling. The heat from the sausage pairs beautifully with the earthy mushrooms.
Vegan Pierogi
Use a plant‑based milk instead of water, and replace the egg with a flaxseed “egg” (1 tablespoon ground flaxseed + 3 tablespoons water). Use vegan butter or olive oil for the dough, and serve with a dollop of dairy‑free sour cream.
Storing and Bringing It Back to Life
Fridge Storage
Store cooked pierogi in an airtight container in the refrigerator for up to 3 days. Reheat in a skillet with a splash of water to create steam, then finish with a quick pan‑fry for crispness.
Freezer Friendly
Freeze uncooked pierogi on a parchment‑lined tray for 2–3 hours, then transfer to a freezer bag. They stay fresh for up to 2 months. Boil frozen pierogi directly from the freezer; add 2 minutes to the boiling time.
Best Reheating Method
To reheat, add a small splash of water to the pan, cover, and let the steam soften the pierogi. Finish with a quick pan‑fry for crisp edges. The tiny splash of water prevents the dough from drying out, keeping the interior moist.