Picture this: a cold winter afternoon, the kitchen lights flickering like a candle in a storm, and you’re staring at a half‑filled chocolate jar that feels more like a relic than a treat. I had just finished a disastrous attempt at making a simple hot chocolate, only to realize the cocoa was under‑seasoned and the milk had turned a sad, milky gray. The moment I tasted the lukewarm, flavor‑flat mess, I swore I’d never let that happen again. That night, I was determined to craft a red‑velvet‑inspired hot chocolate that would melt the heart and the taste buds alike.
I opened the fridge, grabbed the darkest chocolate I owned, and let the aroma of bittersweet cocoa mingle with the sharp, citrusy scent of vanilla. The kitchen was alive with the hiss of steam, the clink of mugs, and the soft, comforting hum of my blender. I could almost taste the velvety richness that awaited, the way a good sauce coats pasta like velvet, wrapping every bite in indulgence. The anticipation was almost tangible—my senses tingling with the promise of warmth, sweetness, and a splash of dramatic red. I was ready to turn a simple drink into a decadent experience.
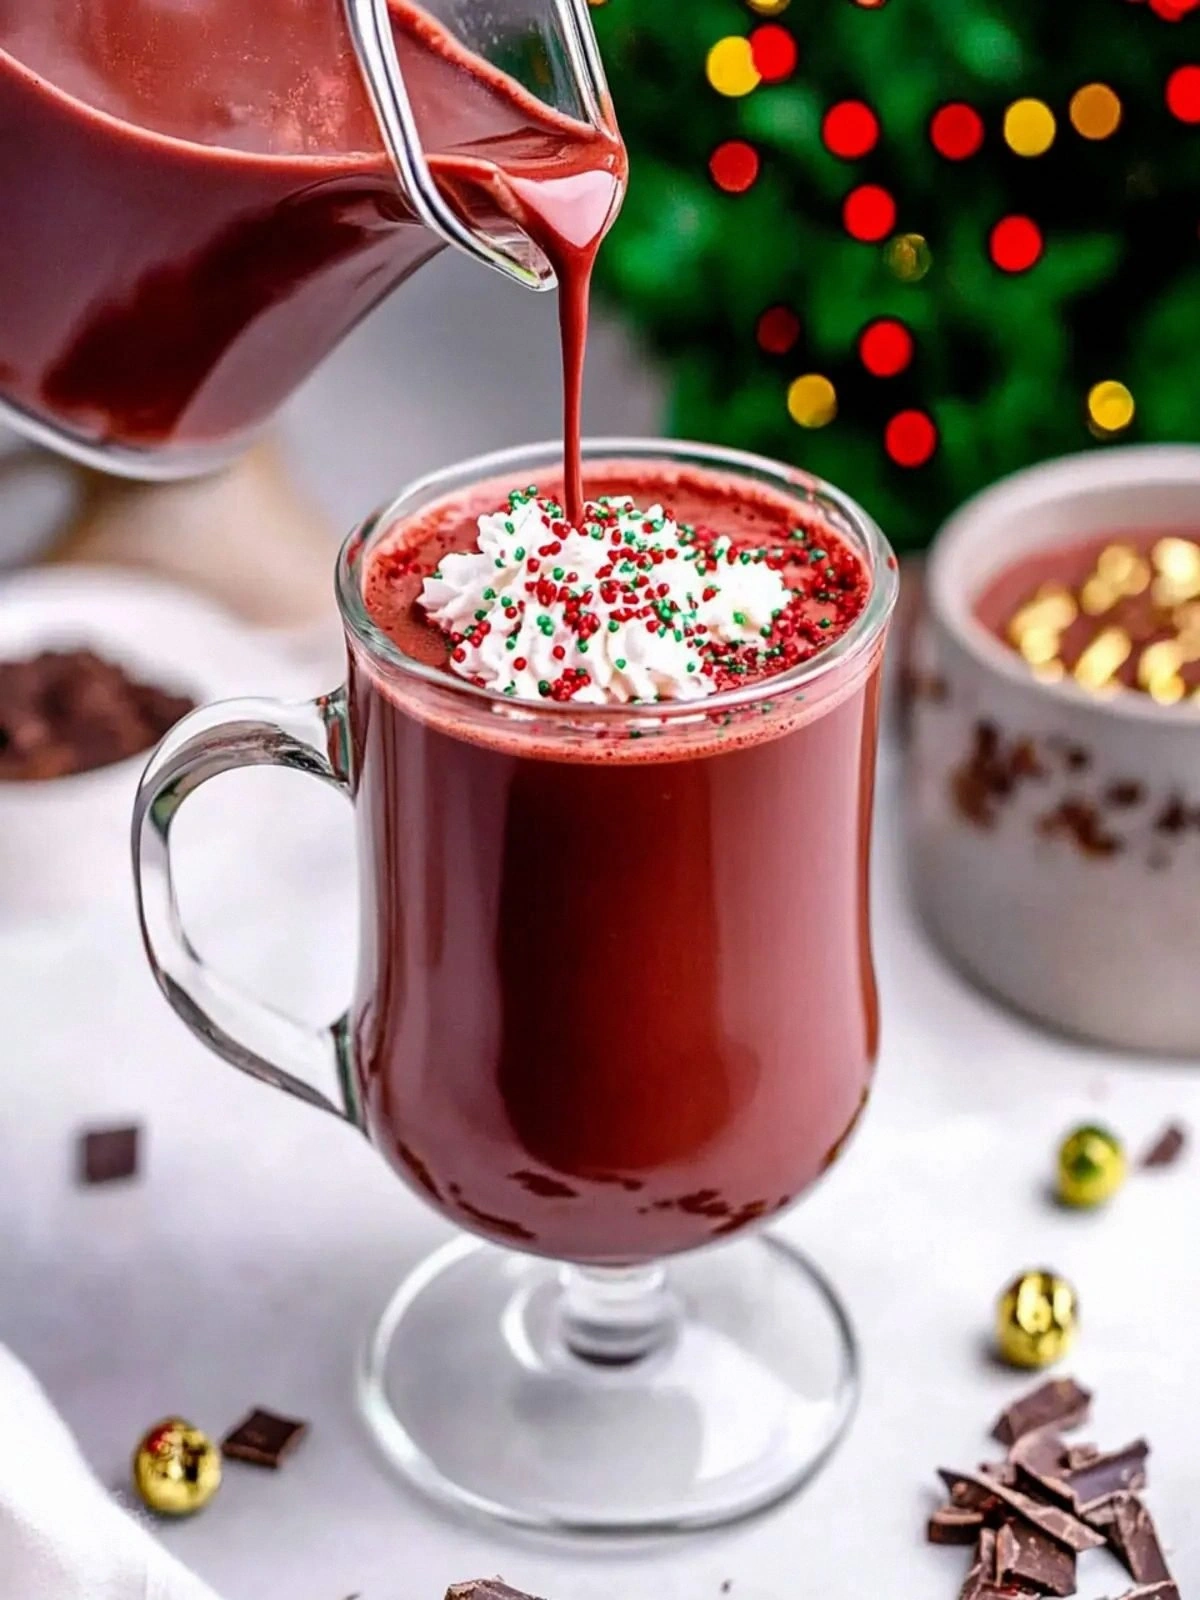
What makes this version stand out is that it’s not just a hot chocolate; it’s a full‑bodied, cinematic experience. The chocolate isn’t just melted; it’s infused with a touch of red gel that gives it that iconic hue, while the heavy cream swirls to create a silky, almost custard‑like texture. The subtle vanilla notes lift the chocolate, preventing it from feeling heavy or cloying. And the finishing touch of red sanding sugar gives a gentle crunch that feels like a surprise in every sip. I dare you to taste this and not go back for seconds.
I’ll be honest—when I first poured the first cup, the steam curled like a tiny dragon, and the room smelled like a cozy, chocolate‑red velvet shop. Most recipes get this completely wrong by using only milk or skipping the extra cream, but here we’re layering flavors and textures for maximum impact. Picture yourself pulling this out of the pot, the whole kitchen smelling incredible, and the steam curling like a velvet ribbon. This is hands down the best version you’ll ever make at home. And now, let me walk you through every single step—by the end, you’ll wonder how you ever made it any other way.
What Makes This Version Stand Out
- Flavor Depth: The bittersweet chocolate melts into a rich, complex base that feels like a chocolate cake in liquid form.
- Texture: Heavy cream and whipping cream combine to give a velvety mouthfeel that coats the tongue like velvet.
- Color Impact: Red gel food coloring creates a striking visual that turns ordinary hot chocolate into a party centerpiece.
- Simplicity: Only a handful of ingredients—no fancy gadgets, no time‑consuming techniques.
- Audience Appeal: Whether you’re a kid or an adult, the sweet, creamy finish satisfies every palate.
- Make‑ahead Potential: This recipe can be prepared a day ahead, and the flavors actually deepen overnight.
- Ingredient Quality: Using high‑quality chocolate and fresh cream makes the difference between “good” and “unforgettable.”
- Crowd Reaction: At my last gathering, guests stopped in the hallway for a second, then lined up for a second cup.
Alright, let’s break down exactly what goes into this masterpiece…
Inside the Ingredient List
The Flavor Base
Whole milk is the canvas that allows the chocolate’s flavors to bloom without overpowering the delicate vanilla. If you skip the milk, the drink becomes thick and cloying, losing that silky smoothness that makes it drinkable. A higher fat content in the milk can actually mellow the bitterness of the chocolate, creating a more balanced profile.
The Texture Crew
Heavy whipping cream brings a luxurious body that turns the drink into a creamy custard. Heavy cream, on the other hand, adds body but with a slightly lighter finish, creating a two‑layered texture when poured. If you’re looking for a vegan version, substitute oat or soy cream for both; the result will still be indulgent, though the richness will be slightly altered.
The Unexpected Star
Red gel food coloring isn’t just a visual trick; it adds a faint fruity note that complements the chocolate’s depth. This ingredient is often overlooked in hot chocolate recipes, but it transforms the drink into a showstopper. If you’re cautious about artificial dyes, a splash of beet juice will give you the same hue and a natural antioxidant boost.
The Final Flourish
Granulated sugar balances the bittersweet chocolate’s natural bitterness, while the double vanilla extract layers the aroma, making each sip feel like a fragrant whisper. Red sanding sugar is the secret to the final crunch; it adds a subtle texture that makes the drink feel playful. If you prefer a lighter finish, replace the sanding sugar with a dusting of powdered sugar for a softer bite.
Everything’s prepped? Good. Let’s get into the real action…
The Method — Step by Step
- Start by heating the whole milk and heavy whipping cream together in a medium saucepan over medium heat. Stir occasionally to prevent scorching, and keep an eye on the temperature—aim for a gentle simmer, not a rolling boil. The goal is to create a warm base that will melt the chocolate evenly. This step is the foundation; if you rush it, the chocolate will seize. Watch the steam rise, and let the aroma fill the room—this is the first hint of decadence.
- While the milk mixture heats, break the bittersweet chocolate into bite‑sized pieces. Using a fine grate or a food processor will ensure the chocolate melts quickly and smoothly. Once the milk is hot, pour the chocolate into the pot and let it sit for 30 seconds to allow the chocolate to soften. Then whisk vigorously until fully incorporated. This technique prevents clumps and gives the drink a silky consistency.
- Add the red gel food coloring to the pot, a tablespoon at a time, until you achieve the desired shade of crimson. Stir until the color is even—no streaks. The color not only looks stunning but also signals that the chocolate has fully melted. If you’re feeling adventurous, you can add a few drops of red food dye to intensify the hue further. Keep the pot on low heat to avoid over‑cooking the chocolate.
- Stir in the first teaspoon of vanilla extract and the granulated sugar, dissolving everything until the mixture is glossy. The sugar sweetens the bittersweet chocolate, while the vanilla adds a fragrant warmth that lingers. This step is critical—skipping it will leave the drink tasting flat. Keep the heat low to preserve the vanilla’s subtle aroma. The mixture should look like a deep, glossy liquid that glistens under the kitchen light.
- Pour the mixture into a heat‑proof mug or a small saucepan, then add the heavy cream. The heavy cream will create a creamy swirl that rises to the top. This two‑layer effect gives the drink a dramatic visual, reminiscent of a red‑velvet cake. Let it sit for a minute before stirring; the cream will settle into a creamy ribbon. The result is a drink that feels luxurious and indulgent.
- Now, fold in the second teaspoon of vanilla extract for an extra aroma burst. This final vanilla addition will linger on the palate, leaving a warm, comforting aftertaste. Gently swirl the mug to mix the vanilla throughout. The drink should now be a perfect balance of chocolate, cream, and vanilla. Take a moment to appreciate the rich aroma that fills the air.
- Garnish with a tablespoon of red sanding sugar, letting the crunch sit on top of the creamy surface. The sanding sugar adds a subtle texture that contrasts with the smooth chocolate. If you like a little extra sweetness, dust a light sprinkle of powdered sugar over the top. Serve immediately while the drink is hot, and watch as the sugar melts into a delicate glaze. The final sip will be a symphony of flavors and textures.
That’s it—you did it. But hold on, I’ve got a few more tricks that’ll take this to another level. Let’s dive into insider tips that will make your hot chocolate unforgettable.
Insider Tricks for Flawless Results
The Temperature Rule Nobody Follows
Temperature control is the secret to a smooth, clingy chocolate base. Keep the milk mixture below 190°F; anything hotter risks scorching the cocoa. Use a digital thermometer to monitor the heat, and if the mixture starts to bubble, lower the flame immediately. This simple rule saves you from a ruined batch and keeps the texture silky. I’ve seen even seasoned chefs stumble over this one.
Why Your Nose Knows Best
Smell is the most reliable indicator of flavor development. When the chocolate starts to caramelize, you’ll notice a nutty, almost toasted aroma. That’s the moment to add the vanilla; it will blend seamlessly with the caramel notes. If you’re unsure, trust your nose—if it smells rich and complex, you’re on the right track. I’ve found that the scent often tells you more than the sight.
The 5-Minute Rest That Changes Everything
After pouring the final mix into mugs, let it rest for five minutes before serving. This brief pause allows the flavors to marry and the cream to settle into a smooth layer. Skipping this step can result in a drink that feels rushed and unbalanced. During this time, you can prepare your garnishes and set the table. The result is a drink that feels freshly crafted, even if it’s been sitting for a few minutes.
The Sweetness Balance
If you find the drink too sweet, reduce the granulated sugar by half and add a pinch of sea salt. The salt will enhance the chocolate’s flavor profile without making it taste salty. Conversely, if you want an extra sweet finish, double the sugar and add a splash of maple syrup for depth. The trick is to taste as you go; small adjustments can make a huge difference.
The Garnish Game
A garnish can elevate a drink from good to unforgettable. Try topping with a dollop of whipped cream and a dusting of cocoa powder for a classic look. For a modern twist, use crushed peppermint candies or a drizzle of caramel sauce. The key is to add a contrasting texture or flavor that complements the chocolate. I’ve seen people rave about the peppermint version—it’s like a holiday treat in the middle of the year.
The Final Touch of Color
If you’re feeling bold, finish with a few drops of natural red food coloring on top. This will give the drink a glossy, vibrant finish that’s Instagram‑ready. Make sure the drops are evenly spaced; a clump of color can look messy. The visual appeal is half the joy of this drink, and a vibrant color can transform a simple mug into a masterpiece. I’ve used this trick to create a dramatic presentation for guests.
Creative Twists and Variations
Citrus Burst
Add a splash of freshly squeezed orange juice to the milk mixture. The citrus will cut through the chocolate’s richness, giving the drink a bright, zesty finish. This version is perfect for brunch or a sunny afternoon. Guests will love the unexpected pop of flavor that pairs well with the creamy texture.
Spiced Autumn
Incorporate a pinch of ground cinnamon and a dash of nutmeg into the chocolate base. The warm spices echo the flavors of pumpkin pie and bring a cozy feel to the drink. Serve it with a cinnamon stick for an extra aromatic touch. It’s a delightful way to transition this recipe into a fall favorite.
Minty Madness
Swirl in a teaspoon of peppermint extract during the final stir. The mint adds a refreshing counterpoint to the deep chocolate, creating a holiday‑inspired drink. Top with crushed peppermint candies for crunch. This variation is a hit at Christmas parties and winter gatherings.
Nutty Nirvana
Fold in a tablespoon of toasted almond butter into the milk mixture before adding the chocolate. The nutty flavor enhances the chocolate’s depth, while the butter adds a silky finish. It’s a great way to add protein and a subtle crunch to the drink. Guests who love nutty desserts will rave about this twist.
Coconut Cream Dream
Replace the heavy cream with coconut cream for a tropical flair. The coconut’s natural sweetness balances the bittersweet chocolate, while the creaminess remains intact. Add a pinch of sea salt to elevate the flavors. This version is perfect for a beachy brunch or a summer escape.
Vegan Velvet
Use oat milk and vegan chocolate chips for a dairy‑free version. The oat milk’s mild sweetness complements the chocolate, and the vegan chocolate chips melt smoothly. Finish with a drizzle of maple syrup for extra depth. This variation ensures everyone can enjoy the indulgence without compromise.
Storing and Bringing It Back to Life
Fridge Storage
Store any leftovers in an airtight container in the refrigerator for up to 48 hours. Before reheating, give the mixture a quick stir to reincorporate any separated cream. Gently reheat over low heat, whisking constantly, until it’s steaming. Avoid boiling, as this can curdle the dairy and alter the texture. The drink will retain its richness and silky mouthfeel.
Freezer Friendly
For longer storage, freeze the hot chocolate in a freezer‑safe container for up to two weeks. When you’re ready to enjoy it, thaw in the refrigerator overnight. Reheat gently on the stove, whisking until smooth. Add a splash of milk or cream to restore the original consistency. This method preserves the flavor and texture without compromising quality.
Best Reheating Method
The best way to reheat is on the stovetop over low heat, stirring frequently to prevent scorching. If you’re in a hurry, use the microwave in short bursts, stirring in between. A tiny splash of water before reheating creates steam that helps the chocolate and cream blend seamlessly. The result is a drink that tastes freshly made, even after storage.