Picture this: it’s a rainy Saturday morning, the kind that makes you want to crawl under a blanket with a steaming mug, but the kids are bouncing off the walls demanding breakfast that feels like a celebration. I was in the kitchen, half‑asleep, when I tried the usual French toast and it turned out about as exciting as a soggy piece of toast. I stared at the flat, pale slices and thought, “There has to be a way to make this iconic breakfast sing.” That night, armed with a bag of brioche, a tub of cream cheese, and a reckless amount of optimism, I invented a version that blew my mind and, frankly, blew the roof off the ordinary.
The moment I sliced the brioche, the buttery aroma hit me like a warm hug from an old friend, and the kitchen suddenly smelled like a bakery on a Sunday morning. I whisked together eggs, milk, and a splash of heavy cream, and the mixture turned a golden hue that reminded me of sunrise over a calm lake. When the batter hit the pan, it sizzled with a crispness that sounded like tiny fireworks, and the edges began to pull away as if they were eager to escape the confines of the skillet. The surprise? A luscious, sweet‑savory filling that oozes out with each bite, turning the humble slice into a decadent, stuffed masterpiece.
Most stuffed French toast recipes either drown the bread in a soggy mess or hide the filling under a mountain of powdered sugar, making it taste like a dessert gone wrong. I dared to flip the script: a light, airy batter that crisps on the outside, a creamy cheese‑fruit center that stays perfectly gooey, and a subtle hint of cinnamon that dances on the palate. This version stands out because it balances texture, flavor, and visual wow‑factor without demanding a culinary degree. I’m about to reveal a secret ingredient that most chefs keep under lock and key – a splash of orange zest that adds a bright, citrusy pop you won’t see coming.
Okay, ready for the game‑changer? Let me walk you through every single step — by the end, you’ll wonder how you ever made it any other way. I dare you to taste this and not go back for seconds. And trust me, I’ve already eaten half the batch before anyone else got a chance, so you know it’s that good.
What Makes This Version Stand Out
- Flavor Explosion: The combination of sweet fruit jam, tangy cream cheese, and a whisper of orange zest creates a layered taste that’s both comforting and surprising.
- Texture Harmony: Crispy, caramelized edges give way to a pillowy interior, while the filling stays luxuriously creamy without leaking.
- Simplicity Meets Elegance: You only need a handful of pantry staples, yet the result feels restaurant‑grade.
- Unique Twist: A dash of orange zest in the batter lifts the entire dish, making it unforgettable.
- Crowd Reaction: Even the pickiest eaters beg for more, and it’s the kind of breakfast that sparks applause around the table.
- Ingredient Quality: Using brioche or Texas toast guarantees a buttery base that soaks up the custard without disintegrating.
- Cooking Method: Pan‑searing first, then finishing in the oven locks in moisture while achieving that perfect golden crust.
- Make‑Ahead Potential: Assemble the night before, refrigerate, and bake in the morning for a stress‑free brunch.
Inside the Ingredient List
The Flavor Base
Cream Cheese (4 oz, softened): This is the heart of the stuffing, providing a velvety texture that melts into the bread like a dream. Skipping it turns the filling into a dry, forgettable jam‑only surprise. If you’re dairy‑free, try a plant‑based cream cheese; it won’t be identical, but it still gives that luscious mouthfeel.
Powdered Sugar (¼ cup): Sweetens the cheese without making it gritty, and it dissolves instantly into the mixture. Omit it and you’ll end up with a tangy, under‑sweet center that clashes with the jam. For a less sweet version, cut the amount in half.
Vanilla Extract (1 tsp): Adds depth and rounds out the cheese’s tang, making the filling taste like a dessert rather than a breakfast filler. A splash of almond extract can be swapped in for a nutty twist.
The Texture Crew
Brioche or Texas Toast (8 slices, 1‑inch thick): The buttery richness of brioche holds up to soaking without falling apart, creating that perfect “just‑right” bite. Using regular white bread leads to soggy, limp results. Look for bread with a tight crumb and a golden crust; it’s worth the extra cost.
Eggs (4 large): They bind the custard and give the exterior its golden color. Fresh eggs produce a brighter custard; older eggs can make the batter a bit watery. If you’re avoiding cholesterol, replace each egg with a flaxseed “egg” (1 tbsp ground flax + 3 tbsp water).
Whole Milk (1 cup) & Heavy Cream (½ cup): The milk provides moisture while the cream adds richness, ensuring the batter isn’t thin. Using all milk makes the toast soggy; all cream makes it overly dense. A 2:1 milk‑to‑cream ratio hits the sweet spot.
The Unexpected Star
Orange Zest (1 tsp): This brightens the entire dish, cutting through the richness with a citrusy snap that most recipes miss. Forgetting it leaves the flavor flat and overly sweet. If oranges aren’t on hand, a splash of orange liqueur works in a pinch.
Ground Cinnamon (1 tsp) & Nutmeg (½ tsp): Warm spices that hug the custard, giving it that classic French toast comfort. Over‑spicing can overwhelm the delicate cheese, so measure carefully. For a holiday spin, add a pinch of clove.
The Final Flourish
Unsalted Butter (2 tbsp, for pan): Creates the golden crust and adds a nutty flavor that’s impossible to replicate with oil. Butter that burns will give a bitter taste, so keep the heat medium‑low. If you prefer a dairy‑free option, use clarified butter (ghee).
Fresh Berries or Jam (½ cup): Provides a burst of fruitiness that contrasts the creamy interior. Fresh berries keep the texture light; jam adds a denser sweetness. Swap in raspberry preserves for a tart edge.
Maple Syrup (for serving): The final drizzle adds a woody sweetness that ties everything together. Use pure maple syrup for authentic flavor; pancake syrup will taste artificial.
Everything's prepped? Good. Let’s get into the real action…
The Method — Step by Step
Start by making the filling: In a medium bowl, blend the softened cream cheese, powdered sugar, vanilla, and orange zest until smooth. The mixture should be light and airy, like whipped clouds. Taste it; you’ll notice a bright citrus note that’s the secret weapon of this recipe. Set the bowl aside while you prep the bread.
Lay out the bread slices on a clean surface. Using a small spoon, spread a generous layer of the cream‑cheese mixture onto one side of each slice, then top with a dollop of jam or a few fresh berries. Press lightly so the filling adheres without tearing the bread.
Kitchen Hack: Use a piping bag for the cream cheese; it distributes evenly and looks professional.In a shallow dish, whisk together the eggs, milk, heavy cream, cinnamon, nutmeg, and a pinch of salt until fully combined. The batter should have a uniform, pale yellow color. Let it rest for 5 minutes – this allows the flour in the bread to absorb some liquid, preventing a soggy final product.
Heat a large skillet over medium heat and add 1 tbsp of butter, swirling to coat the surface. Once the butter foams, gently lay the stuffed bread slices into the pan, buttered side down. Cook for about 2‑3 minutes until the bottom turns a deep amber, the edges start to pull away, and you hear a faint sizzle that signals caramelization.
Watch Out: If the heat is too high, the butter will burn before the bread crisps, leaving a bitter aftertaste.While the first side is browning, carefully flip each slice and dip the now‑exposed side into the custard, allowing it to soak for 10‑15 seconds. The bread should absorb enough batter to become glossy but not soggy. Return the slices to the skillet, buttered side down again, and cook for another 2 minutes.
Kitchen Hack: Use a slotted spoon to lift the slices out of the custard; this drains excess liquid and keeps the crust crisp.Preheat your oven to 350°F (175°C). Transfer the skillet (if oven‑safe) or a baking sheet lined with parchment to the oven and bake for 10‑12 minutes. This finishing bake ensures the interior stays warm and the cheese filling remains gooey while the exterior reaches that perfect, uniform golden hue.
While the toast is in the oven, melt the remaining 1 tbsp of butter in a small saucepan and whisk in a splash of maple syrup for a quick glaze. Brush this glaze over the tops of the toast as soon as they emerge from the oven; the glaze adds a glossy sheen and a subtle caramel note.
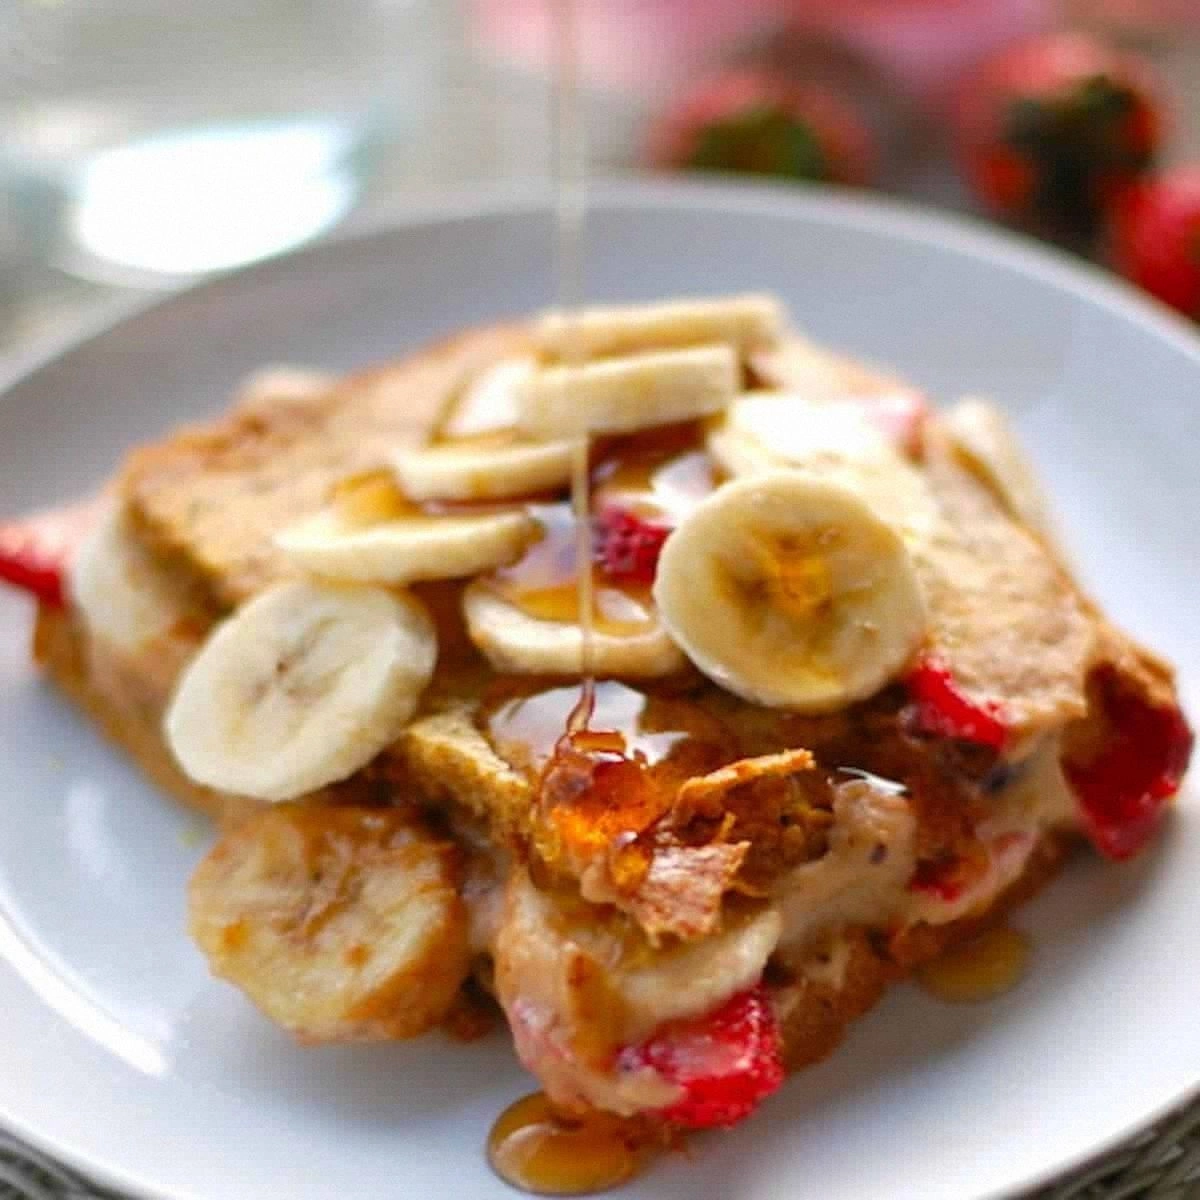
Remove the toast from the oven and let it rest for a minute – this tiny pause lets the filling settle, preventing it from spilling out when you cut. Slice each piece diagonally for a dramatic presentation, then dust with a light snowfall of powdered sugar.
Serve immediately with extra maple syrup on the side, a handful of fresh berries, and a steaming mug of coffee or tea. That first bite? It’s a symphony of crisp, creamy, sweet, and citrusy notes that dance across your palate. And now the fun part – watch your guests devour them with gusto. This next part? Pure magic.
That's it — you did it. But hold on, I've got a few more tricks that'll take this to another level…
Insider Tricks for Flawless Results
The Temperature Rule Nobody Follows
Never start with a cold pan. Warm the skillet for at least a minute before adding butter; this ensures the butter melts evenly and the bread begins to crisp the moment it contacts the surface. I once tried to rush the process on a chilly morning and ended up with soggy, uneven toast. The rule of thumb: medium heat, patient waiting, perfect crust.
Why Your Nose Knows Best
When the butter begins to foam and the bread hits that golden threshold, your kitchen will emit a buttery, nutty aroma that’s unmistakable. Trust that scent more than the timer – if you can smell the caramel notes, the toast is ready to flip. I’ve seen timers betray even the most seasoned cooks; the nose never lies.
The 5‑Minute Rest That Changes Everything
After the oven finish, let the toast sit uncovered for five minutes. This short rest allows the steam inside to redistribute, keeping the interior moist while the crust stays crisp. Skipping this step is the most common mistake I see; the result is a soggy middle that ruins the whole experience.
Butter‑Infused Baking Sheet
For an even more buttery finish, line your baking sheet with a thin layer of softened butter before placing the toast on it. The butter seeps into the bottom, creating a golden base that rivals any restaurant’s. A friend tried this once and swore she’d never go back to plain parchment.
Flavor‑Boosting Syrup
Mix a teaspoon of orange zest into your maple syrup before drizzling. The citrus lifts the syrup, echoing the zest in the batter and creating a cohesive flavor loop. It’s a tiny tweak that makes the dish feel intentional and gourmet.
Creative Twists and Variations
This recipe is a playground. Here are some of my favorite ways to switch things up:
Chocolate Hazelnut Dream
Swap the jam for a thick layer of Nutella and sprinkle chopped toasted hazelnuts inside the cream‑cheese mixture. The result is a decadent, dessert‑like breakfast that will make chocolate lovers swoon.
Savory Sunrise
Replace the sweet jam with caramelized onions, crumbled bacon, and a dash of smoked paprika. The creamy cheese balances the savory toppings, turning this into a hearty brunch main.
Tropical Twist
Use mango puree instead of jam and fold in shredded coconut into the batter. The tropical notes pair beautifully with the orange zest, transporting you to a beachside café.
Apple Cinnamon Delight
Cook thinly sliced apples with cinnamon and brown sugar, then layer them inside the cheese before cooking. The apple slices soften in the oven, creating a comforting, autumn‑alike flavor.
Vegan Version
Replace the cream cheese with a vegan alternative, use almond milk and coconut cream for the custard, and choose a plant‑based butter. The texture stays rich, and the flavor remains just as impressive.
Storing and Bringing It Back to Life
Fridge Storage
Place cooled leftovers in an airtight container and store them in the refrigerator for up to 3 days. Reheat gently in a skillet over medium heat with a splash of butter; the crust will revive, and the interior stays creamy.
Freezer Friendly
Wrap each assembled, uncooked slice tightly in plastic wrap, then place them in a freezer‑safe bag. They’ll keep for up to 2 months. When you’re ready, bake straight from frozen at 375°F (190°C) for 15‑18 minutes, adding an extra minute or two if needed.
Best Reheating Method
For the ultimate reheated crunch, preheat a non‑stick pan over medium‑low heat, add a teaspoon of butter, and toast each slice for 2‑3 minutes per side. Add a tiny splash of water (about a tablespoon) to the pan and cover for 30 seconds; the steam restores the interior’s softness without sogging the crust.