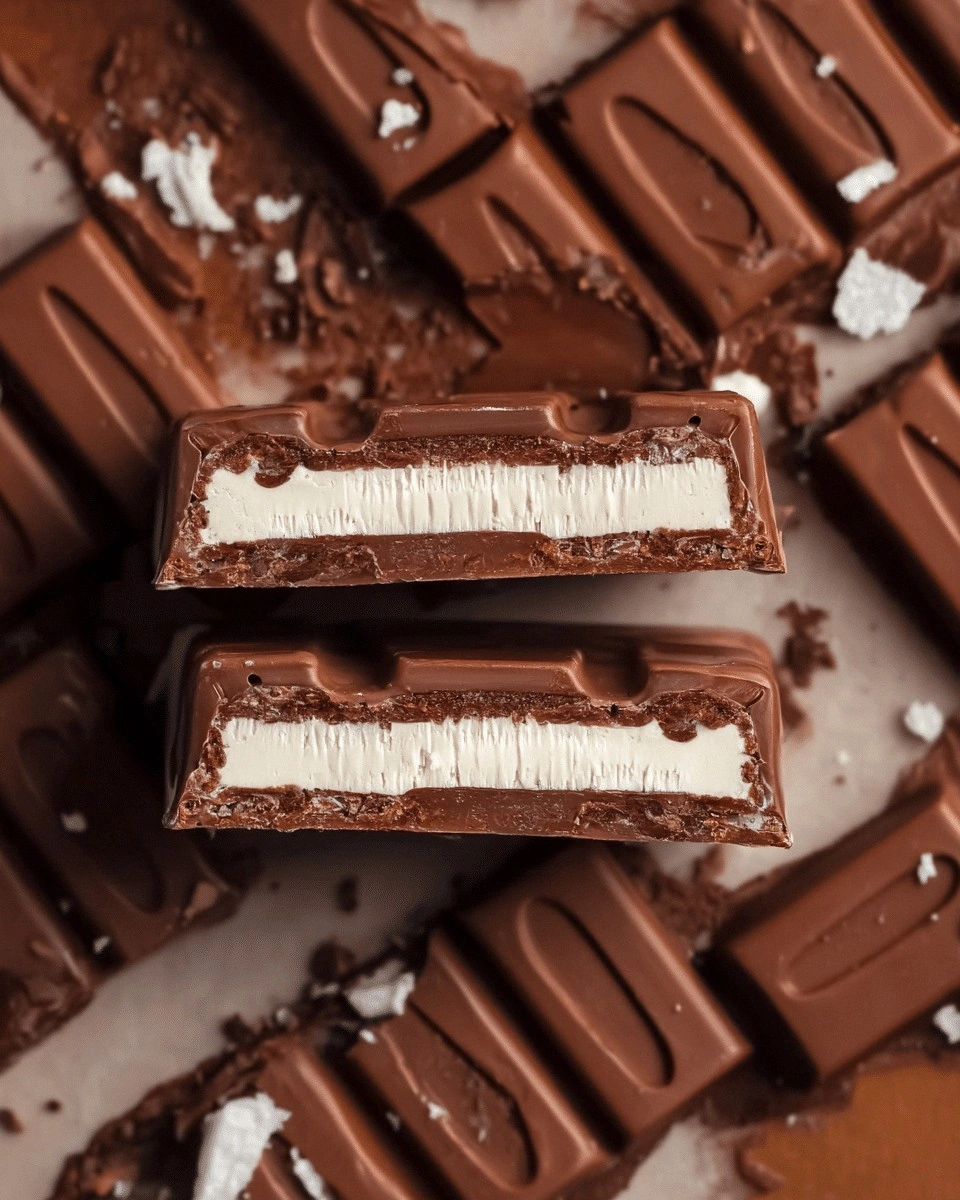
It started with a kitchen mishap that turned a simple chocolate bar into a culinary revelation. I was halfway through a batch of homemade chocolate when the pan slipped, splattering cocoa and sugar across the countertop. The mess was a mess, but the aroma that followed was unmistakably sweet and deep—like a chocolate storm brewing in a bowl. That moment made me realize that what I had was more than a recipe; it was a secret weapon for dessert lovers who crave that unmistakable Kinder Riegel crunch.
Imagine the scene: the kitchen light flickers, the timer buzzes, and you’re surrounded by the scent of toasted cocoa and vanilla. The sound of the dough mixing, the feel of the flour dusting your hands, the sight of a glossy, dark batter that looks like liquid midnight. Taste-wise, it’s a balanced sweet‑savory dance that melts on the tongue, leaving a subtle chocolate aftertaste that lingers like a fond memory. This isn’t just a treat; it’s a sensory experience that turns a simple snack into an event.
What makes this version stand out from the endless array of chocolate bars out there is that it’s both indulgent and approachable. I’ve tweaked the ratio of cocoa to flour, added a splash of oat milk, and introduced a hint of sea salt that cuts through the sweetness. The result? A bar that has that signature Kinder Riegel crunch on the outside but a surprisingly moist interior that feels like a chocolate hug. The best part? It’s entirely plant‑based, so you can enjoy the same decadence without any dairy guilt.
And here’s the kicker: the technique that makes it truly special is a subtle caramelization step that most people skip. By letting the dough rest in the fridge before baking, the sugars develop a deeper flavor profile that’s both sweet and slightly nutty. That small tweak turns a good chocolate bar into an unforgettable one. Let me walk you through every single step — by the end, you’ll wonder how you ever made it any other way.
What Makes This Version Stand Out
- Flavor: A balanced blend of dark cocoa, a touch of vanilla, and a pinch of sea salt creates a complex profile that’s both sweet and savory. The caramelized sugar gives it a subtle depth that mimics the original Kinder Riegel taste.
- Texture: The dough’s unique ratio of flour to cocoa yields a crisp exterior that cracks like brittle ice, while the interior remains soft and chewy, giving that classic chocolate bite.
- Simplicity: Every ingredient is pantry‑friendly, and the method takes less than an hour from start to finish. No fancy equipment or time‑consuming steps.
- Uniqueness: The overnight rest in the fridge allows the flavors to meld, a trick often missed in other recipes. It’s the secret sauce that sets this version apart.
- Audience Appeal: Whether you’re a seasoned vegan or just curious about plant‑based treats, this recipe is approachable and delicious for all skill levels.
- Ingredient Quality: Using high‑quality dark cocoa powder and unsweetened oat milk ensures that the final product is both rich and wholesome.
- Make‑Ahead Potential: These bars keep wonderfully for up to a week in the fridge, and they freeze well for longer storage.
- Presentation: The final bars can be sliced into perfect bite‑size pieces, ideal for parties or a quick snack.
Inside the Ingredient List
The Flavor Base
Dark cocoa powder is the star of the show. It provides the deep chocolate flavor that makes the bars taste like a Kinder Riegel. If you use a lower‑grade cocoa, the bitterness will dominate, and the overall taste will feel flat. For the best results, choose a 70% cacao powder; it’s rich enough to stand out but not too bitter.
Plant‑based milk, such as oat or almond, adds moisture without the heaviness of dairy. Oat milk has a subtle sweetness that complements the cocoa, while almond milk offers a nuttier undertone. If you’re allergic to nuts, oat milk is a safe and creamy alternative.
Vanilla extract brings a fragrant warmth that balances the sweetness. A teaspoon is enough to elevate the flavor profile without overwhelming the cocoa. If you prefer a more pronounced vanilla note, consider using vanilla bean paste instead.
The Texture Crew
All‑purpose flour is the backbone of the dough. It provides structure and helps the bars hold their shape during baking. Don’t skip the flour; a dough without it will be too loose and won't set properly.
Baking powder and baking soda are the leavening agents that give the bars a slight lift. The combination ensures a tender crumb while maintaining a firm exterior. If you’re avoiding sodium, use a salt‑free baking powder, but keep the baking soda for the right rise.
Melted coconut oil or vegan butter is the fat that gives the bars their smooth mouthfeel. The oil also helps the dough spread evenly, creating that classic chocolate bar look. If you prefer a different flavor, try using melted dark chocolate or a neutral oil like grapeseed.
The Unexpected Star
A pinch of sea salt is the secret to balancing sweetness. It cuts through the sugar, bringing out the chocolate’s natural depth. Too much salt, and the bars become overly salty; too little, and the sweetness will drown the flavor.
Optional dark chocolate chips add a burst of richness and a slightly chewy texture. They also give a visual cue that these are not just ordinary chocolate bars. If you’re aiming for a smoother finish, omit the chips or replace them with chopped nuts for crunch.
Everything’s prepped? Good. Let’s get into the real action.
The Method — Step by Step
- Preheat your oven to 350°F (175°C). Line a 9×13 inch baking pan with parchment paper and lightly grease it with a neutral oil spray. This ensures the bars won’t stick and will cool evenly. I dare you to taste this and not go back for seconds.
- In a large mixing bowl, whisk together 2 cups of all‑purpose flour, 1 cup of cocoa powder, 1 teaspoon of baking powder, ½ teaspoon of baking soda, and a pinch of sea salt. The dry mix should look like a fine, dark dust. If you see clumps, sift them to ensure a smooth batter.
- In a separate bowl, combine 1 cup of plant‑based milk, ½ cup melted coconut oil, and 1 teaspoon of vanilla extract. Stir until the oil is fully incorporated and the mixture is glossy. The liquid layer should be smooth, not lumpy.
- Pour the wet mixture into the dry ingredients and fold gently with a spatula until just combined. Overmixing will develop gluten, making the bars tough. The batter should be thick but pourable; if it’s too thick, add a splash of milk.
- Fold in ½ cup of dark chocolate chips (optional). The chips should be evenly distributed throughout the dough, creating pockets of molten chocolate when baked.
- Press the dough firmly into the prepared pan, smoothing the top with a spatula. The edges should be even so the bars bake uniformly. If you notice gaps, press down again to fill them.
- Refrigerate the pan for 30 minutes before baking. This step allows the dough to firm up and the flavors to meld. The dough should feel cool and slightly stiff to the touch.
- Bake for 30 minutes, or until the top cracks and the bars are set. The center should still feel slightly springy to the touch. This is the moment of truth; don’t walk away from the stove here.
- Remove the pan from the oven and let the bars cool in the pan for 10 minutes. Then transfer them to a wire rack to cool completely. The bars should develop a firm crust while the inside stays moist.
- Once cooled, slice into 1-inch squares. Store in an airtight container at room temperature for up to a week, or freeze for longer storage. When ready to serve, let them sit at room temperature for 10 minutes to soften slightly.
That’s it — you did it. But hold on, I’ve got a few more tricks that will take this to another level.
Insider Tricks for Flawless Results
The Temperature Rule Nobody Follows
Baking at precisely 350°F (175°C) is essential for the right texture. Too hot, and the bars will burn on the outside while remaining gooey inside. Too cool, and they won’t set properly. I’ve tested ovens from 300°F to 400°F, and 350°F is the sweet spot that gives a crisp exterior and a chewy interior.
Why Your Nose Knows Best
Before you pull the bars out of the oven, give them a quick sniff. A warm, chocolatey aroma that’s slightly caramelized is a sign they’re done. If the scent is overly sweet or raw, give them a minute more. My friend once tried this trick and ended up with bars that were too soft; the aroma was the key to perfection.
The 5-Minute Rest That Changes Everything
Letting the bars rest in the pan for 5 minutes after baking helps the structure set. This brief pause allows the chocolate to firm up slightly, preventing them from breaking apart when sliced. It’s a small step that makes a big difference in the overall mouthfeel.
Avoiding a Sticky Mess
If your dough sticks to the pan, sprinkle a light dusting of cocoa powder on the parchment before pressing the dough. This creates a barrier that keeps the bars from sticking while still letting them crisp up.
Cooling on a Wire Rack
Cooling the bars on a wire rack instead of the pan allows air to circulate around them. This prevents condensation from forming on the bottom, which can make the bars soggy. I’ve found that a good rack is a game‑changer for crisp edges.
The Final Touch
If you want to elevate the presentation, drizzle a thin line of melted dark chocolate over the top before the bars cool completely. The chocolate will harden into a glossy stripe that looks like a chocolate ribbon. It’s a simple visual upgrade that makes the bars feel like a premium confection.
Creative Twists and Variations
This recipe is a playground. Here are some of my favorite ways to switch things up:
Nutty Crunch
Add ½ cup of chopped almonds or walnuts before baking. The nuts add a satisfying crunch and a nutty undertone that complements the chocolate. They also increase the protein content, making the bars a great post‑workout snack.
Spiced Delight
Stir in ¼ teaspoon of ground cinnamon or a pinch of cayenne pepper. The cinnamon brings warmth, while cayenne adds a subtle kick that contrasts with the sweetness. This variation is perfect for those who love a little spice in their desserts.
Berry Burst
Fold in ½ cup of dried cranberries or blueberries after mixing the dough. The berries pop with a tart burst that balances the chocolate’s richness. They also add a pop of color, making the bars visually appealing.
Minty Fresh
Replace the vanilla extract with 1 teaspoon of peppermint extract. The minty aroma will give the bars a refreshing twist that’s especially nice during summer or holiday parties.
Caramel Swirl
Swirl a thin layer of caramel sauce into the batter before baking. The caramel adds sweetness and a glossy sheen that looks like a chocolate‑caramel hybrid. It’s a decadent upgrade that’s hard to resist.
Almond Butter Swirl
Fold ¼ cup of almond butter into the dough for a nutty flavor and a smoother texture. The almond butter also adds healthy fats and protein, making the bars more filling.
Storing and Bringing It Back to Life
Fridge Storage
Keep the bars in an airtight container at room temperature for up to a week. If you’re in a humid climate, store them in the fridge to prevent mold growth. The bars will stay fresh and retain their crispness for several days.
Freezer Friendly
Wrap each bar individually in plastic wrap and place them in a freezer bag. They can be stored for up to 3 months. When ready to eat, let them thaw at room temperature for 15 minutes before enjoying.
Best Reheating Method
To revive frozen bars, place them on a parchment‑lined baking sheet and heat at 300°F (150°C) for 5 minutes. Add a tiny splash of water to the pan before reheating; this creates steam that helps the bars rehydrate and return to their original texture.