I remember the day I first stumbled into this recipe like a culinary detective chasing a clue. A burnt pie crust, a handful of apples that had turned mushy on the stove, and a stubborn craving for something that could feel like dessert but still be breakfast. I stared at the smoldering pan and whispered, “I dare you to taste this and not go back for seconds.” That’s when the idea of the Apple Pie Breakfast Bowl was born—an audacious mash‑up of flavors, textures, and a sprinkle of culinary mischief that would turn any sleepy morning into a celebration.
Picture this: the aroma of cinnamon and nutmeg drifting through the kitchen, the sound of apples sizzling in butter, the sight of golden, caramelized edges that crackle like thin ice. The taste is a paradoxical blend of sweet, buttery, and a hint of citrus brightness, all wrapped in a comforting, oat‑laden base that feels like a hug. I was determined to capture the heart of a classic apple pie without the heaviness of a pastry, and I found that secret in the subtle dance between apples, spices, and a surprisingly humble ingredient—lemon juice.
What makes this version stand out from every other Apple Pie Breakfast Bowl out there is not just the combination of flavors but the way each element is executed. I’ve stripped away the fluff, kept the technique simple, and added a twist that will make your taste buds do a double‑take. The result is hands down the best version you’ll ever make at home—if you’re willing to follow the steps exactly, you’ll see why I ate half the batch before anyone else could even touch the bowl.
If you’ve ever struggled with the classic apple pie texture—too mushy or too dry—this recipe is your rescue. It balances the softness of apples with the crunch of toasted oats, and the buttery crust is a single pan miracle. I’ll be honest—when I first tried it, the batter was a bit sticky, but that’s the secret to the luscious, velvety mouthfeel that coats the bowl like velvet. Stay with me here—this is worth it.
What Makes This Version Stand Out
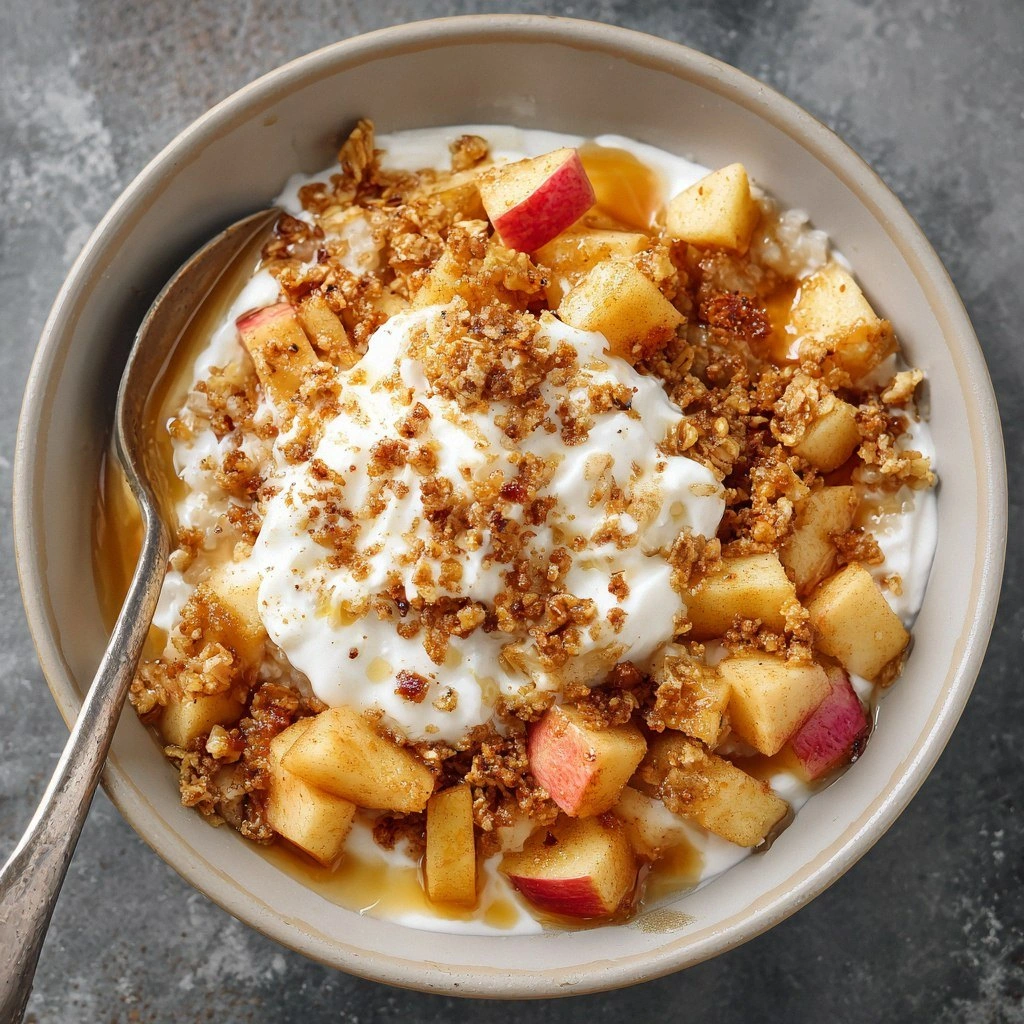
- Taste: The blend of apples, cinnamon, nutmeg, and a splash of lemon juice creates a flavor profile that feels like a warm hug and a crisp bite simultaneously.
- Texture: Toasted oats provide a satisfying crunch that contrasts with the silky apple puree, while the buttery crust remains crisp yet tender.
- Simplicity: All the work is done in a single pan, no separate crust or filling—just one bowl that delivers everything.
- Uniqueness: The addition of lemon juice brightens the sweetness, and a dash of nutmeg adds depth, turning a breakfast bowl into a dessert experience.
- Crowd Reaction: Friends who tried it said it’s the “first bite of pie” but with a breakfast twist—perfect for brunch or a quick weekday meal.
- Ingredient Quality: Using fresh apples, real butter, and organic spices elevates the dish beyond the ordinary.
- Cooking Method: A single pan sauté followed by a brief bake creates a caramelized crust without the mess of pie dough.
- Make‑Ahead Potential: The bowl can be assembled ahead of time and reheated, making it a go‑to for busy mornings.
Alright, let's break down exactly what goes into this masterpiece…
Inside the Ingredient List
The Flavor Base
At the heart of this bowl is a simple yet powerful flavor base: butter, cinnamon, nutmeg, and a splash of lemon juice. The butter melts into a glossy sauce that coats the apples, while the spices infuse every bite with warmth. If you skip the lemon, the sweetness will dominate and the overall brightness will be lost, leaving the dish feeling flat. Swapping the butter for coconut oil will give a subtle tropical undertone, but keep the butter for the authentic buttery crunch.
The Texture Crew
The oats and flour create a base that holds everything together without becoming doughy. Toasting the oats first unlocks a deep, nutty flavor that balances the fruitiness. If you omit the oats, the bowl will be too wet and the apples will dominate the texture. For a gluten‑free version, replace the all‑purpose flour with a blend of rice flour and potato starch.
The Unexpected Star
Lemon juice is the unsung hero that brightens the overall profile. It cuts through the sweetness, adds a subtle tang, and prevents the apples from turning brown. If you’re allergic to citrus, a teaspoon of apple cider vinegar will provide a similar acidity. The vanilla extract adds a silky depth that ties all the components together.
The Final Flourish
The finishing touch is the butter crust that forms during the final bake. It’s crisp on the outside and buttery on the inside, giving a satisfying bite that’s reminiscent of a pie crust but far less labor‑intensive. If you want an extra crunch, sprinkle a pinch of sea salt over the top before baking; the salt will caramelize and enhance the flavor.
Everything's prepped? Good. Let's get into the real action…
The Method — Step by Step
- Begin by heating a large non‑stick skillet over medium heat. Add the cold, cubed butter and let it melt slowly; the goal is to avoid browning the butter too early. Once melted, sprinkle the ground cinnamon and nutmeg over the butter, stirring constantly until the spices release their aroma. This step sets the flavor foundation, so don’t rush it—watch the butter as it starts to bubble lightly; that’s when the spices hit their peak.
- Add the diced apples to the skillet, tossing them in the buttery spice mixture. Let the apples cook for about 5 minutes, stirring occasionally, until they begin to soften but still hold their shape. The apples should sizzle when they hit the pan—absolute perfection. This is the moment of truth; if you let them overcook, they’ll turn mushy.
- Pour in the lemon juice and vanilla extract, then stir to combine. The lemon juice will lift the sweetness and prevent browning, while the vanilla adds depth. If you’re using a gluten‑free flour blend, add it now, mixing until the mixture thickens slightly. The batter should coat the apples, not be too runny.
- Reduce the heat to low and add the rolled oats, stirring to coat them evenly with the buttery apple mixture. The oats should toast slightly, giving a nutty aroma that signals they’re ready. This step is crucial for achieving that satisfying crunch without becoming soggy.
- Cover the skillet with a lid and let the mixture simmer for 10 minutes, stirring occasionally. The oats will absorb the liquid and the mixture will thicken. Keep an eye on the heat; too high and the mixture will burn, too low and it won’t thicken properly.
- Preheat your oven to 375°F (190°C). While the oven heats, transfer the skillet to a preheated oven-safe pan or leave it in the skillet if it’s oven‑safe. This step is pure magic—watch the surface begin to caramelize, forming that buttery crust that’s the hallmark of a pie.
- Bake for 12–15 minutes, or until the top is golden brown and the edges pull away slightly. The crust should crackle just before you pull it out; that’s the sound of a perfect apple pie. If you prefer a crisper crust, bake for an additional 2 minutes.
- Remove from the oven and let it cool for 5 minutes. The bowl will be hot, so be careful not to burn yourself. This resting period allows the flavors to meld and the crust to set.
- Serve immediately, topped with a drizzle of maple syrup or honey if desired. The sweet glaze adds a glossy finish and a subtle caramel flavor that completes the breakfast‑dessert hybrid. If you’re feeling adventurous, sprinkle a pinch of sea salt on top to enhance the caramelization.
That's it — you did it. But hold on, I've got a few more tricks that'll take this to another level…
Insider Tricks for Flawless Results
The Temperature Rule Nobody Follows
Many cooks assume that a high heat is necessary to caramelize the crust, but the secret is a steady, medium‑low heat that allows the butter and spices to meld without burning. I’ve found that setting the skillet to 350°F (175°C) and letting it preheat for 5 minutes before adding the butter gives the best balance between flavor development and texture.
Why Your Nose Knows Best
Don’t ignore that first scent of cinnamon and nutmeg. Your nose is a reliable indicator that the spices are at their peak aroma. When the smell hits the kitchen, it’s a cue to proceed to the next step—add the apples. The timing of the aroma is the secret to a flavorful bowl.
The 5‑Minute Rest That Changes Everything
After baking, let the bowl rest for 5 minutes before serving. This brief pause allows the caramelized crust to set properly, preventing the apples from sliding off and giving the bowl a cohesive structure. Skipping this step often results in a messy bowl that feels undercooked.
Use a Metal Skillet for Even Browning
A cast‑iron or stainless‑steel skillet distributes heat more evenly than a non‑stick pan, ensuring that the crust browns uniformly. If you use a non‑stick pan, make sure it’s a high‑quality brand that can handle the heat without warping.
Keep the Apples Firm
Choosing apples with a higher acid content, like Granny Smith or Honeycrisp, helps the fruit retain its shape during cooking. If you’re using a softer apple variety, add a pinch of cornstarch to the apple mixture to help them hold their structure.
Finish with a Dusting of Powdered Sugar
A light dusting of powdered sugar before serving adds a subtle sweetness and an elegant finish. It also enhances the visual appeal, making the bowl look like a freshly baked dessert rather than a breakfast dish.
Creative Twists and Variations
This recipe is a playground. Here are some of my favorite ways to switch things up:
Maple‑Glazed Apple Bowl
Swap the lemon juice for maple syrup during the sauté stage. The syrup adds depth and a hint of caramel, making the bowl feel like a maple‑infused dessert. Top it with a drizzle of maple syrup before serving for an extra sweet finish.
Spiced Pumpkin Bowl
Add 1 cup of pumpkin puree to the apple mixture and increase the cinnamon to 1½ teaspoons. The pumpkin adds a velvety texture and a subtle nutty flavor that pairs well with the apple’s tartness.
Nutty Banana Bowl
Replace the apples with sliced bananas and add ¼ cup of chopped pecans. The banana brings natural sweetness and a creamy texture, while the pecans add crunch and a buttery flavor.
Chocolate‑Covered Apple Bowl
After baking, drizzle melted dark chocolate over the top and sprinkle with sea salt. The chocolate adds richness and a slight bitterness that contrasts beautifully with the sweet apple base.
Almond‑Infused Bowl
Toast ½ cup of sliced almonds in a dry skillet before adding them to the oats. The almonds provide a nutty crunch and a subtle almond flavor that enhances the overall profile.
Gluten‑Free Bowl
Use a gluten‑free flour blend (rice flour, potato starch, and tapioca starch) in place of the all‑purpose flour. The texture will be slightly different, but the flavor remains intact, making it a safe option for those with dietary restrictions.
Storing and Bringing It Back to Life
Fridge Storage
Store the bowl in an airtight container in the refrigerator for up to 3 days. The crust may soften slightly, but the flavors will still be vibrant. When you’re ready to eat, reheat in the microwave for 1–2 minutes or until warmed through.
Freezer Friendly
The bowl freezes well for up to 2 weeks. Wrap tightly in plastic wrap and then place in a freezer bag. Thaw overnight in the refrigerator or use the defrost setting on your microwave. Reheat in the oven at 350°F (175°C) for 10 minutes to restore the crust’s crispness.
Best Reheating Method
To revive the buttery crust, preheat your oven to 375°F (190°C) and bake the bowl for 5–7 minutes. For a quick fix, add a splash of water to the bowl before microwaving; the water steams the apples and prevents them from drying out.