I was in the middle of a frantic weekday dinner when my pantry whispered a desperate plea: “Do something with these apples, or they’ll go bad!” I grabbed the nearest skillet, a handful of oats, and a rogue butter stick, and what happened next was nothing short of culinary lightning. The kitchen filled with the sweet perfume of caramelizing fruit, the sizzle of butter hitting a hot pan like a tiny fireworks show, and my mind raced with the bold idea that I could pull off a dessert in under ten minutes. That night, I dared myself to create a single‑serve‑friendly apple crisp that would make even the most seasoned pastry chef raise an eyebrow and say, “That’s impressive.”
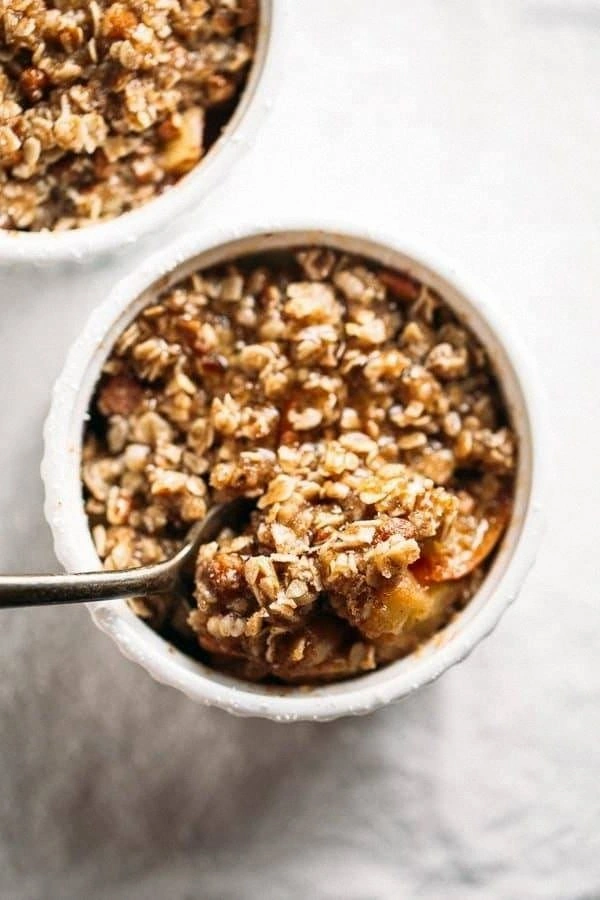
Picture this: a golden‑brown crumble topping that shatters under the fork like delicate glass, hugging tender apple slices that have softened to a buttery melt‑in‑your‑mouth texture. The first bite is a symphony of warm cinnamon, a hint of nutmeg, and just enough sweet crunch to keep you reaching for more. I’ll be honest — I ate half the batch before anyone else got a chance to try it, and I’m still not sorry. This isn’t just a quick fix; it’s a full‑on flavor explosion that proves you don’t need hours or a pantry full of exotic ingredients to create something unforgettable.
Most apple crisp recipes get the topping wrong: either soggy, overly sweet, or clumped into an unappetizing mess. Here’s what actually works: a precise balance of flour, oats, and butter that creates a crisp that stays crisp, even after cooling. I’m throwing a micro‑challenge at you: I dare you to taste this and not go back for seconds. The secret? A dash of sea salt that amplifies the sweetness and a lightning‑fast method that takes five minutes from start to finish. No pre‑heating, no elaborate prep — just pure, honest deliciousness.
Let me walk you through every single step — by the end, you’ll wonder how you ever made it any other way. We’ll dive into the science behind the crumble, the art of slicing apples just right, and a handful of hacks that will make your kitchen feel like a professional bakery. Ready for the game‑changer? Okay, grab your skillet, and let’s get started.
What Makes This Version Stand Out
- Speed: From pantry to plate in five minutes, this version shatters the myth that desserts need hours of love.
- Texture: The topping cracks like thin ice, delivering a buttery crunch that never turns soggy.
- Flavor Depth: A perfect harmony of cinnamon, nutmeg, and a pinch of sea salt that makes each bite sing.
- Simplicity: Only eight staple ingredients, all likely already sitting in your kitchen.
- Portion Control: Single‑serve friendly, yet easily scalable for a family‑sized crumble.
- Versatility: Swap apples for pears, add raisins, or drizzle caramel for a personalized twist.
- Make‑Ahead Potential: Prep the topping ahead of time and store it for a quick assembly later.
- Crowd Reaction: This is hands down the best version you’ll ever make at home — expect applause.
Inside the Ingredient List
The Flavor Base
Apples are the heart of this dish, providing natural sweetness and a tender bite when cooked just right. I recommend using a mix of sweet Gala and tart Granny Smith for a balanced flavor profile; the sweet varieties caramelize beautifully, while the tart ones keep the overall taste from becoming cloying. If you skip the apples, you lose the juicy core of the dish, and the crisp will feel like a dry biscuit rather than a comforting dessert. For those in a pinch, a frozen apple medley works, but thaw it first to avoid excess water.
The Texture Crew
Flour, rolled oats, and brown sugar join forces to create that signature crunch. The flour provides structure, the oats add chewiness, and the brown sugar contributes caramel notes and a hint of moisture that prevents the topping from turning into dust. Swapping the flour for almond flour will give a nuttier flavor but changes the texture, making it slightly denser. When measuring, spoon the flour into your cup and level it off; packing it will lead to a heavier, less airy crumble.
The Unexpected Star
A pinch of sea salt may seem trivial, but it’s the secret weapon that amplifies every other flavor. Salt cuts through the sweetness, making the cinnamon and nutmeg pop like fireworks in your mouth. If you’re on a low‑sodium diet, you can reduce it to just a whisper, but don’t eliminate it entirely or the dish will feel flat. A dash of vanilla extract can also be added for an extra aromatic layer without overwhelming the apple’s natural perfume.
The Final Flourish
Butter is the golden glue that binds the crumble together, melting into a glossy, buttery coating that kisses each oat and flour particle. Use unsalted butter so you can control the salt level precisely; if you only have salted butter, cut back on the added salt. For a dairy‑free version, coconut oil works surprisingly well, offering a subtle tropical hint that pairs nicely with the apples. Remember, the butter should be melted but not scorching — aim for a gentle shimmer.
Everything’s prepped? Good. Let’s get into the real action, where heat meets flavor and magic happens in a skillet.
The Method — Step by Step
Start by heating a medium‑sized skillet over medium‑high heat. Add a tablespoon of butter and let it melt until it starts to foam, the scent of dairy filling the kitchen like a promise. While the butter is warming, quickly core and slice four apples into thin, uniform pieces; this ensures they soften evenly and release their juices without turning mushy. The moment the butter sizzles, toss the apple slices in, stirring them so they’re fully coated. You’ll hear a gentle pop as the fruit meets the hot fat, and within 90 seconds the apples will begin to soften and caramelize.
Kitchen Hack: Sprinkle a pinch of cinnamon on the apples as they cook; the spice toasts instantly, deepening its flavor.While the apples are sweating, whisk together the dry crumble ingredients in a bowl: flour, rolled oats, brown sugar, cinnamon, nutmeg, and a pinch of sea salt. The dry mix should look like loose sand with specks of gold from the sugar. Drizzle the melted butter over the dry mixture, then use a fork to mash it together until the mixture forms clumps the size of peas. This is the pivotal moment where the butter coats each particle, creating that coveted crunch once baked.
Now, spoon the crumble evenly over the apple layer in the skillet. The topping should sit like a blanket, covering the fruit but not pressing down too hard; you want steam to escape and create a light, airy crust. Pat the crumble gently with the back of a spoon to flatten it just enough for even browning. If you’re feeling adventurous, sprinkle a few extra oats on top for an added textural surprise.
Place the skillet in a pre‑heated oven set to 425°F (220°C). The high heat will give the topping an immediate golden hue while the apples finish cooking underneath. Keep a close eye on the first five minutes; you’ll notice the edges of the crumble pulling away from the sides of the pan, a visual cue that the crust is forming correctly. Watch Out: If you leave it too long, the sugar can burn, turning the whole dish bitter.
Watch Out: Oven hot spots can cause uneven browning; rotate the skillet halfway through baking for uniform color.After eight minutes, pull the skillet out and give the crumble a quick visual check. The topping should be a deep amber, and the apple juices should be bubbling at the edges, a sign that they’re perfectly caramelized. If the crumble isn’t quite browned enough, pop it back in for another two minutes — this is the moment of truth where patience rewards you with a flawless crust.
Kitchen Hack: For an extra shine, brush the top with a tiny brush of melted butter right before the final two‑minute blast.Once the crust is golden and the apples are tender, remove the skillet from the oven and let it rest for two minutes. This short rest lets the juices thicken slightly, preventing a soggy bottom when you serve. During this pause, the kitchen will be flooded with a warm, spiced aroma that makes you want to dive in immediately — a sensory snapshot you’ll remember for weeks.
Serve the crisp straight from the skillet or gently slide it onto a warm plate. For an indulgent finish, add a dollop of vanilla‑bean ice cream or a drizzle of caramel sauce; the cold cream will melt into the hot crumble, creating a silky sauce that coats the apple slices like velvet.
That’s it — you did it. But hold on, I’ve got a few more tricks that’ll take this to another level. Stay with me here — this is worth it.
Insider Tricks for Flawless Results
The Temperature Rule Nobody Follows
Never, ever bake a crisp at a low temperature and expect a crisp topping. The secret is a hot oven that instantly sets the butter and sugar, creating a barrier that locks in moisture. If you start at 350°F, you’ll end up with a soggy, gummy top that never reaches that satisfying crunch. Instead, blast the dish at 425°F for the first eight minutes, then drop to 375°F to finish without burning. I’ve seen beginners ruin a perfect batch by under‑heating, and trust me, the disappointment is real.
Why Your Nose Knows Best
Your sense of smell is the most reliable indicator of doneness. When the butter‑sugar mixture starts to emit a caramelized, nutty aroma, you’re on the right track. If you detect a faint burnt smell, pull the skillet immediately; the crust can go from perfect to bitter in seconds. I once let a batch stay too long, and the smell turned acrid — the entire kitchen felt like a warning siren. Trust that nose, and you’ll never over‑cook again.
The 5‑Minute Rest That Changes Everything
After you pull the crisp from the oven, let it sit for exactly five minutes before serving. This short rest allows the juices to redistribute and the crumble to firm up just enough that it won’t slide off the plate. Skipping this step results in a soggy bottom that looks nice but falls apart as soon as you cut into it. The rest also gives the flavors a chance to meld, intensifying that cinnamon‑nutmeg duet.
Butter Temperature Trick
Melt your butter on low heat, not high. A gentle melt preserves the butter’s flavor and prevents it from scorching, which would introduce a bitter note. If you accidentally melt it too fast, the butter can separate, leading to a greasy crumble. Keep an eye on the color; once it turns a clear, golden liquid, you’re ready to mix with the dry ingredients.
The “Dry‑Hand” Method for Apples
When slicing apples, pat them dry with a paper towel before they meet the butter. Excess moisture creates steam, which can make the crumble soggy. A quick dry‑hand technique ensures the butter adheres directly to the fruit, encouraging a quick caramelization. I’ve lost count of the times I’ve forgotten this step, only to end up with a watery base that ruined the texture.
Creative Twists and Variations
This recipe is a playground. Here are some of my favorite ways to switch things up:
Pear & Ginger Delight
Swap the apples for ripe Bartlett pears and add a teaspoon of freshly grated ginger to the crumble. The ginger adds a subtle heat that contrasts the pear’s delicate sweetness, creating a sophisticated flavor profile perfect for a dinner‑party finish.
Berry‑Burst Crunch
Replace half of the apple volume with a mix of blueberries and raspberries. The berries burst with juice, adding a vibrant color and a tangy counterpoint to the sweet topping. Serve with a dollop of Greek yogurt for a tangy creaminess.
Caramel‑Apple Overload
Drizzle a generous spoonful of store‑bought caramel sauce over the apples before adding the crumble. The caramel deepens the sweetness and creates a glossy glaze that makes the dish look restaurant‑ready.
Nutty Crunch Variation
Fold in a quarter cup of chopped toasted pecans or walnuts into the crumble mixture. The nuts add an extra layer of crunch and a buttery, earthy flavor that complements the apples beautifully.
Spiced Rum Infusion
Add a splash of dark spiced rum to the apple pan after the butter has melted. The rum evaporates quickly, leaving behind a warm, adult‑only aroma that turns a simple snack into a festive treat.
Storing and Bringing It Back to Life
Fridge Storage
Allow the crisp to cool completely, then transfer it to an airtight container and store in the refrigerator for up to three days. The topping may lose a bit of its initial crunch, but a quick reheating will revive it.
Freezer Friendly
Portion the uncooked crumble and apple mixture into individual ramekins, then freeze. When you’re ready to eat, bake straight from frozen at 425°F for 12‑15 minutes, adding a few extra minutes as needed. This method locks in flavor and texture for up to two months.
Best Reheating Method
Reheat leftovers in a preheated oven at 350°F for eight minutes, uncovered. For an extra burst of moisture, add a tiny splash (about a tablespoon) of water around the edges before reheating; the steam will revive the apples while the top regains its golden crispness.