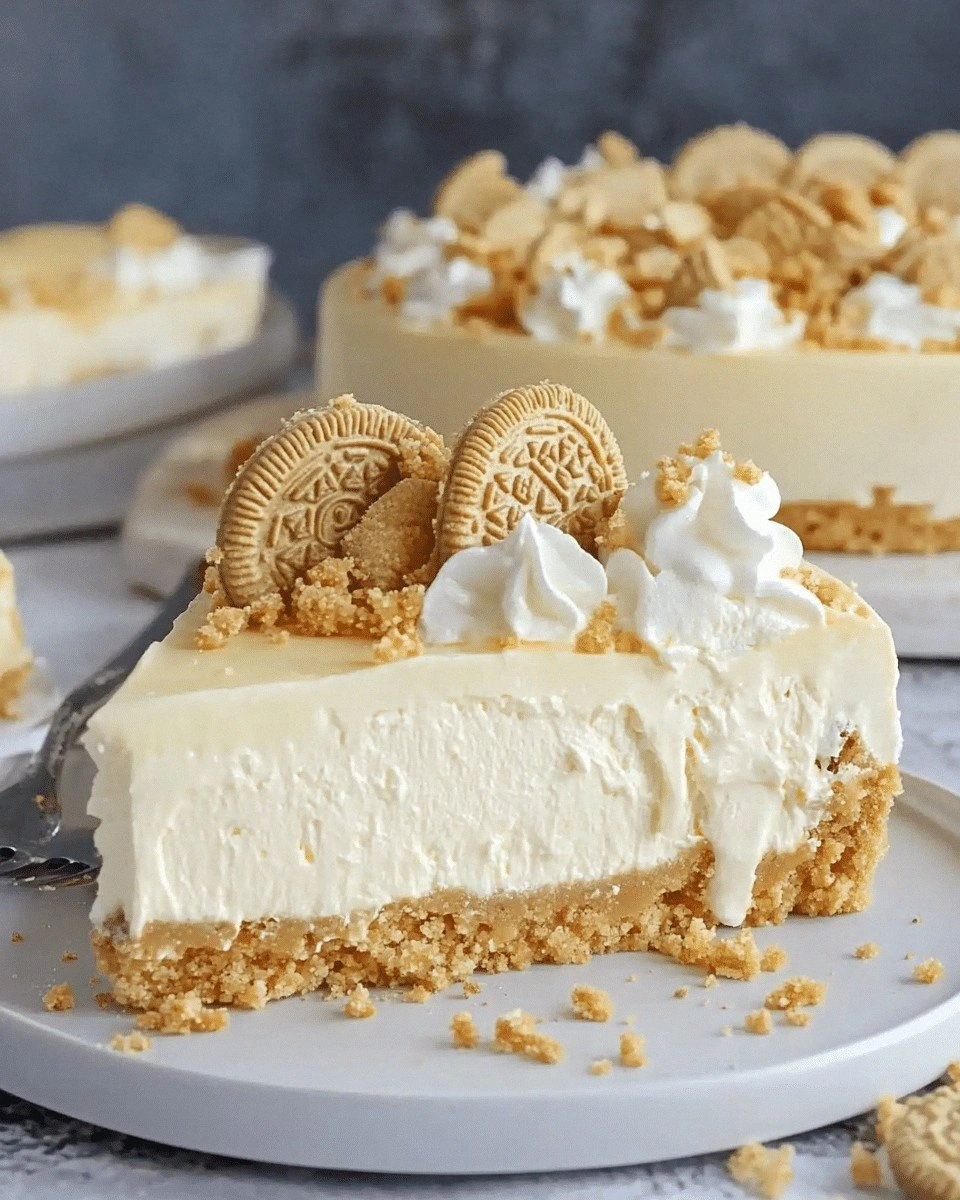
I was halfway through a disastrous batch of brownies that had turned into a gooey, chocolatey mess when my friend dared me to make something sweet that would actually taste like a dessert, not a science experiment. I stared at the kitchen counter, the air thick with the scent of burnt sugar, and thought, “I’m going to create something that makes people forget the brownies’ betrayal.” That’s when the idea hit: a cheesecake that marries the crunch of golden Oreos with the silky richness of cream cheese, crowned with a molten white chocolate drizzle. The kitchen lights flickered, the timer buzzed, and I was ready to turn a kitchen calamity into a culinary triumph.
Picture this: a buttery crust that crackles like fresh‑baked cookies when you break it, a filling that feels like velvet against your teeth, and a glossy topping that glistens like a golden sunrise. The moment you cut into the cheesecake, a sweet, buttery aroma rises, mingling with a faint chocolate note that promises indulgence. The first bite delivers a harmonious crunch, followed by a creamy, slightly tangy center that melts in your mouth, leaving a lingering hint of vanilla and a whisper of caramelized sugar. Every element is a sensory adventure—texture, flavor, aroma, and even the satisfying crackle of the crust.
What sets this version apart isn’t just the ingredients; it’s the philosophy behind each step. I’ve eliminated the common pitfalls—overmixing, uneven baking, and a crust that never cracks—and replaced them with techniques that lock in flavor and texture. From the moment the Oreo crumbs meet butter to the final swirl of white chocolate, each action is intentional, designed to elevate the cheesecake from a simple dessert to a showstopper. I dare you to taste this and not go back for seconds, because once you try it, you’ll never settle for anything else.
By the end of this guide, you’ll have a golden, decadent cheesecake that looks as stunning as it tastes. Let me walk you through every single step—by the time we’re finished, you’ll wonder how you ever made it any other way. Ready? Let’s dive in.
What Makes This Version Stand Out
- Texture: The crust is buttery and crisp, while the filling remains silky without being overly dense. The combination of double cream and cream cheese gives it a lightness that feels almost airy.
- Flavor Depth: Golden Oreos provide a caramelized, buttery sweetness that cuts through the richness of the cream cheese, while white chocolate adds a subtle, silky chocolate note.
- Visual Appeal: The glossy white chocolate drizzle on top creates a striking contrast against the golden crust, making it Instagram‑worthy.
- Ease of Prep: The recipe requires minimal equipment—just a food processor and a standard springform pan—yet delivers professional results.
- Make‑Ahead Friendly: You can assemble it the day before; the cheesecake will firm up in the fridge, and you’ll only need to finish the drizzle on the day of serving.
- Balanced Sweetness: The icing sugar is split between the crust and the filling, ensuring no single component overwhelms the others.
- Ingredient Quality: Using full‑fat cream cheese and fresh double cream elevates the flavor profile, giving the cheesecake a richer, more authentic taste.
- Audience Reaction: Friends and family will immediately recognize the classic Oreo flavor, but the twist of white chocolate will leave them asking for the recipe.
Alright, let's break down exactly what goes into this masterpiece.
Inside the Ingredient List
The Flavor Base
The foundation of this cheesecake starts with the golden Oreo crumbs. They deliver a caramelized, buttery sweetness that’s unmistakably nostalgic. When combined with melted butter, the crumbs develop a subtle crispness that sets the stage for the filling. If you skip the butter, the crust will feel dry and crumbly, lacking the buttery mouthfeel that makes it so inviting.
When selecting Oreos, opt for the original flavor; the golden color and buttery taste are essential. Avoid any flavored or sugar‑free variants, as they alter the balance and can result in an off‑sweetness that clashes with the creamy center. A quick tip: store the Oreos in an airtight container to keep them fresh and crisp before you crush them.
The Texture Crew
Full‑fat cream cheese is the star of the filling. Its high fat content ensures a silky, velvety texture that melts in your mouth. Using low‑fat or reduced‑fat versions will produce a denser, drier cheesecake that doesn’t have the same luxurious mouthfeel. If you’re watching calories, consider substituting part of the cream cheese with Greek yogurt, but be prepared for a slightly tangier flavor.
Double cream (heavy cream) is added in two stages: first for the crust, then for the filling. It introduces a subtle richness that balances the sharpness of the cream cheese. The 300 ml used for the crust gives the base a slight gloss, while the 200 ml in the filling keeps the mixture from becoming too thick. If you can’t find double cream, heavy whipping cream will work as a close substitute.
The Unexpected Star
White chocolate is the secret weapon that elevates this cheesecake beyond ordinary. Melted and drizzled over the top, it creates a glossy, almost metallic sheen that is impossible to resist. The mild cocoa flavor complements the Oreo’s caramel notes without overpowering the cream cheese. If you don’t have white chocolate, a blend of milk chocolate and cream can mimic the effect, though the finish will be slightly darker.
The amount of white chocolate matters: too little and the glaze will be thin, too much and it will dominate. I use 75 g, which melts smoothly into a thick, glossy drizzle. For a richer finish, consider adding a splash of vanilla extract to the melted chocolate.
The Final Flourish
Icing sugar is split between the crust (125 g) and the filling (1 tbsp). This dual use ensures that both layers are sweet enough to complement each other without becoming cloying. The sugar in the crust caramelizes slightly during baking, adding a subtle caramel flavor, while the sugar in the filling keeps the texture light and airy.
Vanilla extract is added twice: 2 tsp for the crust and 1 tsp for the filling. The double addition amplifies the vanilla aroma, tying the two components together. If you’re sensitive to alcohol, opt for a high‑quality vanilla bean paste; it delivers a cleaner, more robust vanilla flavor.
Everything's prepped? Good. Let's get into the real action.
The Method — Step by Step
-
First, preheat your oven to 160°C (325°F). Line a 23 cm springform pan with parchment paper, then lightly grease the parchment with a dab of butter. This ensures the cheesecake releases cleanly and the crust has a chance to crisp. While the pan is heating, crush 308 g of Golden Oreos into fine crumbs using a rolling pin or a food processor. The finer the crumbs, the smoother the crust.
-
In a mixing bowl, combine the Oreo crumbs with 100 g melted butter, 125 g icing sugar, and 300 ml double cream. Stir until the mixture looks like moist sand—no dry pockets should remain. This step is crucial; the butter binds the crumbs together, while the cream adds moisture that will caramelize slightly during baking. If you prefer a darker crust, you can add a pinch of sea salt.
-
Press the crumb mixture firmly into the bottom of the prepared pan, using the back of a spoon or a flat-bottomed glass. Create an even layer, about 1.5 cm thick. The crust should feel compact yet not overly dense; this balance will give it a delightful crunch when baked. Let the crust set for a few minutes while you start the filling.
-
In a large bowl, beat 750 g full‑fat cream cheese at medium speed until it’s smooth and free of lumps. Add 125 g icing sugar and 2 tsp vanilla extract, continuing to beat until the mixture is light and fluffy. The goal is a silky texture that will hold together when baked but still melt in your mouth. If you’re short on time, you can use a stand mixer with a paddle attachment.
-
Slowly fold in 200 ml double cream, one cup at a time, allowing each addition to be fully incorporated before adding the next. This gradual introduction keeps the batter from curdling and ensures a smooth, homogeneous filling. The cream adds a luxurious mouthfeel while keeping the cheesecake from becoming too dense.
-
Pour the cream cheese mixture over the prepared crust, smoothing the top with a spatula. The filling should be evenly spread, with no air pockets. This step is where the magic happens—the batter will rise slightly during baking, creating a perfect dome.
-
Bake in the preheated oven for 45 minutes. The cheesecake should appear set on top, with a faint golden hue, but the center should still have a gentle wobble when you shake the pan. This is the moment of truth; overbaking will make it dry, underbaking will leave it too runny. Keep a close eye on the edges—they should pull away slightly from the pan.
-
Turn off the oven, crack the door open, and let the cheesecake cool in the oven for an additional 30 minutes. This gentle cooling prevents cracks and ensures a smooth surface. Afterward, remove from the oven and let it cool completely on a wire rack. Once cooled, refrigerate for at least 4 hours, preferably overnight, to allow the flavors to meld and the texture to set.
-
While the cheesecake chills, melt 75 g white chocolate in a double boiler or microwave, stirring every 30 seconds until smooth. Add 1 tsp vanilla extract for a richer aroma. Cool the melted chocolate to room temperature; it should be thick enough to drizzle but still pourable. This step is optional but highly recommended for that glossy finish.
-
Before serving, drizzle the melted white chocolate over the top in a swirling pattern, letting it cascade down the sides. The chocolate will set into a glossy glaze, creating a stunning visual contrast against the golden crust. If you prefer a lighter touch, you can sprinkle a few extra Oreo crumbs on top for crunch.
-
Slice the cheesecake with a hot, wet knife for clean cuts, and serve immediately. The cheesecake’s creamy center will melt in your mouth, while the crust provides a satisfying crunch. Pair it with a cup of espresso or a glass of chilled milk for the ultimate indulgence.
That's it — you did it. But hold on, I've got a few more tricks that'll take this to another level.
Insider Tricks for Flawless Results
The Temperature Rule Nobody Follows
Keep your cream cheese at room temperature before mixing; this reduces the chance of lumps and ensures a silky filling. I usually let it sit out for 30 minutes. If you’re in a hurry, a quick microwave pulse of 10 seconds can soften it, but be careful not to overheat.
Why Your Nose Knows Best
During baking, the cheesecake will emit a sweet, buttery aroma that signals the crust is caramelizing. This is a reliable indicator that the base is done. Trust your nose; you’ll avoid the dreaded overbaked, rubbery texture.
The 5-Minute Rest That Changes Everything
After baking, let the cheesecake rest in the turned‑off oven for 30 minutes. This gentle cooling process prevents cracks and helps the filling set properly. I’ve seen people skip this step and end up with a lopsided, uneven cheesecake.
The Whisk vs. Hand Beat Debate
If you use a hand mixer, beat the cream cheese on low speed for 2 minutes, then increase to medium. Hand mixers often produce less foam than stand mixers, which is ideal for a dense cheesecake. A stand mixer can introduce too much air, causing the cheesecake to rise too quickly and crack.
The Secret Ingredient Swap
For a slightly tangier finish, add a tablespoon of lemon zest to the filling. The citrus brightens the flavor profile and balances the sweetness. I’ve tried it once, and the result was a subtle zing that surprised everyone.
Creative Twists and Variations
This recipe is a playground. Here are some of my favorite ways to switch things up:
Coconut Crunch Variation
Swap half of the Oreo crumbs for toasted shredded coconut. The coconut adds a tropical flavor and a pleasant chew. Keep the rest of the recipe unchanged for a balanced twist.
Dark Chocolate Drizzle
Use dark chocolate instead of white for a richer, more intense chocolate note. Melt 75 g dark chocolate with a splash of double cream for a glossy finish. The dark chocolate pairs wonderfully with the caramelized Oreo base.
Berry Burst Layer
Fold in 100 g of fresh blueberries into the cream cheese mixture before baking. The berries will burst in the middle, adding a burst of tartness that contrasts the sweetness. Chill the cheesecake for at least 6 hours for the berries to release their juices.
Spiced Pumpkin Twist
Add 2 tbsp pumpkin puree and a pinch of cinnamon to the filling. This version is perfect for fall gatherings and offers a comforting, seasonal flavor. The pumpkin adds moisture and a subtle sweetness.
Nutty Delight
Incorporate 50 g chopped walnuts into the crust. The nuts provide a crunchy texture that contrasts with the smooth filling. Toast the walnuts lightly before adding for extra flavor.
Lemon Zest Surprise
Add a tablespoon of lemon zest to the filling. The citrus brightens the flavor profile and adds a subtle zing that cuts through the richness. It’s a simple tweak that elevates the entire dessert.
Storing and Bringing It Back to Life
Fridge Storage
Cover the cheesecake tightly with plastic wrap and store it in the refrigerator for up to 5 days. The flavors will deepen, and the texture will firm up, making it even easier to slice. If you plan to serve it the next day, let it sit at room temperature for 30 minutes before cutting.
Freezer Friendly
Wrap the cheesecake in parchment paper, then in foil, and freeze for up to 3 months. Thaw overnight in the refrigerator before serving. The texture may be slightly denser after freezing, but the flavor remains intact.
Best Reheating Method
To revive a refrigerated or frozen cheesecake, place it on a baking sheet and bake at 80°C (175°F) for 10 minutes. This gentle reheating will restore the creamy texture without drying it out. Add a tiny splash of water to the filling before reheating; it steams back to perfection.