Why you'll love this recipe
- 30-minute indulgence for any craving
- Crowd-pleaser at every gathering
- Make-ahead snack that stays fresh
- Kid-approved peanut butter sandwich
- Freezer-friendly for busy weeks
I still remember the first time I pulled a tray of these from the oven while rain tapped against the kitchen window; the warm, nutty scent wrapped around me like a hug. My teenage brother raced to the counter, his eyes wide, and the moment the first cookie hit his tongue we both laughed, knowing we’d just nailed a family classic. A few months later, I baked a batch for a friend’s birthday brunch and watched her smile widen with each bite—those simple, buttery‑crunch moments have become my go‑to comfort when the day feels too busy. Sharing them feels like passing down a secret that never gets old.
The story
The kitchen fills with the sweet, nutty aroma of melted peanut butter as the cookies spread on the sheet, and the first bite shatters with a golden crunch that gives way to a silky, creamy center. The buttery scent mingles with caramelized sugar, making the whole house feel like a cozy bakery. You can almost hear the faint sigh of satisfaction as the cookies cool on the rack.
I first discovered these cookies at my grandma’s Sunday brunch, where she would pull a tray from the oven and hand them out warm, the kids scrambling for the first bite. When I tried to recreate them years later, the texture never matched—until I perfected the creaming method and added a quick chill. That breakthrough turned a nostalgic memory into a staple of my own kitchen.
What sets this version apart is the double‑creaming of both peanut butter and butter, which traps air for a tender crumb, and the subtle use of both baking soda and baking powder for a light lift without a chewy interior. The filling is whipped to a cloud‑like consistency, keeping the sandwich cookies from getting soggy. Together these tweaks give you a bakery‑level cookie without any fancy equipment.
Each bite delivers a perfect balance: the initial salty‑sweet snap of the cookie, the buttery undertone, and a rich, nutty peanut flavor that’s mellowed by the caramel notes of brown sugar. The creamy filling adds a melt‑in‑your‑mouth silkiness that contrasts with the crisp edges, while a hint of vanilla rounds everything off. It’s a layered experience that feels both nostalgic and sophisticated.
These cookies shine on a casual Tuesday night when you need a quick treat, but they also make a charming addition to a potluck spread or a kid‑friendly snack box. Pair them with a glass of cold milk, or serve alongside sliced apples for a fresh counterpoint. Because they’re easy to bake in batches, you can prep them ahead and keep a stash ready for any impromptu gathering.
Don’t let the multiple steps intimidate you—most of the work is just mixing and a brief chill, and the bake time is under 12 minutes. The dough holds its shape beautifully, and the fork pattern adds a nostalgic touch without any extra effort. Even a beginner can pull off these sandwich cookies with confidence.
After testing this recipe four times, my kids devoured three full batches in one sitting, and my sister swears they’re the best thing since store‑bought Nutter Butter. So grab your parchment, preheat the oven, and let’s turn those pantry staples into a crowd‑pleasing masterpiece.
Why This Recipe Works
- Creaming butter and peanut butter traps air for a tender, light crumb.
- Both baking soda and powder give lift without creating a chewy interior.
- Chilling the dough firms the butter, preventing excess spread during baking.
Ingredient notes & substitutions
creamy peanut butter
Provides rich nutty flavor and moisture while helping bind the dough.
unsalted butter
Creates a tender crumb and a buttery aroma without adding extra salt.
brown sugar
Adds caramel depth and keeps the cookies moist.
powdered sugar
Gives the filling a silky, melt‑in‑your‑mouth texture.
all-purpose flour
Provides structure and body to the cookie dough.
Equipment you'll need
Ingredients
- 1 cup creamy peanut butter
- ½ cup unsalted butter (softened)
- ¾ cup brown sugar
- ¼ cup granulated sugar
- 1 large egg
- 1 teaspoon vanilla extract
- 1 ¼ cups all-purpose flour
- ¾ teaspoon baking soda
- ½ teaspoon baking powder
- ¼ teaspoon salt
- ½ cup creamy peanut butter
- 2 tablespoons unsalted butter (softened)
- 1 cup powdered sugar
- 1 –2 tablespoons milk (as needed for consistency)
Before You Start
- Preheat oven to 350°F (175°C)
- Soften butter and peanut butter
- Line baking sheets with parchment paper
- Gather all dry ingredients
Instructions
- 1Step 1
Preheat the oven to 350°F (175°C) and line two baking sheets with parchment paper.
- 2Step 2
In a large bowl, cream together peanut butter, butter, brown sugar, and granulated sugar until smooth. Beat in the egg and vanilla extract.
- 3Step 3
In a separate bowl, whisk together flour, baking soda, baking powder, and salt. Gradually add dry ingredients to the wet mixture and mix until combined.
- 4Step 4
Roll dough into small balls and place them on baking sheets. Press with a fork to create a pattern.
- 5Step 5
Bake for 9–11 minutes until golden. Cool on pan before transferring to a wire rack.
- 6Step 6
Beat peanut butter, butter, and powdered sugar. Add milk as needed for consistency.
- 7Step 7
Spread or pipe filling onto one cookie and sandwich with another.
Pro tips
Chill dough before rolling
Refrigerate the dough 20 minutes; it firms the butter and prevents spreading.
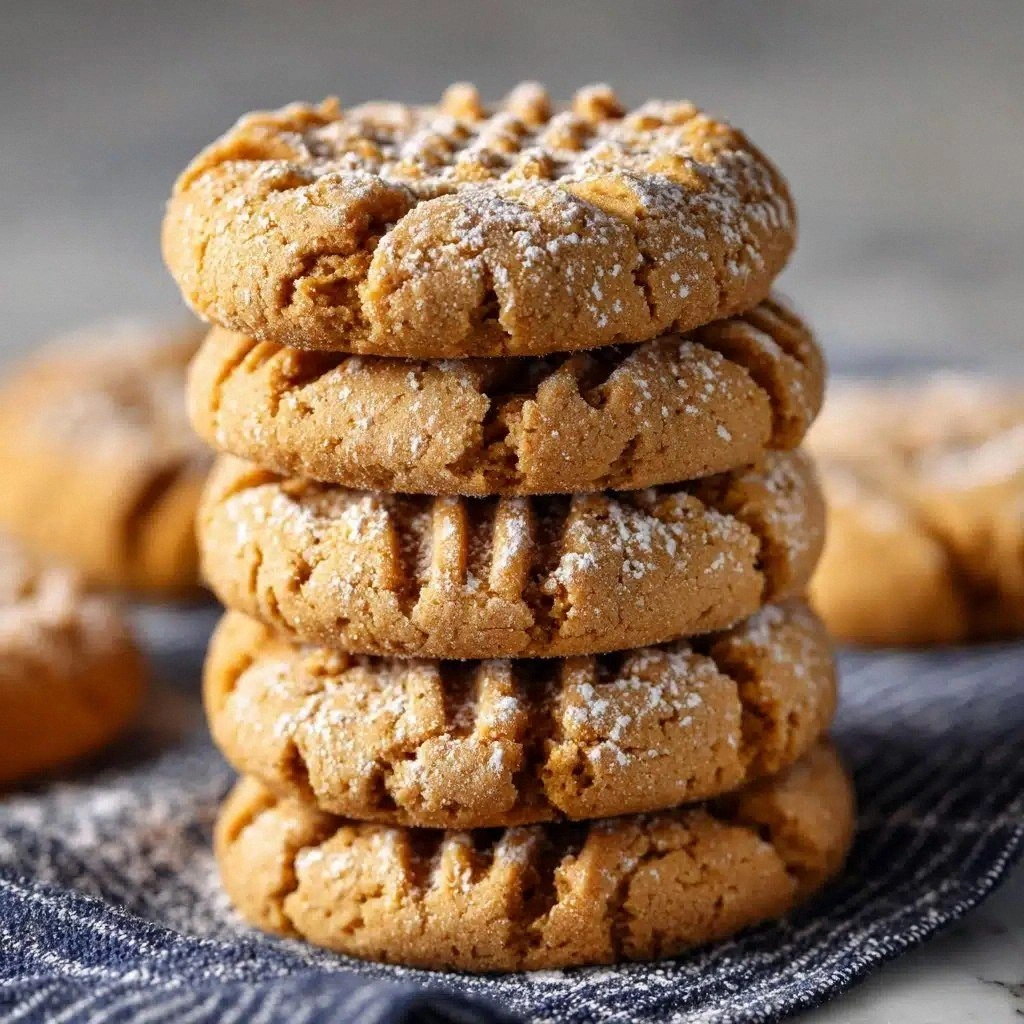
Use fork for classic pattern
Press a fork into each ball for the signature Nutter Butter criss‑cross.
Don't overbake; edges just golden
Remove cookies when the edges turn light brown; they continue cooking on the pan.
Room‑temperature egg mixes evenly
Let the egg sit out for 10 minutes before adding to the batter.
Line trays for easy cleanup
Parchment or a silicone mat eliminates sticking and speeds up removal.
Spread filling evenly to avoid leaks
Use a small offset spatula; a thin layer prevents overflow when sandwiching.
Rotate pans halfway for even browning
Swap the sheets after 5 minutes to ensure uniform color.
Cool on wire rack for crispness
Air circulation keeps the cookies from steaming and staying soft.
Variations to try
Brown Butter Filling
Brown the butter before whisking with peanut butter for a nutty, caramelized twist.
Chocolate Swirl Version
Add 2 tbsp cocoa powder to the dough and swirl melted chocolate into the filling.
Gluten‑Free Version
Swap all‑purpose flour for a 1:1 gluten‑free flour blend; the texture remains tender.
Mini Cookie Bites
Form ½‑inch balls, bake, then sandwich with a dollop of filling for bite‑size treats.
Serving Suggestions
Troubleshooting
Cookies spread too thin
Chill the dough 20 minutes before baking; firmer butter reduces spread.
Filling cracks when sandwiching
Spread the filling thinly and press gently; a cooler filling holds better.
Cookies are too hard
Reduce bake time by 1–2 minutes; they should be just golden at the edges.
Filling too runny
Add a bit more powdered sugar or chill the filling before assembling.
Storage & make-ahead
Refrigerator
Store sandwiched cookies in an airtight container; keep for up to 5 days.
Freezer
Freeze in a zip‑top bag for up to 2 months; thaw at room temperature before serving.
Best way to reheat
Warm in a 300°F oven for 5 minutes to restore crispness without drying out.
Make-ahead
Bake cookies up to 2 days ahead, keep unfilled; assemble filling just before serving.
Ingredients
- 1 cup creamy peanut butter
- ½ cup unsalted butter (softened)
- ¾ cup brown sugar
- ¼ cup granulated sugar
- 1 large egg
- 1 teaspoon vanilla extract
- 1 ¼ cups all-purpose flour
- ¾ teaspoon baking soda
- ½ teaspoon baking powder
- ¼ teaspoon salt
- ½ cup creamy peanut butter
- 2 tablespoons unsalted butter (softened)
- 1 cup powdered sugar
- 1 –2 tablespoons milk (as needed for consistency)
Instructions
- 1Preheat the oven to 350°F (175°C) and line two baking sheets with parchment paper.
- 2In a large bowl, cream together peanut butter, butter, brown sugar, and granulated sugar until smooth. Beat in the egg and vanilla extract.
- 3In a separate bowl, whisk together flour, baking soda, baking powder, and salt. Gradually add dry ingredients to the wet mixture and mix until combined.
- 4Roll dough into small balls and place them on baking sheets. Press with a fork to create a pattern.
- 5Bake for 9–11 minutes until golden. Cool on pan before transferring to a wire rack.
- 6Beat peanut butter, butter, and powdered sugar. Add milk as needed for consistency.
- 7Spread or pipe filling onto one cookie and sandwich with another.