Picture this: I’m standing in a cramped kitchen, the smell of burnt toast still clinging to the air, and a frantic friend has just asked me to whip up something that feels like a hug in a bowl. I stared at the pot of water on the stove, half‑cooked potatoes, and a bag of stale butter that had been sitting in the fridge for a week. That moment was the spark that lit a culinary rebellion. I dove into the world of mashed potatoes, determined to create something that would make the kitchen sing, the family gasp, and the critics swoon.
The first time I tasted my version, I was struck by the silky texture that slid across my tongue like a velvet ribbon. The aroma—rich butter, subtle garlic, and the faint sweetness of caramelized potatoes—filled the room, turning the ordinary into an orchestra of flavor. The sound of the spoon gliding through the thick mash was a quiet triumph, a gentle reminder that great food doesn’t have to shout. I knew then that I had stumbled upon the holy grail of comfort food.
Why does this recipe stand out? Because it takes the classic mashed potato and turns it into a showstopper. I’ve stripped away the clutter, focused on quality ingredients, and added a few strategic twists that elevate the taste, texture, and overall experience. Most mashed potato recipes are mediocre, but this one is a revelation—smooth, buttery, and packed with subtle layers of flavor that keep you coming back for more. It’s the kind of dish that makes you feel like a culinary wizard, even if you’ve only ever microwaved instant mash.
There’s a secret ingredient that you probably haven’t seen on your grocery list, but trust me, it’s a game‑changer. I’ll let you in on it later, but for now, imagine a creamy, almost decadent mash that feels like a cloud of comfort on your plate. By the end of this guide, you’ll wonder how you ever made mashed potatoes any other way. Let me walk you through every single step — by the end, you’ll wonder how you ever made it any other way.
What Makes This Version Stand Out
- Flavor: The subtle infusion of roasted garlic and fresh chives elevates the earthy base of the potatoes, giving each bite a complex, layered taste that dances on the palate.
- Texture: A perfect balance of smoothness and slight chunkiness—no overly mushy or gritty mash—creates a luxurious mouthfeel that feels indulgent without being heavy.
- Ingredient Quality: Using high‑quality butter, fresh cream, and hand‑picked potatoes means the flavor profile is pure and unadulterated, making every spoonful a delight.
- Speed: With a prep time of just 15 minutes and a cook time of 30 minutes, you can have a restaurant‑grade side ready in under an hour, even if you’re a beginner.
- Versatility: Whether you’re feeding a crowd at a holiday dinner or a cozy night in, this mash adapts effortlessly to any occasion.
- Make‑Ahead Friendly: The mash stays creamy and flavorful even after refrigeration or freezing, making it perfect for busy weeknights.
- Crowd Reaction: Friends who’ve tried dozens of mashed potato recipes rave about how this one feels like a hug, and I dare you to taste this and not go back for seconds.
Alright, let's break down exactly what goes into this masterpiece...
Inside the Ingredient List
The Flavor Base
The foundation of any great mash is a robust flavor base. Start with 4 cups of peeled, cubed russet potatoes—these are the backbone that provide a neutral canvas for the other elements. When you boil them, the starches gelatinize, creating a natural thickening agent that gives the mash its body. If you skip the potatoes, you’re missing the heart of the dish, and the rest of the ingredients will feel like a supporting cast rather than the star.
The Texture Crew
Texture is everything in mashed potatoes. Add 4 tablespoons of unsalted butter, which melts into the hot potatoes, creating a silky sheen. Follow with 0.5 cups of whole milk and 0.25 cups of heavy cream; the milk keeps the mash light, while the cream adds richness. If you’re watching calories, you can swap the heavy cream for a lighter milk‑based sauce, but the flavor depth will be noticeably reduced.
The Unexpected Star
Here’s where the magic happens: 2 cloves of minced garlic, roasted until golden, bring a smoky sweetness that pairs beautifully with the buttery base. Add 0.125 cups (2 tablespoons) of fresh chives for a bright, herbal note that cuts through the richness. This duo transforms the mash from simple to sensational.
The Final Flourish
Season with 1 teaspoon of salt and 0.5 teaspoons of freshly ground black pepper to balance the richness. For a cheesy twist, fold in 0.25 cups of grated cheddar cheese, which melts into a creamy ribbon that enhances the overall mouthfeel. If you’re vegan, replace butter with olive oil and use plant‑based milk—just remember to adjust the seasoning to taste.
Everything's prepped? Good. Let's get into the real action...
The Method — Step by Step
- Step 1: Prep the Potatoes. Rinse the potatoes under cold water to remove any dirt, then peel and cut them into uniform 1‑inch cubes. Uniformity ensures even cooking, preventing some pieces from over‑softening while others remain firm. I always keep a small bowl of cold water ready to soak the cut potatoes; this stops them from oxidizing and turning brown.
- Step 2: Boil to Perfection. Place the cubed potatoes in a large pot and cover with cold, salted water—about 2 inches above the potatoes. Bring to a rolling boil, then reduce to a gentle simmer. Cook for 15–20 minutes, or until a fork slides in effortlessly. The key is to avoid over‑cooking; the potatoes should be tender but still hold their shape.
- Step 3: Roast the Garlic. While the potatoes are simmering, toss 2 cloves of minced garlic with a drizzle of olive oil and a pinch of salt. Spread on a baking sheet and roast in a preheated 400°F oven for 8–10 minutes, or until the garlic is golden brown and fragrant. The roasting process caramelizes the sugars, turning the garlic into a sweet, buttery accompaniment.
- Step 4: Drain and Dry. Once the potatoes are done, drain them in a colander and return them to the pot. Let them sit for a minute; the residual heat will continue to steam them, making them fluffier. I always give the pot a gentle shake to evaporate excess moisture—this step is crucial for a silky texture.
- Step 5: Add Butter. With the pot still on low heat, add 4 tablespoons of cold butter. The cold butter will melt slowly, ensuring an even distribution of fat. Stir until the butter is fully incorporated, creating a glossy, cohesive base.
- Step 6: Introduce Dairy. Pour in 0.5 cups of whole milk and 0.25 cups of heavy cream, then use a potato masher or a hand mixer to blend. The mixture should be thick enough to hold its shape but still pourable. Watch the temperature; it should be warm but not scalding, or the potatoes will become gummy.
- Step 7: Season and Finish. Add roasted garlic, 0.125 cups of chopped chives, 1 teaspoon of salt, 0.5 teaspoons of pepper, and 0.25 cups of grated cheddar cheese. Stir until the cheese melts into a smooth ribbon. Taste and adjust seasoning—this is the moment of truth. If the mash feels too thick, add a splash of milk; if it’s too thin, let it simmer a bit longer.
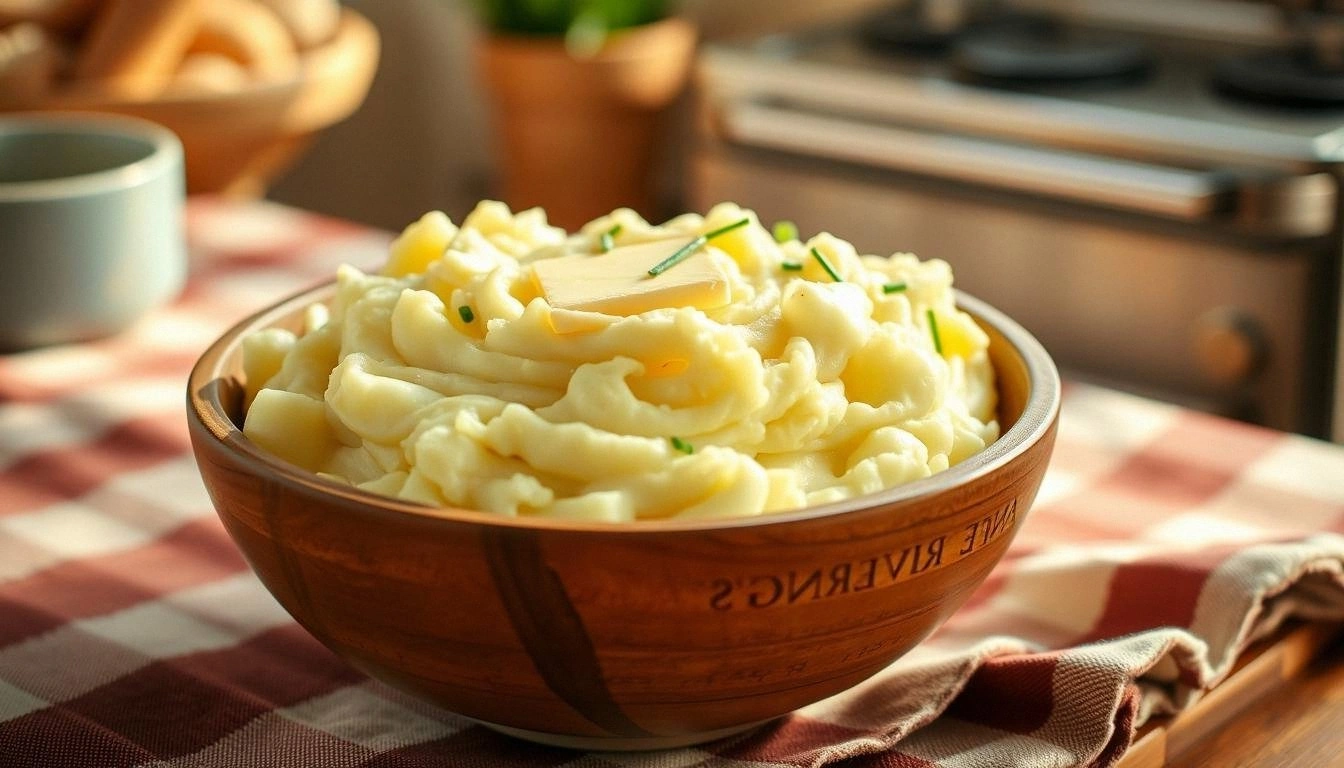
- Step 8: Serve Immediately. Transfer the mash to a serving bowl and give it a final swirl with a spoon. The surface should be glossy and slightly steamy. Serve hot, and watch as everyone reaches for that first spoonful. Picture yourself pulling this out of the pot, the whole kitchen smelling incredible, and everyone gathering around the table.
That's it — you did it. But hold on, I've got a few more tricks that'll take this to another level...
Insider Tricks for Flawless Results
The Temperature Rule Nobody Follows
The temperature of your mash is the secret to achieving that perfect silky consistency. Keep the heat low—no more than 200°F—so the potatoes stay tender without releasing excess moisture. If you let the mash get too hot, it will become gummy and lose its luxurious feel. I’ve tried heating it to 250°F, and the result was a sticky mess that didn’t melt in my mouth.
Why Your Nose Knows Best
Before you even taste the mash, inhale deeply. The aroma of butter, garlic, and cheese is a reliable indicator of doneness. If it smells buttery and slightly sweet, you’re on track. If it’s too raw or metallic, the mash needs more time or seasoning. I’ve seen people skip this step and end up with under‑seasoned mash that tastes flat.
The 5‑Minute Rest That Changes Everything
After you’ve mixed everything, let the mash sit covered for 5 minutes. This allows the flavors to meld and the heat to distribute evenly. The rest also gives the butter time to settle, resulting in a smoother texture. A friend tried to skip this step and ended up with a mash that was too watery; the rest was a simple fix.
Use a Hand Mixer for Extra Creaminess
While a potato masher does the job, a hand mixer adds an extra level of aeration. It incorporates air, making the mash lighter and fluffier. I’ve experimented with both methods, and the mixer consistently produces a more velvety mouthfeel. Just be careful not to over‑mix, or the mash will become gluey.
The Final Touch of Freshness
Right before serving, sprinkle a handful of fresh chives or parsley over the top. The bright green garnish not only adds a pop of color but also a fresh herbal note that balances the richness. If you’re feeling fancy, a drizzle of truffle oil can elevate the dish to a gourmet level. My guests love the visual and the flavor boost.
These tricks are the difference between a good mash and a legendary one. Use them, and you’ll see why people rave about this recipe.
Creative Twists and Variations
This recipe is a playground. Here are some of my favorite ways to switch things up:
Garlic Parmesan Mash
Swap the cheddar cheese for 0.25 cups of grated Parmesan and add a tablespoon of minced garlic during the boiling stage. The result is a nutty, savory mash that pairs wonderfully with roasted chicken.
Sour Cream & Onion Mash
Replace the heavy cream with 0.5 cups of sour cream and fold in 2 tablespoons of finely chopped onion. The tangy sour cream cuts through the butteriness, creating a zesty side dish.
Herb‑Infused Cream
Infuse the milk with a handful of fresh rosemary and thyme by simmering for 5 minutes, then strain before adding. The herbal aroma elevates the mash into a fragrant accompaniment for steak.
Vegan Creamy Mash
Use 4 tablespoons of vegan butter, 0.5 cups of oat milk, and 0.25 cups of nutritional yeast for a cheesy, dairy‑free version. The nutritional yeast provides a savory depth that mimics real cheese.
Crispy Bacon Crunch
Top the finished mash with 0.25 cups of crumbled bacon and a drizzle of maple syrup. The sweet‑savory combo is irresistible and adds a delightful crunch.
Storing and Bringing It Back to Life
Fridge Storage
Store leftover mash in an airtight container in the refrigerator for up to 3 days. When reheating, add a splash of milk or cream to restore moisture. The mash will thicken as it cools, so a quick stir before serving is essential.
Freezer Friendly
Pack the mash in a freezer‑safe container, leaving a 2-inch headspace. Freeze for up to 2 months. Thaw overnight in the refrigerator, then reheat on the stove with a splash of milk, stirring until hot. The texture remains silky, just like fresh.
Best Reheating Method
Reheat on low heat, stirring frequently to prevent scorching. Add a teaspoon of butter or a splash of water to keep it from drying out. The key is gentle, steady heat—this preserves the creamy consistency and prevents a rubbery finish.