Introduction
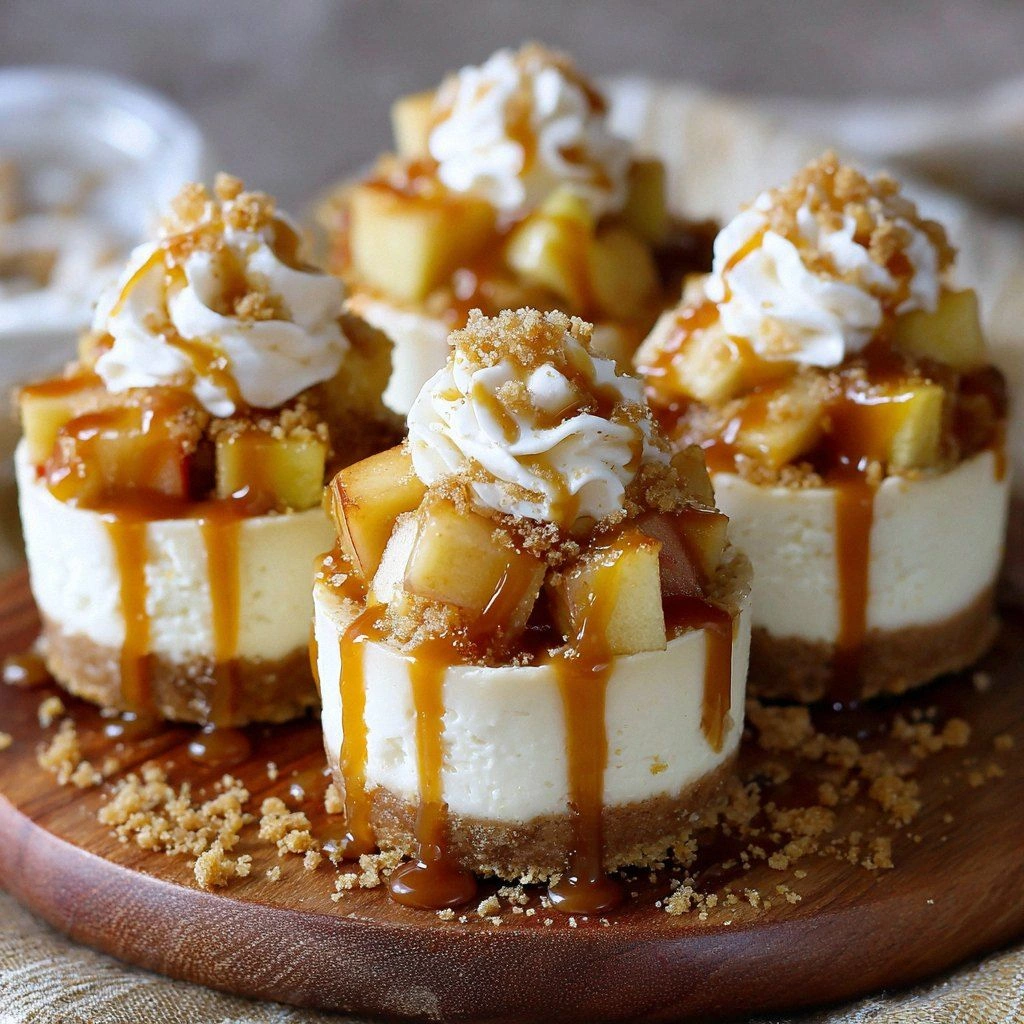
Picture this: I was halfway through a marathon of baking, the oven preheated, the dough already rolling on the counter, and I realized I had forgotten the caramel sauce that would tie everything together. The kitchen smelled like burnt sugar and disappointment, and my friends were already eyeing the dessert like it was a rare find. That moment of panic turned into a culinary epiphany, and I decided to make the most daring dessert I could: Salted Caramel Apple Pie Chees.
From the first sizzle of butter melting into a glossy base to the sweet, crisp bite of caramelized apples, this dish is a symphony of textures and flavors. The aroma of toasted cinnamon and nutmeg rises like a warm blanket, while the caramel sauce drizzles down the sides, coating the mixture like velvet. Every bite feels like a caramel-coated apple pie meets a silky cheesecake, creating a harmony that lingers on the palate. I dare you to taste this and not go back for seconds.
What makes this version stand out is the deliberate layering of flavors and the meticulous balance of sweet and salty. The apples are diced just so, retaining a slight crunch that contrasts the smooth cream cheese filling. The salted caramel isn’t just a glaze; it’s an integral part of the batter, infusing each bite with a depth that most recipes miss. Most recipes get this completely wrong, focusing on either the pie or the cheesecake, but here both shine in equal measure.
I confess I ate half the batch before anyone else got to try it. The first spoon was a revelation, and the second was a guilty pleasure. The combination of caramel, apples, and cream cheese felt like a secret handshake between comfort and indulgence. If you've ever struggled to find that sweet spot between dessert and dessert, you're not alone — and I've got the fix.
Picture yourself pulling this out of the oven, the whole kitchen smelling incredible, and the first bite feeling like a caramel-coated apple pie that melts into a silky cheesecake. Let me walk you through every single step — by the end, you'll wonder how you ever made it any other way.
What Makes This Version Stand Out
- Taste: The caramel sauce is infused into the batter, not just drizzled on top, giving every bite a rich, buttery sweetness balanced by a subtle sea salt finish.
- Texture: The apples maintain a slight bite, while the cheesecake base is light and airy, creating a contrast that feels both comforting and sophisticated.
- Simplicity: Despite the complexity of flavors, the recipe uses only a handful of ingredients and a single pan, making it approachable for beginners.
- Uniqueness: The combination of apple pie spices with a caramel cheesecake is a rare twist that sets this dish apart from standard desserts.
- Crowd Reaction: Friends who’ve tried this say the first bite is “wow, this is hands down the best version you'll ever make at home.”
- Ingredient Quality: Using fresh apples, high‑quality cream cheese, and real salted caramel sauce elevates the entire experience.
- Cooking Method: Baking in a single pan ensures even heat distribution and a caramelized top that’s both golden and crisp.
- Make‑Ahead Potential: This dessert can be prepared up to a day in advance, allowing the flavors to meld while saving time on the day of serving.
Alright, let's break down exactly what goes into this masterpiece...
Inside the Ingredient List
The Flavor Base
All-purpose flour and unsalted butter form the foundation of this dessert, creating a buttery crust that holds the filling together. The flour’s neutral flavor allows the caramel and apples to shine, while the cold butter creates a flaky texture when baked. Skipping the butter would leave the crust dry and crumbly, so keep it cold and cubed before mixing.
Brown sugar adds depth and a subtle molasses note that complements the caramel. It also helps the crust brown evenly. If you prefer a lighter color, swap for white sugar, but be prepared for a slightly less complex flavor profile.
Salt is essential for balancing the sweetness. A pinch of sea salt in the crust brings out the richness of the caramel without overpowering the dish. Too little salt and the dessert will taste flat; too much and it becomes briny.
The Texture Crew
Ground cinnamon and nutmeg are the spice duo that transports this dessert straight to a cozy kitchen. They provide warmth and depth, and their aromatic oils release during baking, infusing the batter with a comforting scent. If you’re allergic to nutmeg, you can replace it with allspice or omit it entirely.
Apples are the star of the show, diced into bite‑size pieces that maintain a slight crunch. Granny Smith or Honeycrisp work best because they hold their shape during baking. If you prefer a softer texture, peel the apples to reduce acidity.
Cornstarch acts as a thickening agent, ensuring the caramel sauce doesn’t run off the apples. It also gives the cheesecake a silky mouthfeel. If you’re gluten‑free, substitute with arrowroot or potato starch.
The Unexpected Star
Heavy cream adds richness and a silky texture to the cheesecake mixture. It also helps the caramel sauce emulsify, preventing separation during baking. A splash of half-and-half can lighten the batter if you’re watching calories.
Cream cheese is the backbone of the cheesecake component. It provides a tangy contrast to the sweet caramel and apples. Use full‑fat cream cheese for the best flavor; low‑fat versions will result in a thinner, less creamy filling.
Eggs bind the mixture together, giving the dessert structure. Two eggs are enough to set the filling without making it dense. If you’re vegan, use flaxseed meal or a commercial egg replacer.
The Final Flourish
Salted caramel sauce is the secret weapon that ties everything together. It’s poured into the batter before baking, allowing the flavors to meld. Use a high‑quality store‑bought or homemade caramel for the best taste.
Vanilla extract enhances the overall sweetness and adds a subtle floral note. A teaspoon is enough; too much vanilla can overpower the caramel.
Optional powdered sugar and whipped cream are for garnish. They add a sweet, airy finish that balances the richness of the core dessert.
Everything's prepped? Good. Let's get into the real action...
The Method — Step by Step
- Preheat your oven to 350°F (175°C). Line a 9-inch springform pan with parchment paper to prevent sticking. This is the moment of truth; the aroma of butter melting will already hint at the richness to come. Use a silicone baking mat on the parchment for extra protection.
- In a medium bowl, combine 2 cups all-purpose flour, 1 cup cold unsalted butter (cubed), 0.5 cup brown sugar, and 0.5 tsp salt. Use your fingertips to blend until the mixture resembles coarse crumbs. The cold butter creates a flaky crust that will hold the filling together.
- Press the crumb mixture into the bottom of the prepared pan, forming an even layer. Tap the pan gently on the counter to settle the crumbs. Bake for 10 minutes, until the edges are lightly golden. The crust should smell buttery, not raw.
- While the crust bakes, prepare the filling. In a blender, combine 4 diced apples, 2 tsp ground cinnamon, 1 tsp ground nutmeg, and 0.25 cup cornstarch. Blend until the apples are finely chopped but not pureed, preserving a slight bite. This step ensures the apples are evenly distributed and not clumped.
- In a separate bowl, beat 8 oz softened cream cheese until smooth. Add 1 tsp vanilla extract and 2 eggs, mixing until fully incorporated. The mixture should be silky and free of lumps.
- Fold the apple mixture into the cream cheese base, then pour in 1 cup heavy cream and 1 cup salted caramel sauce. Stir until the batter is homogeneous; the caramel should be fully blended, not floating on top. The batter should have a slight sheen.
- Pour the batter over the pre-baked crust, smoothing the surface with a spatula. The batter should rise slightly around the edges, forming a gentle lip. Place the pan in the oven and bake for 30 minutes, or until the top is set and the edges pull away from the pan.
- Remove from the oven and let cool to room temperature on a wire rack. Once cooled, refrigerate for at least 4 hours, preferably overnight, to allow the flavors to meld and the cheesecake to firm. This rest period is crucial for a perfect slice.
- Before serving, dust the top with 0.5 cup powdered sugar and garnish with 0.5 cup whipped cream if desired. Slice with a hot knife for clean edges. The final bite should be creamy, caramel‑sweet, and apple‑spiced, with a hint of sea salt lingering.
That's it — you did it. But hold on, I've got a few more tricks that'll take this to another level...
Insider Tricks for Flawless Results
The Temperature Rule Nobody Follows
Many bakers bake the crust at a higher temperature, but the key to a buttery, flaky base is a moderate 350°F. This allows the butter to melt slowly, creating steam pockets that puff the crust without over‑browning. If you’re using a convection oven, lower the temperature by 25°F to avoid scorching.
Why Your Nose Knows Best
During the 10‑minute crust bake, listen for the subtle shift from raw to golden. Your nose can detect the caramelization of the butter, signaling the perfect moment to flip the crust. If you’re unsure, use a light touch on the edge; if it feels slightly firm, it’s ready.
The 5‑Minute Rest That Changes Everything
After removing the cheesecake from the oven, let it rest on a wire rack for 5 minutes before cooling. This brief pause allows the heat to distribute evenly and prevents a sudden drop that could cause cracking. It also lets the caramel sauce set slightly, making slicing cleaner.
Keep the Crust from Drying Out
Cover the crust loosely with foil during the final 5 minutes of baking. This traps moisture and prevents the edges from becoming too hard. Once the batter is set, remove the foil to let the top brown slightly.
Use a Warm Water Bath for Even Baking
Place the springform pan in a larger baking dish filled with about an inch of hot water. This water bath ensures that the cheesecake cooks evenly, preventing the edges from over‑baking while the center remains under‑done.
Make It a Crowd‑Pleaser
When serving, cut the cheesecake into small, bite‑size squares rather than traditional wedges. This presentation allows guests to sample multiple flavors in one bite and keeps portions manageable for those who love a little indulgence without the commitment.
Creative Twists and Variations
This recipe is a playground. Here are some of my favorite ways to switch things up:
Caramel Apple Crumble Cheesecake
Swap the butter crust for a crumble topping made from oats, flour, brown sugar, and melted butter. The crumble adds a crunchy contrast that feels like a dessert on a dessert.
Spiced Orange Caramel Chees
Add zest from one orange to the batter and replace the apples with diced dried apricots. The citrus brightens the caramel, creating a refreshing twist.
Chocolate‑Caramel Fusion
Fold in 1/2 cup dark chocolate chips into the batter. The chocolate deepens the flavor profile and pairs beautifully with the caramel.
Low‑Sugar Version
Use a sugar substitute like stevia or monk fruit in place of the brown sugar. Keep the caramel sauce as is, as it already contains natural sugars.
Vegan Adaptation
Replace the cream cheese with a coconut cream cheese alternative, use aquafaba instead of eggs, and swap salted caramel for a vegan caramel sauce.
Mini Cheesecake Cups
Instead of a springform pan, bake the batter in a muffin tin for individual servings. The mini cups are perfect for parties or as a sweet snack.
Storing and Bringing It Back to Life
Fridge Storage
Wrap the cheesecake tightly in plastic wrap and store in the refrigerator for up to 5 days. The caramel and apples will keep their moisture, and the cheesecake will stay firm.
Freezer Friendly
Freeze the cheesecake for up to 2 months. Before freezing, slice and wrap each piece individually. When ready to serve, thaw overnight in the fridge.
Best Reheating Method
To reheat, place a slice in a microwave-safe dish and cover with a paper towel. Warm on medium for 30–45 seconds, or until the center is just heated. Add a tiny splash of water before reheating to steam back to perfection.