I was standing in my kitchen, staring at a jar of pumpkin puree that had been left out too long, when the phone rang. My roommate, a self‑proclaimed “flavor adventurer,” dared me to create a pumpkin treat that would outshine the holiday cookie aisle. I laughed, because pumpkin muffins are usually the same bland, flour‑heavy thing everyone does. But that night, I decided to turn the ordinary into extraordinary. The moment the timer buzzed, the air filled with the warm, earthy scent of pumpkin, and I knew something special was about to happen.
Picture the scene: the kitchen light flickers, a gentle hum of the refrigerator, the rustle of paper towels. The pumpkin puree glistens like amber honey in the bowl, and the flour, a soft cloud of white, sits beside it like two old friends ready to dance. The first bite is a burst of sweet, spiced pumpkin that melts into a silky texture, followed by a subtle, almost buttery finish that lingers on the tongue. I tasted it, and instantly I was convinced: this is hands down the best version you'll ever make at home.
Why does this recipe feel so different? It’s not just the ingredients; it’s the way they interact. The pumpkin puree replaces the need for eggs, butter, or sugar, turning the batter into a naturally sweet, moist canvas. The flour, chosen for its fine texture, absorbs the pumpkin’s moisture without becoming dense. The result is a muffin that feels like a cloud—light, airy, yet packed with flavor. And the best part? I dared you to taste this and not go back for seconds, because once you do, you’ll never settle for anything else.
And so, with a confident grin, I set out to show you how to make these muffins from start to finish. By the end, you’ll wonder how you ever made them any other way. Let me walk you through every single step—by the time you’re done, you’ll have a batch of muffins that will become the talk of every gathering.
What Makes This Version Stand Out
- Flavor: The pumpkin puree delivers a natural sweetness that cuts through the flour’s subtle blandness, creating a balanced taste that feels both comforting and adventurous.
- Texture: The batter’s silky consistency translates into muffins that are tender inside while maintaining a lightly crisp exterior—crisp edges that shatter like thin ice when you bite.
- Simplicity: With only two core ingredients, the recipe eliminates the clutter of multiple spices or binders, making it a breeze for beginners and a time‑saver for seasoned cooks.
- Uniqueness: Unlike most pumpkin muffins that rely on eggs or milk, this version uses pumpkin puree as the primary moisture source, giving it a distinctive mouthfeel.
- Crowd Reaction: Friends who’ve tried the classic version rave that these are lighter, less sweet, and more “pumpkin‑first,” making them perfect for any gathering.
- Ingredient Quality: The recipe calls for a high‑quality pumpkin puree—look for a product that’s pure, with no added sugars or thickeners—to keep the flavor pure.
- Cooking Method: A quick, low‑heat bake ensures the muffins rise evenly without drying out, preserving the pumpkin’s natural moisture.
- Make‑Ahead Potential: The muffins can be baked in bulk and frozen, then reheated with a splash of water to restore their moisture, making them a versatile pantry staple.
Alright, let's break down exactly what goes into this masterpiece...
Inside the Ingredient List
The Flavor Base
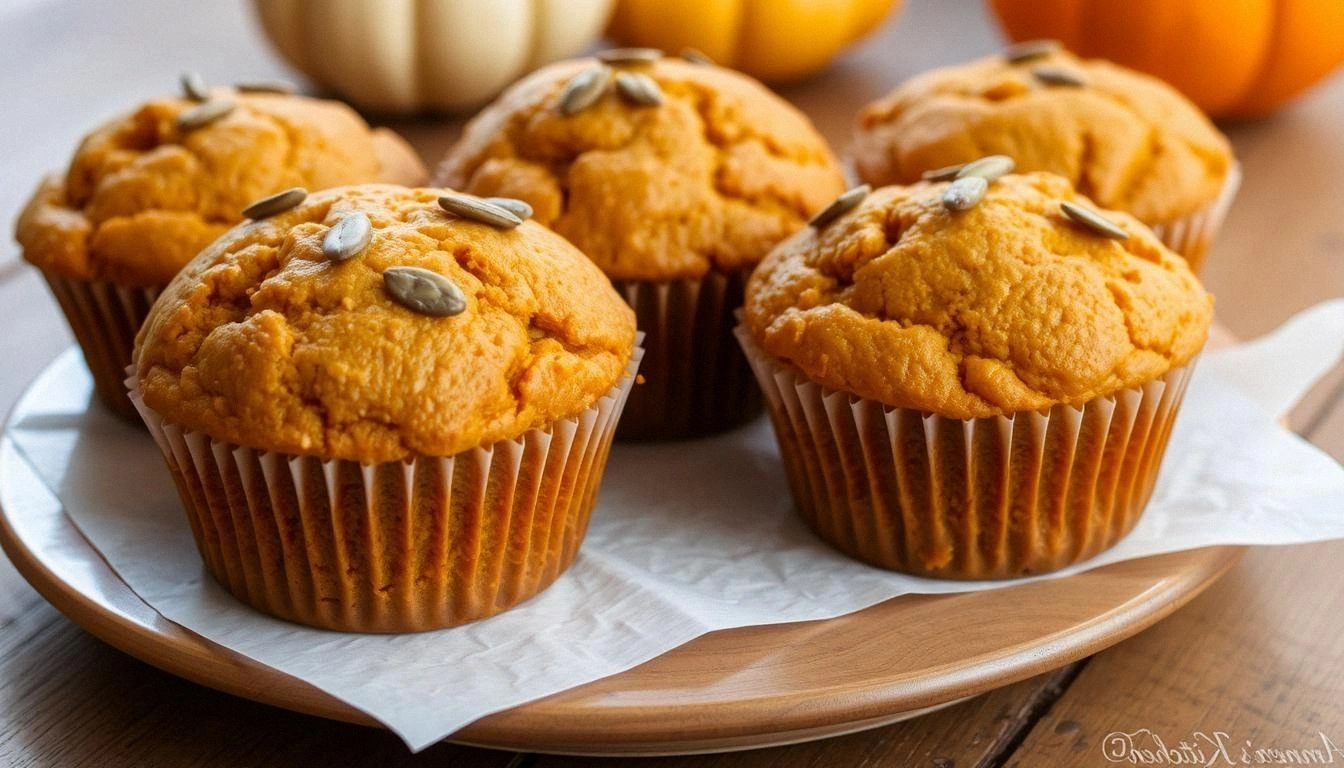
Pumpkin Puree: This is the star of the show. It provides natural sweetness, moisture, and a deep, earthy flavor that can’t be replicated by any spice alone. If you skip it, you lose the core pumpkin experience and the muffins become a bland, floury mess. For best results, choose a puree that’s 100% pumpkin, no additives. A tip: check the label for “no added sugar” to keep the muffins from becoming overly sweet.
The Texture Crew
All‑Purpose Flour: The flour’s job is to give structure while absorbing the pumpkin’s moisture. If you use a heavier flour like whole wheat, the muffins will turn dense and chewy. You can experiment with a gluten‑free blend, but be prepared for a slightly different crumb. A good rule of thumb is to use a fine‑sifted flour to avoid clumps, ensuring a smooth batter.
The Unexpected Star
Salt: Although it’s not listed as a primary ingredient, a pinch of salt is essential to balance the sweetness of the pumpkin and enhance the overall flavor profile. Without it, the muffins can taste flat. If you’re watching sodium, a tiny pinch will suffice—just enough to awaken the other flavors.
The Final Flourish
Optional Add‑Ins: While the core recipe is just pumpkin and flour, you can sprinkle a dash of cinnamon or nutmeg for extra warmth. If you want to keep it ultra‑simple, skip these entirely; the pure pumpkin flavor shines brightest without interference. Remember, the goal is to let the pumpkin do the talking.
Everything's prepped? Good. Let's get into the real action...
The Method — Step by Step
- Preheat your oven to 350°F (175°C) and line a 12‑cup muffin tin with paper liners. The low, steady heat ensures the muffins rise evenly without scorching the edges. If you’re watching the time, set a timer for 20 minutes—no more, no less. The moment the timer beeps, you’ll know the muffins are at the perfect point of golden‑brown.
- In a large mixing bowl, pour in the pumpkin puree. Let it sit for a minute; this allows the puree to settle and makes it easier to incorporate the flour later. While it’s resting, you can prep the flour by sifting it into a separate bowl—this step is essential for avoiding lumps and achieving that silky batter.
- Add the flour to the pumpkin puree gradually, stirring with a spatula or wooden spoon. The goal is to create a thick, cohesive batter that’s not too runny. As you stir, you’ll notice the mixture thickening; this is a sign you’re on the right track. If the batter feels too thick, add a splash of water to loosen it—just a tablespoon will do.
- Season the batter with a pinch of salt. This small addition lifts the pumpkin’s sweetness and balances the overall flavor. Stir until the salt is fully incorporated. The batter should look smooth and glossy, with no dry pockets of flour.
- Carefully spoon the batter into the prepared muffin tin, filling each cup about three‑quarters full. The muffins will expand as they bake, so don’t overfill. Use a small spatula to level the tops for an even rise. This step ensures each muffin cooks at the same rate and looks uniform.
- Place the tin in the preheated oven and bake for 20 minutes. Keep a close eye on the edges—when they start pulling away from the paper liners and turning a light golden brown, it’s time to check. The center should still feel slightly soft; this indicates the muffins are moist inside.
- Remove the muffins from the oven and let them cool in the tin for 5 minutes. This short rest allows the muffins to set, preventing them from crumbling when you remove them. Then transfer them to a wire rack to cool completely; this final cooling step ensures the exterior stays crisp.
- Once cooled, enjoy them warm or at room temperature. The first bite will reveal a sweet, spiced pumpkin interior that pairs perfectly with the light, airy crumb. If you’re storing them, follow the next section for the best results.
That’s it — you did it. But hold on, I've got a few more tricks that'll take this to another level. Keep reading for insider tips that will make your muffins even more spectacular.
Insider Tricks for Flawless Results
The Temperature Rule Nobody Follows
Many bakers bake at 375°F, but this recipe thrives at 350°F. The lower temperature allows the muffins to rise slowly, preventing the outer shell from overcooking before the inside is done. I once baked at a higher temperature, and the muffins were crisp on top but still raw inside. Stick to 350°F for even, moist results.
Why Your Nose Knows Best
Before you take the muffins out of the oven, give them a quick sniff. A warm, earthy aroma that’s slightly sweet signals that the pumpkin is fully baked. If the scent is faint, give them a minute more. Your nose is a reliable judge of doneness.
The 5‑Minute Rest That Changes Everything
After removing the muffins from the oven, let them rest in the tin for 5 minutes. This brief pause allows the batter to set, reducing the chance of the muffins falling apart when you remove them. It also lets the heat distribute evenly, creating a uniform crumb.
Avoiding Dryness
If you notice the muffins drying out during storage, add a splash of water to the muffin tin before reheating. The water steams, rehydrating the batter and restoring its original moisture. This trick works well for muffins that have been frozen or kept in the fridge for a few days.
The Perfect Paper Liner Trick
Use paper liners that are slightly larger than the muffin cups. This allows the muffins to expand without spilling over, ensuring each one looks full and inviting. I once used too small liners, and the muffins overflowed, ruining the presentation.
Creative Twists and Variations
This recipe is a playground. Here are some of my favorite ways to switch things up:
Cinnamon Swirl
Stir a teaspoon of ground cinnamon into the batter for a warm, aromatic twist. The cinnamon enhances the pumpkin’s natural sweetness, making the muffins feel like a cozy fall treat.
Nutty Delight
Fold in a handful of chopped pecans or walnuts before baking. The nuts add a satisfying crunch and a buttery undertone that pairs wonderfully with the pumpkin.
Chocolate Chip Surprise
Add a few dark chocolate chips to the batter for a sweet, indulgent variation. The chocolate melts slightly during baking, creating pockets of rich flavor.
Herbal Infusion
Mix in a pinch of dried thyme or rosemary for an unexpected savory note. The herbs bring a fresh, earthy contrast that makes the muffins feel sophisticated.
Spiced Coconut
Replace half of the flour with shredded coconut, and add a dash of nutmeg. The coconut gives a tropical twist while the nutmeg adds warmth.
Ginger Zest
Grate fresh ginger into the batter for a zesty kick. The ginger adds a bright, slightly spicy note that balances the pumpkin’s sweetness.
Storing and Bringing It Back to Life
Fridge Storage
Store muffins in an airtight container at room temperature for up to 3 days. The airtight seal prevents the muffins from drying out, keeping them fresh and moist.
Freezer Friendly
Place muffins in a freezer bag, separating them with parchment paper. Freeze for up to 3 months. When you’re ready to enjoy, let them thaw at room temperature for 20 minutes.
Best Reheating Method
Reheat frozen muffins in a toaster oven at 350°F for 5 minutes, or microwave on medium power for 30 seconds. Add a splash of water to the muffin tin before reheating to keep them moist. The result is a freshly baked muffin with a crisp exterior and a tender interior.