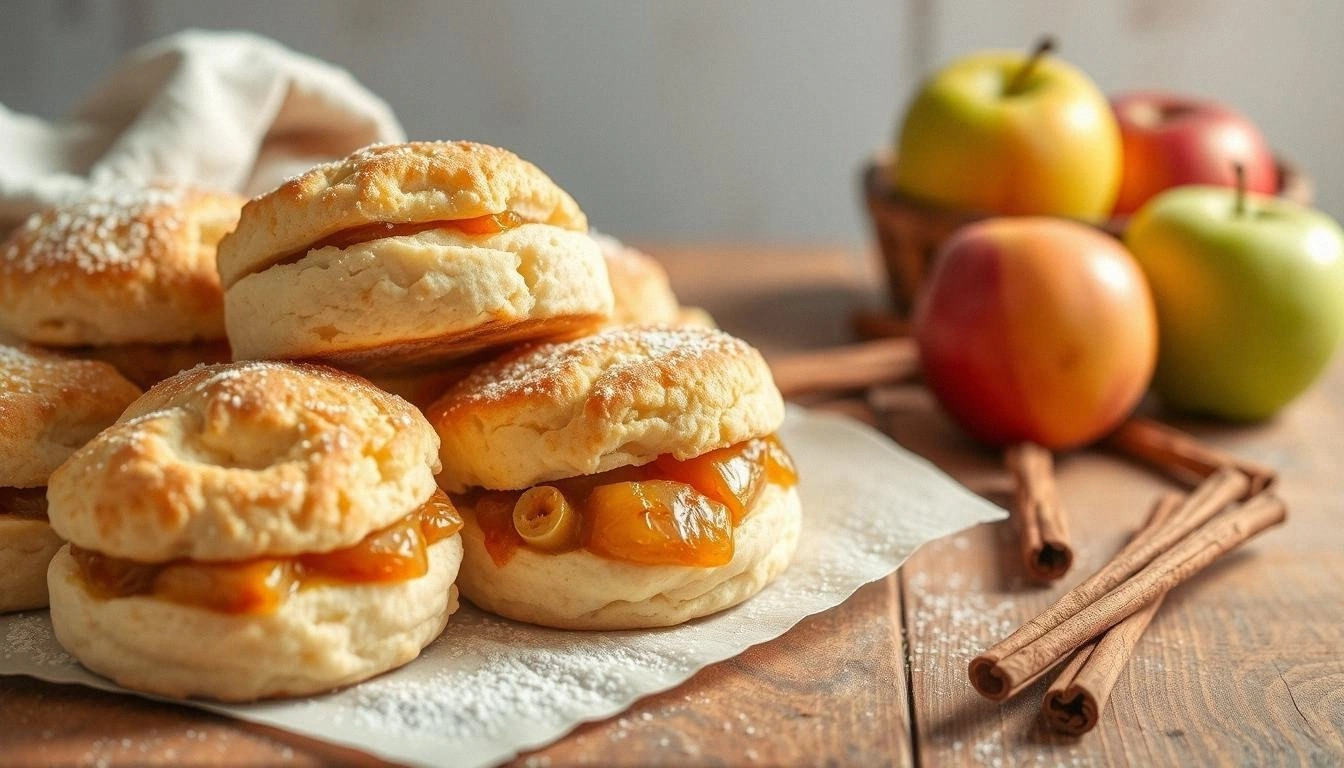
I was halfway through a midnight snack run, the fridge humming like a sleepy dragon, when I discovered the most glorious kitchen catastrophe. A bag of Pillsbury Butter Tastin’ biscuits lay abandoned on the counter, their buttery scent mingling with the sweet perfume of a fresh apple pie filling that had been left to cool. I stared at the abandoned biscuit dough and thought, “What if I could turn this into something that feels like a slice of pie but is quicker, easier, and just as addictive?” I took the biscuits, the apple filling, a sprinkle of brown sugar, and a dash of cinnamon, and the result was a revelation that would change my snack game forever. That night, as the biscuits sizzled in a pan, I tasted the first bite and felt the world shift: the buttery crunch met the caramelized apple, and the cinnamon sang like a lullaby. I was so convinced that this was a recipe worth sharing that I called my friend and said, “I dare you to taste this and not go back for seconds.”
Picture yourself pulling these golden treasures from the oven, the whole kitchen smelling of butter, apples, and a whisper of nutmeg. The moment you break the crust, steam curls like a tiny cloud of cinnamon, and a sweet glaze drips onto the parchment, glistening like a sugary river. The first bite is a paradox of textures: the biscuit is flaky and buttery, the apple filling is soft and slightly caramelized, and the glaze adds a glossy, sugary sheen that coats the palate like velvet. The aroma is so intoxicating that it will have you reaching for a second, then a third, and before you know it, you’ll be humming the kitchen song that plays whenever something delicious is about to happen.
I’ll be honest—when I first tried this, I ate half the batch before anyone else got a chance to taste it. That’s because this version is hands down the best version you'll ever make at home. It’s simple enough that even a novice can master it, yet it’s packed with flavor complexity that would make a seasoned pastry chef nod in approval. The secret? A perfect balance of biscuit dough, a homemade glaze that’s not too sweet, and a store‑bought cream cheese icing that adds a creamy, tangy counterpoint. Most recipes get this completely wrong by over‑baking the biscuits or under‑seasoning the apple filling, but here, everything works in harmony. If you've ever struggled with making a dessert that’s both quick and satisfying, you're not alone—and I've got the fix.
Okay, ready for the game‑changer? Let me walk you through every single step—by the end, you'll wonder how you ever made it any other way. From the first whisk to the final glaze drizzle, I’ll keep you side by side, sharing micro‑challenges, bold claims, and a few kitchen hacks that will elevate the experience. Trust me, this is the kind of recipe that turns a simple afternoon into a culinary celebration. And if you’re ready to taste the ultimate apple pie biscuit, then let’s dive in.
What Makes This Version Stand Out
- Flavor Depth: The combination of apple pie filling and a subtle glaze creates a taste profile that feels like a slice of pie without the fuss.
- Texture Contrast: The biscuits are buttery and flaky, while the apple filling adds a moist, caramelized center that gives every bite a satisfying bite.
- Time Efficiency: With pre‑made biscuits and a quick glaze, you can have a dessert ready in less than 30 minutes.
- Ingredient Simplicity: Only nine ingredients, all pantry staples or quick to find, mean less prep and less cleanup.
- Make‑Ahead Friendly: The biscuits bake ahead and stay crisp for up to a week when stored in an airtight container.
- Scalable: Whether you’re cooking for two or eight, the recipe scales up or down without compromising flavor.
- Visual Appeal: The glossy glaze and dusting of cinnamon make these biscuits look as good as they taste.
- Versatile Pairings: Serve them with coffee, tea, or a splash of milk for a comforting breakfast or a sweet snack.
Inside the Ingredient List
The Biscuit Base
Canned biscuits are the foundation of this recipe. They’re pre‑flavored with butter and have a light, airy crumb that crumbles just enough to hold the apple filling. The key to a perfect biscuit is choosing a brand with a buttery, slightly sweet flavor—Pillsbury Butter Tastin’ or Grands are my go‑to choices. If you’re feeling adventurous, you can use a homemade biscuit dough, but the time saved with canned biscuits is worth it.
The Apple Core
Apple pie filling or fresh apples form the sweet, tart center. If you opt for fresh apples, choose firm varieties like Honeycrisp or Granny Smith to maintain structure during baking. Dice the apples into small, even pieces so they cook uniformly. Fresh apples add a bright, crisp flavor that pairs beautifully with the warm spices. If you’re in a hurry, the canned filling works perfectly, delivering the same flavor profile without prep time.
The Sweet & Spice Layer
Brown sugar, cinnamon, nutmeg, and vanilla extract create a fragrant, caramelized glaze that coats each biscuit. Brown sugar adds depth and a hint of molasses, while cinnamon and nutmeg provide warmth and complexity. Vanilla extract ties everything together with a subtle sweetness. Together, they form a glaze that’s glossy, not syrupy—just enough to enhance the biscuit’s buttery base.
The Final Flourish
Unsalted butter is melted and brushed over the biscuits before glazing, which adds a shiny finish and extra buttery flavor. The homemade glaze—powdered sugar and heavy cream—provides a sweet, silky coat that sets into a gentle crust. Store‑bought cream cheese icing adds a tangy, creamy finish that balances the sweetness and gives a professional finish. Each element is essential; skipping any will change the texture or flavor profile significantly.
Everything's prepped? Good. Let's get into the real action and watch the magic happen.
The Method — Step by Step
- Preheat your oven to 375°F (190°C). Line a baking sheet with parchment paper to prevent sticking. Arrange the biscuit dough on the sheet, spacing them about 2 inches apart. This spacing allows the biscuits to expand slightly without merging into one another.
- Bake the biscuits for 12–15 minutes, or until they’re golden brown and puffed. The first time you try this, keep a close eye on the edges; they should pull away from the parchment when they’re done. The scent of butter and baking will fill your kitchen, making the anticipation almost unbearable.
- While the biscuits are baking, prepare the glaze. In a small bowl, whisk together 1/4 cup brown sugar, 1 teaspoon ground cinnamon, 1/4 teaspoon nutmeg, and 1 teaspoon vanilla extract until the sugar is fully dissolved. The mixture should have a smooth, syrupy consistency.
- Remove the biscuits from the oven and let them cool for a minute. While still warm, drizzle the glaze over the top of each biscuit, allowing it to soak into the flaky layers. The glaze will set into a subtle crust as the biscuits cool, creating a glossy finish.
- If you’re using fresh apples, now is the time to fold them into the glaze. Dice 2 medium apples into small cubes and gently stir them into the glaze mixture. The apples will soften slightly from the heat of the biscuits, creating a warm, caramelized center.
- For the final flourish, prepare the cream cheese icing. In a small bowl, mix 1/4 cup store‑bought cream cheese icing with 1 tablespoon of melted butter until smooth. Drizzle or pipe the icing over the cooled biscuits for a creamy, tangy contrast that balances the sweet glaze.
- Serve immediately while they’re warm and the glaze is still slightly glossy. If you prefer a cooler bite, let them sit for a few minutes before serving. These biscuits are best enjoyed fresh, but they can be reheated in a 350°F oven for 5 minutes to restore warmth and crispness.
- Enjoy! Pair them with a cup of hot cocoa or a glass of cold milk to complement the buttery, apple-infused flavor. If you’re feeling adventurous, sprinkle a pinch of sea salt over the glaze for a sweet‑savory twist that will elevate the experience.
That's it—you did it. But hold on, I've got a few more tricks that'll take this to another level.
Insider Tricks for Flawless Results
The Temperature Rule Nobody Follows
Many bakers bake biscuits at a lower temperature to avoid over‑browning. I’ve found that baking at 375°F (190°C) gives the best rise and a crisp crust. The heat is high enough to create steam inside the dough, which puffs the biscuits, yet low enough to keep the edges from burning. Keep the oven preheated for at least 15 minutes before placing the biscuits inside.
Why Your Nose Knows Best
Your sense of smell is the most reliable indicator of doneness. As the biscuits bake, the aroma of butter and caramelized sugar will fill the room. When the smell is rich and slightly nutty, the biscuits are ready. Don’t rely solely on the timer—every oven behaves differently, and the scent will tell you when to pull them out.
The 5-Minute Rest That Changes Everything
After baking, let the biscuits rest for five minutes on the parchment. This brief pause allows the steam to settle, resulting in a more tender crumb. It also gives the glaze time to set into a thin, glossy crust that won’t run off when you drizzle the icing.
Brushing with Butter for Extra Shine
A quick brush of melted butter over the tops of the biscuits before glazing adds a sheen that looks as good as it tastes. The butter also creates a barrier that keeps the glaze from soaking too deeply into the biscuit, preserving the flaky texture.
Glaze Consistency Matters
If your glaze is too thick, it will drip and create a sticky mess. If it’s too thin, it won’t coat the biscuits evenly. Aim for a consistency that pours like honey but still holds its shape when drizzled. A splash of warm milk or water can help you achieve the perfect thickness.
Storing for Freshness
Store leftover biscuits in an airtight container at room temperature for up to a week. If they begin to lose their crispness, place them in the oven at 350°F (175°C) for 5 minutes to revive the texture. For longer storage, freeze them for up to three months and thaw at room temperature before reheating.
Creative Twists and Variations
This recipe is a playground. Here are some of my favorite ways to switch things up:
Nutty Apple Bisc
Add a handful of chopped walnuts or pecans to the glaze for a crunchy, nutty flavor that complements the apple. Toast the nuts beforehand to bring out their natural oils.
Citrus Burst
Zest a lemon or orange into the glaze for a bright, citrusy contrast that lifts the sweetness. The zest adds a fresh aroma that pairs beautifully with the warm spices.
Chocolate Drizzle
Drizzle melted dark chocolate over the glazed biscuits for a decadent twist. The bittersweet chocolate balances the apple’s sweetness and adds a glossy finish.
Maple Syrup Twist
Replace the brown sugar in the glaze with an equal amount of pure maple syrup for a richer, caramel-like flavor. The maple also deepens the color of the glaze.
Spiced Rum Infusion
Stir a teaspoon of dark rum into the glaze for an adult version. The rum adds depth and a subtle warmth that makes the biscuits perfect for a cozy evening.
Vegan Version
Use vegan biscuits and replace the butter with coconut oil. Swap the cream cheese icing for a vegan whipped topping made from coconut cream.
Storing and Bringing It Back to Life
Fridge Storage
Place the biscuits in an airtight container or zip‑top bag and store them in the refrigerator for up to 3 days. The cold environment helps maintain the buttery crumb and prevents the glaze from softening too quickly.
Freezer Friendly
Wrap each biscuit individually in parchment paper and place them in a freezer bag. Freeze for up to 3 months. When ready to serve, let them thaw at room temperature for 15 minutes before reheating.
Best Reheating Method
To restore crispness, preheat a 350°F oven and bake the biscuits for 5 minutes. If you want a softer interior, microwave on high for 15 seconds, then finish in the oven. Add a tiny splash of water before reheating to create steam and keep the biscuits moist.