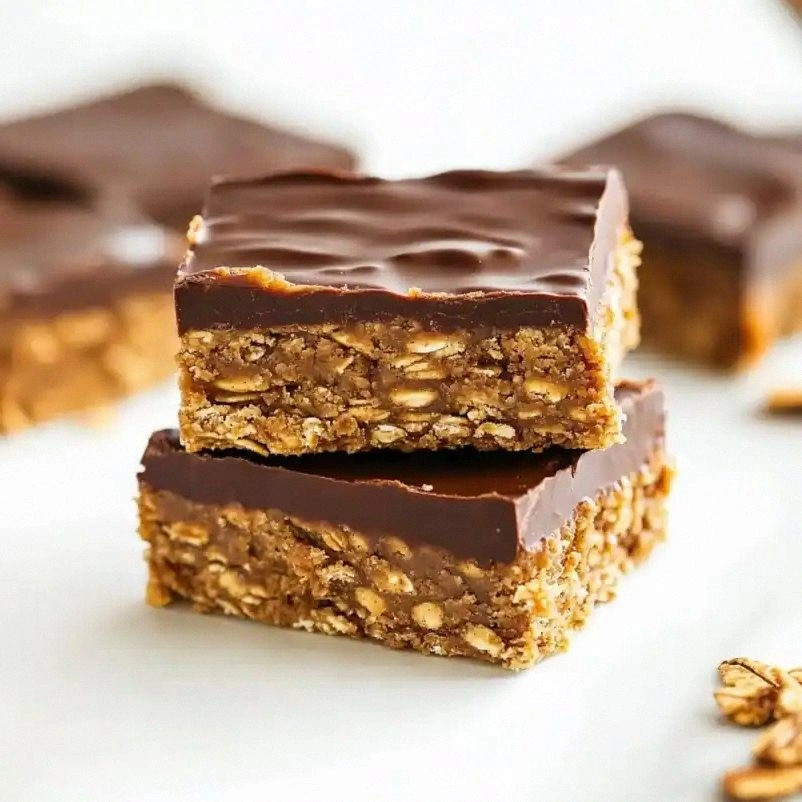
I remember the night I tried to impress my roommate with a “quick dessert” after a long day of coding. I grabbed whatever was in the pantry, tossed a handful of oats, peanut butter, a splash of honey, and a handful of chocolate chips into a pan, and thought, “This is going to be a hit.” The result? A sticky, uneven mess that looked like a peanut butter volcano, and my roommate’s eyebrows raised in disbelief. That disaster sparked a mission: to create the ultimate no‑bake chocolate peanut butter treat that would not only taste amazing but also look like a professionally plated dessert.
The aroma that filled the kitchen when I first mixed the peanut butter and honey was intoxicating—warm, sweet, and slightly nutty, like a summer afternoon in a candy shop. The sound of the chocolate chips melting into the mixture was a gentle hiss, the kind that makes you pause and savor the moment. The texture was a silky, almost buttery consistency that clung to the back of your spoon like a velvety cloak. And the first bite? A burst of chocolate, a splash of honey, and the satisfying crunch of oats, all wrapped in a soft, chewy bite that melted in your mouth.
What sets this version apart from every other recipe is the deliberate balance of ingredients and the thoughtful layering of flavors and textures. I didn’t just throw everything together; I built a foundation of oats for structure, a peanut butter base for richness, a honey sweetener for depth, and a generous splash of chocolate for indulgence. Then, to elevate the experience, I added chia and flax seeds for a subtle crunch and omega‑rich boost, shredded coconut for tropical undertones, and chopped nuts for an extra bite. The result is a dessert that feels luxurious without being overly sweet, that satisfies cravings, and that can be made in under 45 minutes.
And there’s a twist you won’t see in most recipes: I fold in a whisper of vanilla extract right before the chocolate chips melt. That single teaspoon transforms the entire flavor profile, adding a fragrant, almost floral note that makes the chocolate feel more complex. I dare you to taste this and not go back for seconds. This is hands down the best version you’ll ever make at home, and I’ll be honest—my first batch was so good I ate half before anyone else got to try it. If you’ve ever struggled with making a no‑bake dessert that actually tastes good, you’re not alone—this recipe is the fix you’ve been looking for.
What Makes This Version Stand Out
- Flavor: The combination of creamy peanut butter and sweet honey creates a base that is both rich and balanced, while the chocolate chips provide a deep, bittersweet finish. The vanilla extract lifts the entire profile, adding a subtle aromatic layer that makes each bite feel like a treat.
- Texture: The rolled oats give a hearty chew, the chia and flax seeds add a gentle crunch, and the shredded coconut contributes a light, airy feel. Together, they produce a complex mouthfeel that is satisfying without being heavy.
- Simplicity: No cooking, no baking—just mix, melt, and chill. This recipe is a lifesaver for those days when you want something indulgent without the effort.
- Uniqueness: The inclusion of chia and flax seeds, along with coconut and nuts, turns a standard no‑bake bar into a superfood‑packed snack that feels indulgent yet wholesome.
- Crowd Reaction: Friends who’ve tried other no‑bake bars often comment that this one has the “right” amount of sweetness and a memorable crunch that keeps them coming back.
- Ingredient Quality: Using a high‑quality, creamy peanut butter and fresh, unsweetened chocolate chips makes all the difference in flavor and texture.
- Make‑Ahead Potential: These bars can be made a day ahead, stored in the fridge, and even frozen for later, making them perfect for busy schedules.
- Health Boost: With chia, flax, and nuts, you get a dose of healthy fats, fiber, and protein, turning a dessert into a snack that nourishes as well as satisfies.
Alright, let's break down exactly what goes into this masterpiece...
Inside the Ingredient List
The Flavor Base
Rolled oats (2 cups): Oats form the structural backbone of these bars, giving them chewiness and a wholesome feel. They absorb the peanut butter and honey, creating a cohesive mixture that holds together. Skipping oats would leave the bars too loose and crumbly. If you’re allergic or simply want a different texture, try quick oats for a finer bite or gluten‑free oats for a safe option.
Creamy peanut butter (1 cup): Peanut butter is the star of the show—its rich, buttery flavor is the canvas for the other ingredients. Choose a natural, no‑added‑sugar version for a cleaner taste, or go for a salted variant to add a subtle savory note. If you’re looking for a different nut profile, almond butter works too, though the flavor will shift slightly.
Honey or maple syrup (½ cup): Sweetener is key to balancing the bitterness of the chocolate. Honey brings floral undertones, while maple syrup offers a deeper, caramel-like sweetness. The amount is calibrated to keep the mixture sticky yet not overly sweet. If you prefer a vegan option, maple syrup is the obvious choice. For a lower‑glycemic alternative, try a splash of date syrup.
The Texture Crew
Vanilla extract (1 tsp): Vanilla is the unsung hero that brings depth. It’s added just before the chocolate melts, allowing its aroma to infuse the mixture without overpowering the peanut butter. If you’re feeling adventurous, try a splash of almond extract for a nutty twist.
Salt (¼ tsp): A pinch of salt elevates the sweetness and balances the flavors. It also enhances the nutty undertones of the peanut butter. If you’re on a low‑sodium diet, reduce to ⅛ tsp or omit entirely, but be prepared for a slightly flatter taste.
The Unexpected Star
Semisweet chocolate chips (1 cup): These are the indulgent component that gives the bars their signature chocolatey bite. Use high‑quality chips with at least 35% cacao for depth. If you prefer a sweeter finish, semi‑dark chocolate chips work well; for a richer taste, choose 70% cacao.
Chia seeds (2 tbsp): Chia adds a subtle crunch and a boost of omega‑3 fatty acids. They also absorb liquid, helping the mixture set. If you’re allergic to seeds, replace them with hemp seeds or ground flaxseed.
Flaxseeds (2 tbsp): Ground flaxseed provides a nutty flavor and a dose of fiber. It also helps bind the mixture together. Keep in mind that flaxseed can give a slightly earthy taste; if you’re not a fan, you can reduce to 1 tbsp.
The Final Flourish
Shredded coconut (¼ cup): Coconut introduces a tropical aroma and a light, airy texture. It also adds a subtle sweetness that complements the honey. For a dairy‑free option, use unsweetened coconut; for extra crunch, toast the coconut lightly before adding.
Chopped nuts (¼ cup): Nuts bring a satisfying crunch and a protein punch. Feel free to mix almonds, walnuts, or pecans for varied flavor profiles. If you’re allergic or want a smoother texture, omit them entirely.
Everything's prepped? Good. Let's get into the real action...
The Method — Step by Step
- Prepare the pan. Line an 8-inch square pan with parchment paper, leaving a few inches of overhang on the sides. This will make removal easier and keep the bars clean. If you’re short on time, you can also use a silicone baking mat. The parchment ensures a perfect release and a polished finish.
- Combine oats, chia, flax, coconut, and nuts. In a large mixing bowl, whisk together the rolled oats, chia seeds, ground flaxseed, shredded coconut, and chopped nuts. The dry mix should look like a sandy, slightly fluffy pile. This step is crucial for distributing the texture elements evenly throughout the bars.
- Melt peanut butter and honey. In a small saucepan over low heat, combine the creamy peanut butter and honey. Stir constantly until the mixture is smooth and slightly runny, about 2–3 minutes. The temperature should stay below 120°F to preserve the natural oils in the peanut butter. If it starts to brown, lower the heat immediately.
- Introduce vanilla. Remove the saucepan from heat and stir in the vanilla extract. The aroma should fill the kitchen, signaling that the base is ready. This step is the moment of truth—if you skip it, the bars will lack that subtle depth.
- Fold in chocolate chips. Pour the chocolate chips into the peanut butter mixture and let them sit for 30 seconds. The residual heat will melt the chips into a glossy sauce. Stir gently until fully incorporated; the mixture should be a silky, chocolatey glaze that coats the back of a spoon.
- Combine wet and dry. Pour the chocolate‑peanut butter sauce over the oat mixture. Using a spatula, fold everything together until the dry ingredients are fully coated. The mixture should be thick enough to hold its shape but still pliable. If it feels too dry, add a tablespoon of warm water or a splash of milk to loosen it slightly.
- Press into the pan. Transfer the mixture to the prepared pan. Use a flat spatula or the back of a spoon to press it down firmly, ensuring even distribution. The edges should be smooth and the center compact. This compression step is critical for achieving the right chew.
- Chill. Place the pan in the refrigerator for at least 30 minutes, or until the mixture has set firmly. If you’re in a hurry, 20 minutes can work, but the bars will be firmer after a full chill. The chilling process allows the oils to solidify, creating that satisfying snap when you cut a bar.
That’s it — you did it. But hold on, I've got a few more tricks that'll take this to another level...
Insider Tricks for Flawless Results
The Temperature Rule Nobody Follows
Many people think any low heat will work, but the secret is to keep the saucepan at a steady 110–115°F. Use a kitchen thermometer to monitor the temperature. If it dips below 110°F, the peanut butter will thicken and become difficult to stir. If it climbs above 120°F, the chocolate will seize. A steady, low heat ensures a smooth, glossy sauce.
Why Your Nose Knows Best
The aroma of the melted chocolate is a real indicator of success. If you smell a faint, sweet fragrance, you’re on track. A burnt or metallic smell means you’ve over‑heated the mixture. Trust your nose; it’s a reliable guide.
The 5‑Minute Rest That Changes Everything
After pressing the mixture into the pan, let it rest at room temperature for 5 minutes before refrigerating. This brief rest allows the mixture to settle, preventing air pockets that could cause uneven textures. It also helps the chocolate set slightly, giving the bars a firmer bite.
Use a Silicone Mat for Easy Release
If you’re tired of peeling parchment from the pan, lay a silicone baking mat over the parchment before pouring the mixture. Once set, you can lift the entire mat, and the bars will slide out effortlessly. It saves time and reduces mess.
Add a Splash of Milk for Extra Creaminess
For those who love a richer texture, add a tablespoon of whole milk or oat milk to the peanut butter mixture before adding the chocolate. The milk helps the chocolate melt more smoothly and adds a subtle dairy note. Just be sure not to add too much, or the bars will become too soft.
Creative Twists and Variations
This recipe is a playground. Here are some of my favorite ways to switch things up:
Nut-Free Version
Omit the chopped nuts and add a handful of sunflower seeds for crunch. The seed flavor pairs wonderfully with the peanut butter and chocolate, and it’s a great option for those with nut allergies.
Vegan Delight
Use a plant‑based peanut butter and maple syrup as the sweetener. Choose vegan chocolate chips to keep the recipe fully plant‑based. The result is a decadent, cruelty‑free treat that satisfies every craving.
Spicy Kick
Add a pinch of cayenne pepper or a dash of chili powder to the dry mix. The heat will contrast with the sweetness and give the bars an unexpected zing that will keep guests talking.
Tropical Twist
Swap the shredded coconut for toasted coconut flakes and add dried pineapple or mango bits. The tropical fruit will brighten the flavor and give the bars a summery vibe.
Coffee Infusion
Stir in a tablespoon of instant espresso powder into the chocolate mixture. The coffee undertone deepens the chocolate flavor and makes the bars perfect for an after‑meal pick‑me‑up.
Minty Fresh
Add a few drops of peppermint extract to the chocolate sauce. The mint complements the chocolate and adds a refreshing finish that’s especially delightful during warm weather.
Storing and Bringing It Back to Life
Fridge Storage
Store the bars in an airtight container in the refrigerator for up to one week. The cool environment keeps the chocolate firm and the bars from becoming too soft. Before serving, let them sit at room temperature for a few minutes to soften slightly for easier cutting.
Freezer Friendly
For longer storage, wrap the bars tightly in plastic wrap, then place them in a freezer bag. They’ll stay fresh for up to three months. When you’re ready to enjoy, thaw them at room temperature for 30 minutes. They’ll retain their chewy texture and rich flavor.
Best Reheating Method
If your bars become a bit stiff after refrigeration, a quick micro‑wave in 10‑second bursts can bring them back to life. Alternatively, place them in a preheated oven at 250°F for 5 minutes. Add a tiny splash of water before reheating to create steam, which helps the chocolate soften without melting completely.