Last winter, my kitchen turned into a chaotic battleground when a batch of cinnamon rolls went flat and smelled like burnt toast. I stared at the soggy dough, wondering why the simple recipe I had copied from a blog had failed. Determined to rescue the day, I swapped out the usual heavy butter for a lighter, room‑temperature alternative and added a splash of full‑fat sour cream to the batter. The result was a cake that rose like a cloud, with a tender crumb that cracked open with a satisfying pop when you cut into it. I was so thrilled that I decided to document the entire process and share the secret tweaks that turned a mediocre dessert into a show‑stopper.
From that moment, I became obsessed with the idea that the right balance of wet and dry ingredients, combined with a touch of acidity, could elevate any sweet treat. I experimented with different ratios of flour to sugar and discovered that a 1:1 ratio of granulated to brown sugar gave the cake a caramelized edge while keeping the center moist. I also realized that adding a teaspoon of baking soda to the mix helped the batter rise faster, producing a light, airy texture that felt almost like a sponge. The final touch was a swirl of cinnamon and light brown sugar, which not only added flavor but also created a beautiful ribbon of spice that looked as good as it tasted. This version of the cinnamon swirl cake is not just a recipe; it’s a revelation that will change the way you think about desserts.
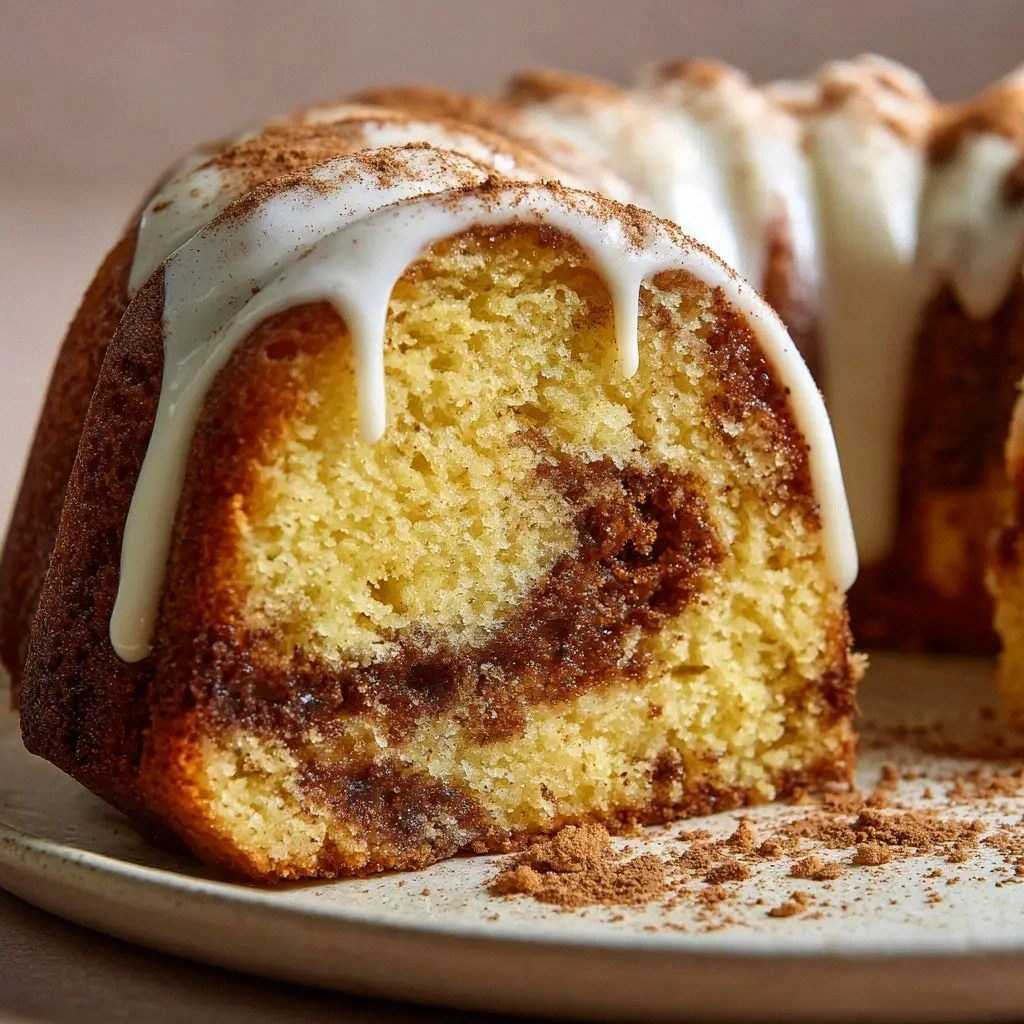
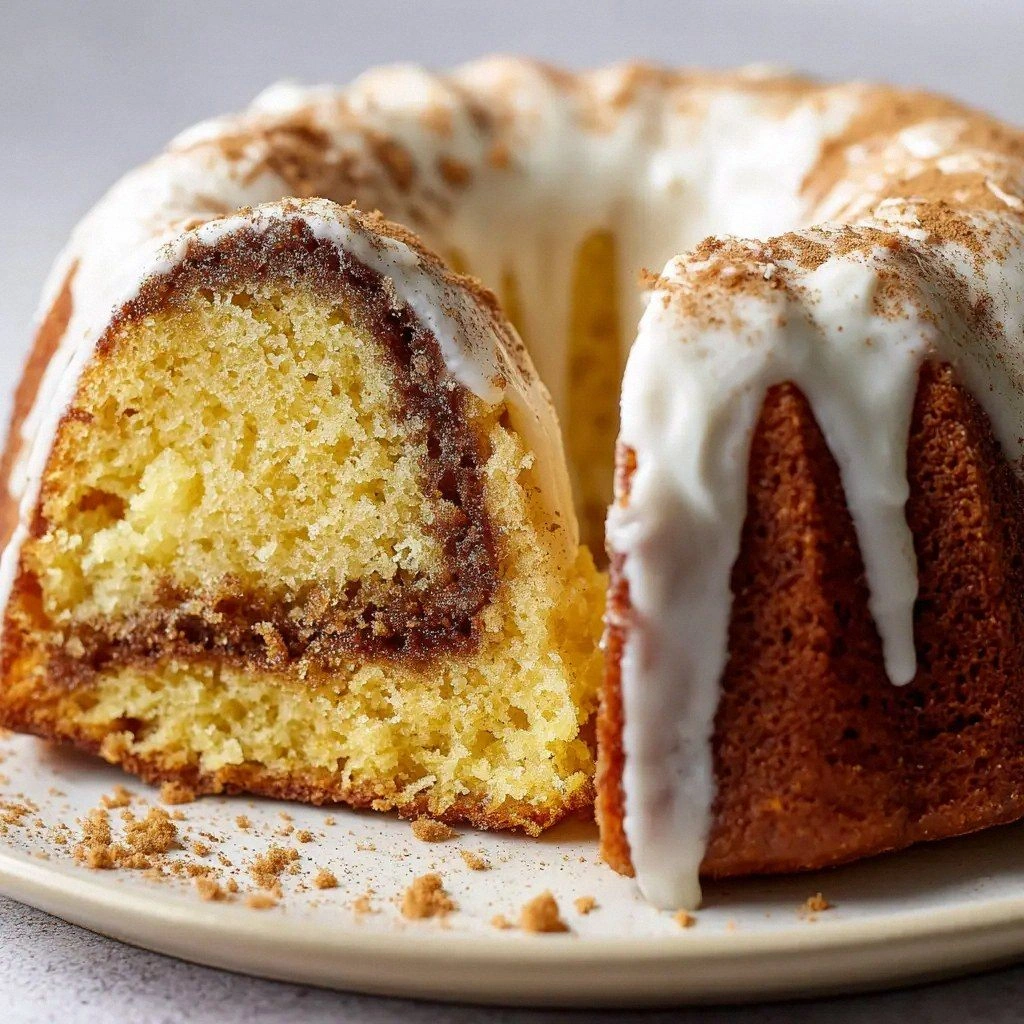
Picture yourself pulling this golden‑brown masterpiece out of the oven, the kitchen filling with a scent that feels like a warm hug from grandma’s living room. The first bite is a burst of buttery sweetness, followed by a subtle hint of spice that lingers on the tongue. The texture is a delicate dance between a moist interior and a slightly crisp top that cracks like thin ice when you press it with a fork. The glaze, made from powdered sugar and heavy cream, adds a glossy finish that makes every slice shine like a polished trophy. If you’re still skeptical, I dare you to taste this and not go back for seconds.
Most recipes get this completely wrong because they either over‑bake the cake or forget the crucial step of adding sour cream, which balances the sweetness and keeps the crumb tender. I’ve spent countless evenings tweaking the proportions, and the result is a cake that is hands down the best version you’ll ever make at home. The secret lies in the simple yet powerful combination of ingredients and the precise timing of each step. By the end of this post, you’ll wonder how you ever made it any other way. Let me walk you through every single step — by the end, you’ll wonder how you ever made it any other way.
What Makes This Version Stand Out
- Flavor: The dual sweetness of granulated and brown sugar creates a caramelized edge that is both sweet and slightly nutty, while the sour cream adds a subtle tang that cuts through the richness. This balance turns each bite into a complex, layered experience that keeps your palate intrigued.
- Texture: A light, airy crumb paired with a crisp, slightly caramelized top gives the cake a satisfying contrast that feels like a confectionary duet. The moisture from the sour cream keeps the interior tender even after cooling.
- Ingredient Quality: Using full‑fat sour cream and real butter rather than substitutes ensures depth of flavor and a silky mouthfeel that artificial ingredients can’t replicate. The result is a cake that feels luxurious without being overly indulgent.
- Visual Appeal: The cinnamon swirl not only tastes amazing but also creates an eye‑catching pattern that makes every slice look like a piece of art. The glossy glaze adds a professional finish that would make any baker proud.
- Ease of Execution: Despite the seemingly complex steps, the recipe is designed to be approachable for both beginners and seasoned bakers. Every instruction is straightforward, with no hidden tricks or obscure techniques.
- Make‑Ahead Friendly: The cake can be assembled a day in advance and refrigerated, allowing the flavors to meld and the glaze to set. When you’re ready to serve, just pop it in the oven for a few minutes to reheat.
- Versatility: From holiday gatherings to casual brunches, this cake adapts effortlessly to any occasion. Its balanced sweetness and spice make it a crowd‑pleaser that can be customized with a variety of toppings.
Inside the Ingredient List
The Flavor Base
The foundation of this cake starts with butter, sugar, eggs, and vanilla. Butter provides richness and a silky mouthfeel, while the combination of granulated and brown sugar creates a layered sweetness that caramelizes during baking. Eggs act as a binder and contribute to the cake’s structure, while vanilla adds depth and aromatic warmth that rounds out the flavor profile. Together, these ingredients form the backbone that supports the cinnamon swirl.
The Texture Crew
Sour cream is the secret weapon that keeps the crumb moist and tender. Its acidity reacts with the baking soda, producing gentle bubbles that lift the batter. The flour gives the cake its structure, and the small amount of all‑purpose flour added to the swirl mixture helps it cling to the cake’s surface. The combination of these elements results in a cake that feels light on the tongue yet satisfies the craving for something substantial.
The Unexpected Star
Cinnamon is the star that turns an ordinary cake into a fragrant, spicy masterpiece. Ground cinnamon not only provides a warm, woody aroma but also contributes subtle sweetness that enhances the overall flavor. When combined with light brown sugar, it creates a swirl that looks like a ribbon of spice, adding both visual and gustatory excitement.
The Final Flourish
The glaze, made from powdered sugar and heavy cream, is the finishing touch that elevates the cake from simple to spectacular. It adds a glossy sheen that catches the light and a creamy sweetness that balances the spice. The final teaspoon of vanilla extract in the glaze deepens the flavor profile, giving the cake an unmistakable finish that lingers on the palate.
Everything's prepped? Good. Let's get into the real action...
The Method — Step by Step
- Preheat your oven to 350°F (175°C) and grease a 9‑inch bundt pan with butter or non‑stick spray. The heat will create a uniform baking surface that prevents sticking. While the oven warms, set a large mixing bowl to room temperature, which helps the butter soften for better incorporation.
- In a separate bowl, whisk together the all‑purpose flour, baking powder, baking soda, and kosher salt. This dry mix ensures that the leavening agents are evenly distributed, preventing uneven rises. Once combined, set the bowl aside to keep the mixture dry.
- In a stand mixer or with a hand whisk, cream the butter and granulated sugar until light and fluffy, about 3 minutes. The goal is to incorporate air, which will give the cake a lighter texture. Once fluffy, add the eggs one at a time, beating well after each addition to ensure a smooth batter.
- Add the sour cream and vanilla extract (batter) to the creamed mixture, mixing until just combined. The sour cream adds moisture and a slight tang that balances the sweetness. Be careful not to overmix; a few streaks of flour are acceptable.
- Fold the dry ingredients into the wet mixture using a spatula or a gentle stir. The batter should be thick yet pourable; if it’s too thick, add a tablespoon of milk to loosen it slightly. This step is where the cake’s structure starts to form.
- In a small bowl, combine the light brown sugar and ground cinnamon. This mixture will become the signature swirl that defines the cake. Gently stir until the sugar is fully coated with cinnamon, creating a smooth, fragrant paste.
- Pour half of the batter into the prepared bundt pan, spreading it evenly. Then dollop spoonfuls of the cinnamon-sugar mixture across the surface, followed by the remaining batter. Use a knife or a skewer to lightly swirl the layers together, creating a marbled effect that’s both visual and flavorful.
- Bake in the preheated oven for 45 to 50 minutes, or until the cake is golden brown and a toothpick inserted into the center comes out clean. The top should develop a slight crispness that gives a satisfying crack when you press it. Let the cake cool in the pan for 10 minutes before transferring it to a wire rack to finish cooling.
- While the cake cools, whisk together the powdered sugar, heavy cream, and vanilla extract (glaze) until smooth and glossy. The glaze should be thick enough to coat the cake without dripping excessively. Once the cake is fully cooled, drizzle the glaze over the top, letting it pool in the swirl lines for an extra touch of decadence.
That’s it — you did it. But hold on, I've got a few more tricks that'll take this to another level...
Insider Tricks for Flawless Results
The Temperature Rule Nobody Follows
Many bakers overlook the importance of room‑temperature ingredients, but this cake’s success hinges on it. Butter and eggs should be at room temperature to blend smoothly and trap air. If you rush this step, the batter will be denser, and the cake won’t rise as expected.
Why Your Nose Knows Best
Before you start baking, give the batter a sniff. A faint citrusy note indicates the vanilla is fresh, while a sour aroma suggests the sour cream has gone slightly fermented, which can actually improve flavor. Trust your nose to catch subtle shifts that affect the final taste.
The 5‑Minute Rest That Changes Everything
After folding in the dry ingredients, let the batter rest for five minutes before pouring it into the pan. This short pause allows the flour to hydrate fully, resulting in a smoother, more even crumb. Skipping this step can lead to a slightly uneven texture.
Watch the Crust
When the cake’s top turns a deep golden brown, it’s ready. Avoid the temptation to open the oven early; the crust needs that final caramelization to lock in moisture. A slightly darker crust also adds a subtle bitterness that balances the sweetness.
Glaze Timing Is Key
Wait until the cake has cooled completely before glazing. If you glaze while the cake is still warm, the glaze will melt and run, losing the glossy finish. A chilled cake ensures the glaze sets into a smooth, shiny coating.
Creative Twists and Variations
This recipe is a playground. Here are some of my favorite ways to switch things up:
Chocolate Cinnamon Swirl
Swap the vanilla glaze for a melted chocolate drizzle, and add cocoa powder to the batter. The chocolate provides a rich, bittersweet contrast that complements the warm spices. This variation is perfect for chocolate lovers who crave a bit of spice.
Apple‑Cinnamon Bundt
Fold in diced apples and a pinch of nutmeg into the batter before swirling. The apple adds juiciness and a subtle tartness that balances the sweetness. Serve warm with a scoop of vanilla ice cream for a cozy dessert.
Almond‑Infused Swirl
Replace the all‑purpose flour in the swirl mixture with almond flour and add a tablespoon of almond extract. The nutty undertones pair beautifully with the cinnamon, creating an elegant, nutty flavor profile. This version is also gluten‑free.
Spiced Orange Glaze
Infuse the glaze with freshly grated orange zest and a splash of orange liqueur. The citrus brightens the cake and adds a refreshing lift that cuts through the richness. This glaze works wonderfully for spring or summer celebrations.
Caramel‑Pecan Delight
Stir in chopped pecans and drizzle caramel sauce over the finished cake. The crunchy pecans add texture, while the caramel offers a buttery sweetness that enhances the cinnamon swirl. It’s a decadent twist that feels like a dessert upgrade.
Low‑Sugar Version
Replace half of the granulated sugar with coconut sugar and use a sugar substitute like stevia for the remaining portion. The result is a slightly caramelized cake with reduced sugar content, perfect for those monitoring their intake without sacrificing flavor.
Storing and Bringing It Back to Life
Fridge Storage
Wrap the cooled cake tightly in plastic wrap and store it in the refrigerator for up to five days. The glaze will firm slightly, so let the cake sit at room temperature for 15 minutes before serving to soften it back to its original sheen.
Freezer Friendly
Place the cake in an airtight container or freezer bag, leaving a small vent for expansion. Freeze for up to two months. Thaw overnight in the refrigerator, then bring to room temperature before glazing again for the best texture.
Best Reheating Method
Preheat your oven to 300°F (150°C) and place the cake on a baking sheet. Warm for 8–10 minutes, or until the cake is heated through and the glaze is slightly glossy. Add a splash of water to the pan before reheating to create steam, which keeps the cake moist.